Fortune and Glory - PBF Game 1

Welcome to our first game of Flying Frog Productions Fortune and Glory !

It is the late 1930s and the world is in turmoil. Humanity is on the brink of war as imperialist nations in Europe and Asia work aggresively to expand their domination. The Axis have taken control of Germany and now spread their darkness across the globe in their hunt for powerful occult artifacts that can give them the upper hand in the days to come. But the spirit of adventure and freedom won’t be stamped out so easily!

Heroic adventurers from around the world answer the call, racing against time to to hunt down ancient artifacts, explore deadly temples, and fight back the powers of darkness from engulfing the world. It is a race of good versus evil and only a cunning and agile explorer can claim the ultimate prize of … Fortune and Glory!

Our cast of heroes are:

  • Doctor Zhukov - Master of Science (played by @RogerBW). One of the great scientific minds of the day, Doctor Gregor Zhukov loves little more than to push the boundaries of super science and reason. Preferring to avoid getting caught up in the politics of the state, Dr. Zhukov has used the money granted to him by the Russian government to fund research on his fantastical experiments and expeditions to collect data on ancient technology rather than produce the weapons of war which the money was meant for. So far, they haven’t noticed … yet.

  • Alexander Cartwright - Reclusive Novellist (played by @Chewy77). Always in the wrong place at the wrong time, Alexander Cartwright hoped to stay out of trouble for a while, secluded in the foothills of South America to quietly write about his adventures. But as the growing shadow of the Axis falls across the world, and onto his doorstep, it has become clear that he can no longer just sit by idle. Trouble, it seems, always has a way of finding him, and he has never been the kind of man to stay in one place for too long.

  • Duke Dudley - British Lord (played by me, @gmwhite999). A wealthy British Lord and international playboy (if only!), Duke Dudley of the house of Dud has lead a carefree life, wanting for nothing. Coming from a long line of military men, his father was killed in the Great War against the Kaiser when the Duke was only a boy, leaving him a substantial fortune as well as a hatred for the German military. Now, as the Axis grow in power, Duke Dudley has taken it upon himself to foil their efforts for world domination. If the Crown won’t take a stand against tyranny, the Duke will!

They will be cooperatively working against … the Axis, fronted by their top agents Herr Teufel and Tresa.

We will go through specific rules as play continues but to read an essential rules summary, click below, or visit the game rulebook on the Flying Frog Productions website here. In summary, we are adding the Advanced Rules and the Optional Rule for Fixed Movement. We’ll cover these at each step as we get to them.

The initial locations and Dudley’s Gear card have been drawn, but first, this …

Important Disclaimer
Fortune and Glory is set in the pulp adventure genre of the late 1930s. As such, the original game includes enemies, villains and symbols of the Nazi party that had taken hold of Germany at the time. The use of their name and iconography for the original game is purely rooted in historical context and not intended to condone or glorify them or their actions. Given the digital nature and visibility of this game and risks caused by sensitivity or unnecessary attention, I will refer to that organization as the “Axis” and where possible have substituted the original name and imagery accordingly, although cannot promise that I will not correct every visual reference. As the manual advises, if you find this material strongly objectionable it is our recommendation that you do not use this product - or, in our case, follow this game.

2 Likes

@gmwhite999 asked for a die roll:
Here is the board for the start of Round 1.

To clarify opening positions:

  • Doctor Zhukov starts in Moscow
  • Alexander Cartwright starts in Rio de Janeiro
  • Duke Dudley starts in London
  • The Mines of the Sacred Stone (a Temple Artifact) is in the Great White North
  • The Spear of the Azure Jewel is in the British Isles
  • The Armor of Pharox is the Congo Jungle (a Deep Jungle location)
  • The Amulet of Power is in Western Europe
  • The Axis Secret Base is in Siberia, along with an Axis Soldier and the War Zeppelin
  • Herr Teufel is in the Congo Jungle searching for the Armor of Pharox
  • Tresa is off the board, waiting to be assigned next round

To win this game;

  • The Heroes need to collect 30 Fortune between them.
  • The Axis need to move the Villain Track to 15 which they do by recovering Artifacts and Fortune.

Game on, so let’s start with the first part of the round, and the Initiative Phase.

  • Zhukov rolls d6: 6
  • Cartwright rolls d6: 1
  • Dudley rolls d6: 6

Okay, time to roll off then and then draw Event cards for Cartwright.

@gmwhite999 asked for a die roll:
First Roll-off:

  • Zhukov rolls d6: 2
  • Dudley rolls d6: 3

It looks to me as though Glory is the Investigation-equivalent, while Fortune is our victory points.

Suggestions: should we go immediately for Artifacts, or do other things to build up our strength first? I’m guessing the latter, but I don’t yet have a feel for what those things would be.

Ah that worked! Dudley will move and take his actions first, followed by Zhukov (@RogerBW) and then Cartwright (@Chewy77) as other moves go clockwise.

However, Cartwright gets to draw an Event card - and with his special ability, draws too and can choose which to keep. Your choices are:

  • Local Trouble. Play on any Hero in a City during the Adventure Phase. Tha Hero may not interact with the City in any way this turn OR Play while in a City during your Adventure Phase to gain 3 Glory

or

  • Too Close. Play to force a Test just rolled to be entirely re-rolled. This may be used on yourself or another Hero or Villain.

Which card do you want to keep?

Exactly - Glory is our Currency - like Investigation in A Touch of Evil - and Fortune is the Heroes’ Victory Points. The best way to get Glory is to have fights or pass Danger tests while going for Artifacts.

As a cooperative game, we can agree our moves - and can even join up to to and collect Artifacts together.

There are two possible options for our movement, which each Hero can choose from on each round:

  • Take a Fixed Movement allowance of 4 spaces.
  • Roll 1 die and move up to that many spaces. Note that if that roll is a 1 or 2, that Hero gains a free Event Card.

Each Hero must choose which option to take before rolling a die.

Note that we can all get to an Artifact site within 4 spaces at the moment.

If we split up, it would make sense for Zhukov to go for the Amulet of Power (Hahahahaha [cough] Da. Very serious business.) while Dudley takes the Spear.

1 Like

Or the other way around. For a reminder for each Artifact on the cards at the top of the board, the number in the gold/yellow circle is the Fortune made when collecting and then selling the Artifact at a City, and the number in the Red Shield is the number of Danger Tests the Hero has to make to collect it. So, in theory, the Spear is much easier to obtain than the Amulet.

Also, maybe it makes sense for Dudley to roll for his movement. He only needs a 1 to get to hunt for the Spear, or a 2 to hunt for the Amulet - either of those rolls also giving him an Event Card - and if he gets a 5 or 6 he can make it across the North Atlantic Sea to the Great White North, making it there before Tresa will next Round. Then if I roll enough to get there, Zhukov can go for the two European ones, probably starting with the Spear to try for a quick win and some Glory too. Thoughts, Doctor - and Novellist?

@gmwhite999 asked for a die roll:
I’ll speed this up for Dudley by making a movement roll then, as even moving 1 space I can do something useful, and a 1 or 2 will get me an Event Card.

Dudley Movement roll is d6: 5

Ah ha! A 5 - so Dudley can make it across the pond to the Great White North and the Mines! I think I shall do that.

@RogerBW what will Zhukov do for his movement - move up to 4 spaces or roll?

@RogerBW asked for a die roll:
2 spaces gets me to Western Europe, so I’ll take the roll.
d6: 3

I think that gets me to British Isles (2 North Sea, 1 British Isles; or Germany, Western Europe, British Isles) so that’s what I’ll do, then go after the Spear of the Azure Jewel.

ETA: or do I need to move out of Moscow into Eastern Europe first? In which case I’ll go for North Sea and hope for an event card.

1 Like

A City is a different space to the land and sea spaces, so it costs 3 to get to Western Europe and 4 to get to the British Isles. So you could make it to Western Europe and go for the Amulet of Power if you wish.

A City with an Anchor icon is a Port City (such as London) so you can leave/enter that from the adjacent Sea space too without having to enter the adjacent land space first. Note that a few Port Cities allow access to more than one Sea Space.

Each Sea Space shows the Movement cost to enter them in the white numbers printed on that space.

Note too that there are six “island spaces” which are treated as land spaces and ringed in black lines. Four of them - the British Isles, Japan, New Zealand and the Forbidden Island - can move moved on to by land from a neighbouring land space without requiring sea movement.

Let’s try for the Amulet.

Okay - Zhukov heads to Eastern Europe to adventure this round.

Cartwright (@Chewy77) next: do you wish to move up to 4 spaces or roll of your movement? Currently it will take 3 spaces to move to the Congo Jungle if you wish to race Herr Teufel to the Armor of Pharox?

(Additonal: I now realise I forgot to add Herr Teufel’s 2 bodyguards to the map at the Congo Jungle but will explain how they work when we get to the Adventure Phase.)

I think I prefer this card, it will be more useful against villains.

You read my mind, Congo is just a pond hop away, although I had not considered Herr Teufel would have a squad with him. Is it worth a go? I’d say yes, f… the nazis.

1 Like

Quick clarification, we just get knocked down if we lose a battle, right?

And with not much to lose, I’d say let’s go to Congo, I think I’m up to date with my tropical jabs :stuck_out_tongue:

1 Like

If you lose all of your Wounds you get KOd, return to your starting city and lose d6 worth if glory, gear and allies. So yes, nothing to lose now. Plus there is added bonus for you. Herr Teufel was wrongly placed and should be in the Great White North with Dudley at the Mines, so I will move him there.

Cartwright heads into the Congo Jungle, so we move into the Adventure Phase… which starts with Dudley after the server migration, shortly.

1 Like

Migration finished - I think! - so onto the Adventure Phase. Before we get on with Dudley, I’ll summarise the essential rules for this phase.

Adventure Phase Summary
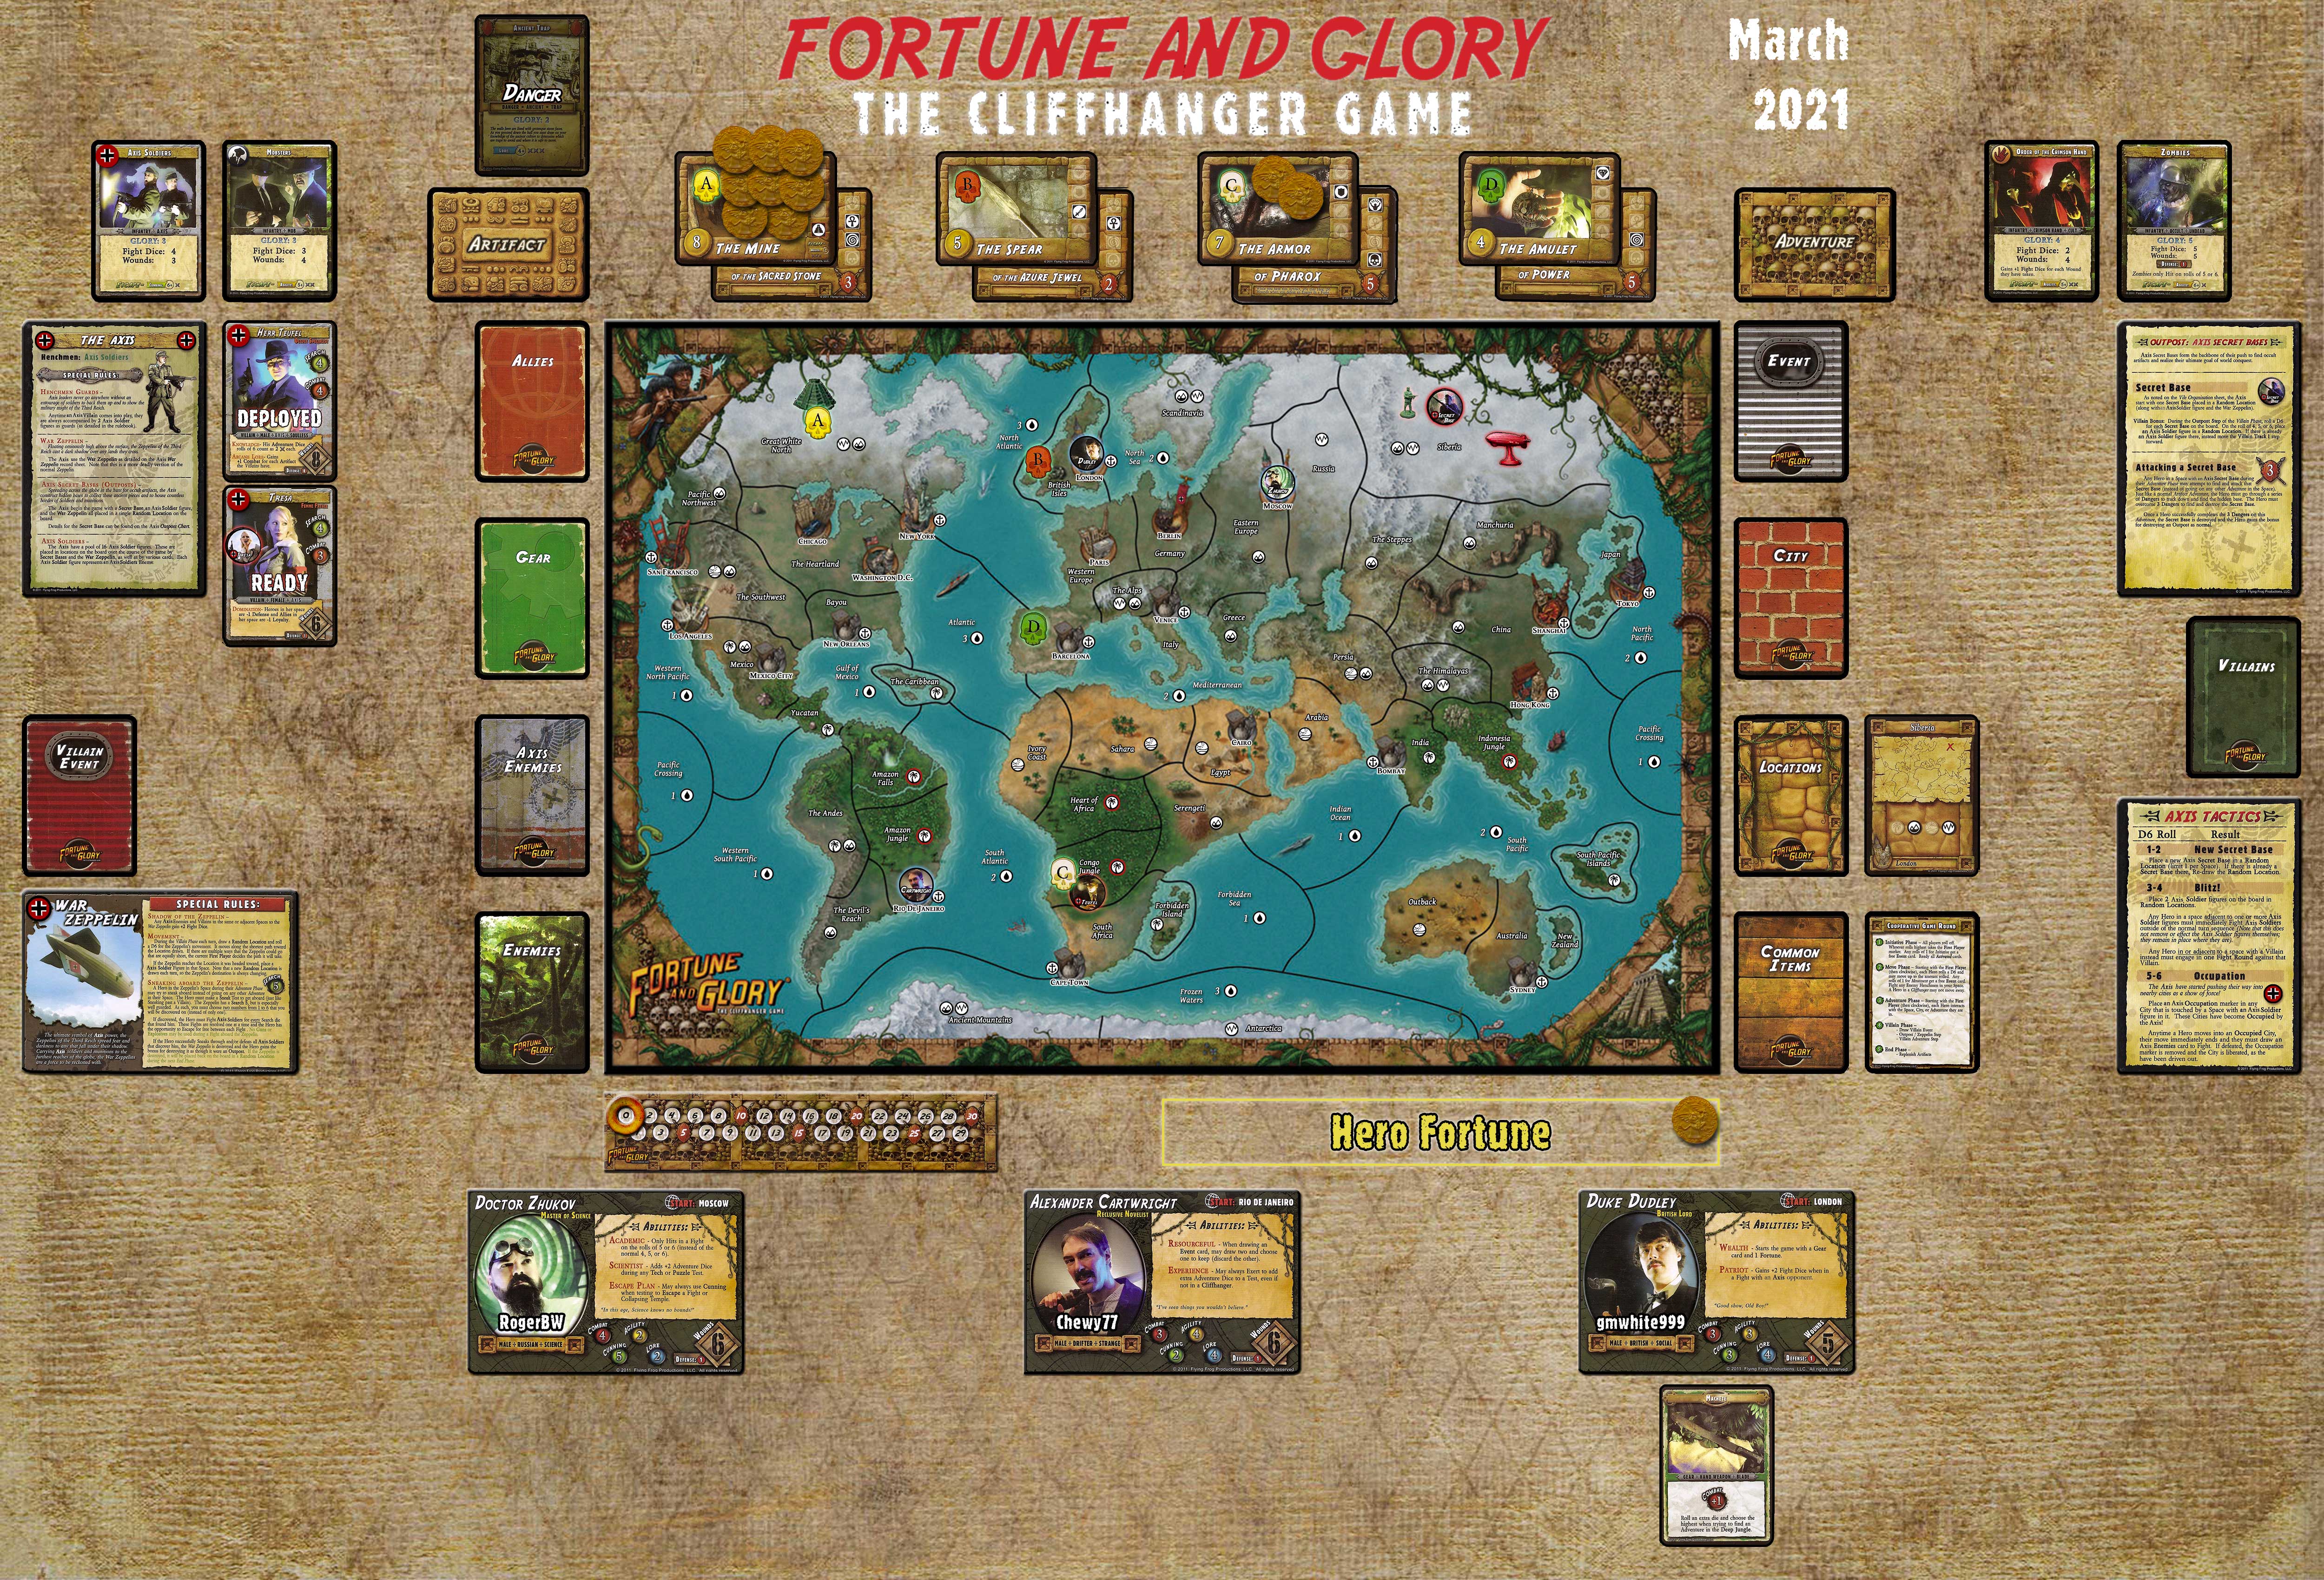
Adventure Phase

During the Adventure Phase each Hero encounters the Space they end their movement in.

  • In a Land Space with an Artifact, the Hero can try to hunt down and recover the Artifact (see the Artifact Adventures section).

  • In a Land Space without an Artifact, or in a Sea Space, the Hero rolls 1 die. If the roll is a 4, 5 or 6, they draw an Event card; if the roll is a 1, they are attacked and must draw an Enemies card; if the roll is a 2 or 3, their journey is uneventful.

  • In a City Space, the Hero draws one City card and encounters that first, but then they can interact with the city to:

  1. Sell Artifacts they have recovered for Fortune (receive an additional 1 Fortune if selling in a Major City),
  2. Buy Gear or Allies cards to help them at the cost of 5 Glory each,
  3. Buy Common Items cards for the amount of Glory shown on each card, or
  4. Heal their Wounds at the cost of 1 Glory per Wound.

Artifact Adventures

A Hero in a space with an Artifact marker can now go exploring to recover the Artifact. Each Artifact has a given Fortune that the Hero will receive for recovering it and selling in in a City (shown in the gold circle) and a given number of Danger cards that the Hero must face to recover it (shown in the red shield). To recover the Artifact, the Hero must successfully overcome the number of Dangers listed although they do not have to complete them all in the same game round (unless explicitly stated for the Artifact).

Each Danger card usually contains a Skill Test or Fight that must be successfully won (or Escaped From) for that Danger to be overcome. If successful, the Hero can receive a reward in Glory and can then decide to Press On to try a new Danger, or decide to Camp Down and end their turn. If the Hero Camps Down, they receive the Glory they earned from the Danger(s) they overcame and fully heal any Wounds they received, and can resume their hunt for the Artifact next game round that much closer to retrieving it. They can though continue to Press On until completing all the stated number of Dangers, at which time they collect all of the Glory they earned and the Artifact. Note that if a Hero decides to Press On where there is a Villain also searching for the same Artifact, they must first Sneak past the Villain each time they Press On.

If a Danger test is unsuccessful, the Danger card is flipped to reveal a Cliffhanger. The Heroes turn immediately ends, and they lose any Glory they accumulated that turn during the Adventure for this Artifact. In the next Game Round, they cannot move (although still roll for initiative) and instead have to overcome the Cliffhanger - these are more deadly tests where failure usually results in a Hero being KO’d, but success results in the Hero immedaitely gaining the Glory reward and then being able to Press On or Camp Down with their hunt for the Artifact.

There are some special types of Artifacts called Temples. These work differently, in that each Temple has an amount of Fortune and for every Danger (or Cliffhanger) successfully overcome, that Hero or Villain gains 1 of the Fortune there immediately. However, if a Danger is failed and a Cliffhanger occurs, there is a chance that the Temple may collapse, and then all Heroes and Villains there must roll to Escape it or be KO’d. Whoever takes the last Fortune coin from the Temple also gains the Temple Treasure, which counts as an Artifact and can be sold at a City for 3 extra Fortune, that Temple (Artifact) is now removed from the board and will be replaced by a new Artifact in the End Phase.

Skill Tests

Each Hero has 4 Skills that will be tested at various stages in the game: Combat, Agility, Cunning and Lore. Each Skill has a rating value which is the number of dice the Hero will roll during that test. Each Skill test will tell you what Skill (or Skills) are to be tested (possibly some combined and possibly with a choice of Skills to test), what the Success Number required on a die is, and how many successes are required (marked by an X).

For example: a Skill Test of Agility 4+ XXX is Agility test requiring 3 successful die rolls of 4 or higher. A Hero rolls the number of dice equal to their Agility value, and if they get three 4s or higher, they are successful. However, they do not have to get them all on the first roll in most instances - and as long as they get at least one successful roll (in this case, at least one die is a 4 or higher), they keep the number of successes they scored and can reroll again, adding extra successes on their new roll. They can keep doing this until the Test is succesfully completed, or until they roll no successes in one roll and they then fail that Test.

Succeeding a Test usually rewards the Hero with Glory; Failure will penalise them in some way, usually Wounds or loss of Glory, Gear or Allies. Notably, failing a test on a Danger card usually while on an Artifact Adventure flips that card to a Cliffhanger (more in the Artifact Adventures section).

Fights

Fights are basically a series of Skill Tests using the Hero’s Combat Skill against an Enemy until one side is defeated (is reduced to zero Wounds remaining and is KO’d), one side Escapes or for a fixed number of Fight Rounds in certain cases.

Unless otherwise stated, each Fight Round the Hero and the Enemy roll their Combat or Fight Dice, and each roll of 4 or higher is a Hit on their opponent. Most Heroes and some Villains and Enemies have a Defense value: this is subtracted from the number of Hits that Hero or Enemy receives that Fight Round to show how many Wounds they take.

For normal Fights, if a hero wins they usually receive some Glory for the encounter. If they lose, they are normally KO’d and will revive back in their Home City in the End Phase. In Fights of one single round, other outcomes are possible, normally these are competing against Villains at Artifact sites or when invading the Zeppelin.

Escapes

Heroes often have the chance Escape rather than Fight. This is usually a Skill Test, which if successful during a Fight will end that fight although they will gain no Glory from it. If the Escape test during a Fight is failed, the Enemy gets a free attack on the Hero and the Fight continues with another Fight Round, although the Hero can choose to try and Escape again each new Fight Round.

Escape tests at a Temple Collapse are either passed - leaving the Hero/Villain safe in that location - or failed, leaving that character KO’d.

Sneaking

A Sneak Test is a different sort of test that is not dependent on the Hero’s Skill values, but the Enemy’s or Villain’s Search value. Sneaking mostly comes into play when a Villain is searching for the same Artifact as a Hero, or when a Hero is trying to sneak aboard the Zeppelin.

To Sneak past an Enemy or Villain, the Hero chooses a number between 1 and 6 and the Enemy rolls a number of die equal to their Search value. For each die that rolls the number chosen by the Hero, the Hero has to Fight a single Fight Round against that Enemy or Villain.

Additional Rules

Carrying Limits. Each Hero can carry up to 3 Gear cards and 3 Allies cards, but can have an unlimited number of Event cards and Glory. Note that in the cooperative game, Fortune is shared between the Heroes. (In the Cooperative Game, Heroes can trade Gear and Allies with each other when in the same Space, but can never trade Event Cards.)

KO’d. If a Hero is KO’d, they must immediately lose 1 die worth of a combination of Glory, Gear cards or Allies cards. (In the Cooperative Game, Fortune gained by the Heroes collectively is not lost in this way.) A KO’d Hero will revive in their Starting City during the End Phase of that Round.

Exerting: A Hero is allowed to Exert themselves when faced with a Cliffhanger Test or when trying to Escape. The Hero can take 1 or more Wounds on themselves and gains that number of extra dice for that one roll only, not that entire Test. A Hero cannot though KO themselves by Exerting.