PBF Stationfall tutorial

Apart from Basic Actions, such as Step and Pick Up, there are also Section Actions. All of them are written along with the Section’s name in the text bubble next to the Section (details can be found in the Reference manual). Section Actions cost 1 Action to perform, just as the Basic Actions. Section Actions are only available to perform by a Character with its pawn in the Section where the Action can be done. A Section can be Damaged. Damage means that anything written in its white part of the Section’s text bubble is disabled, including Section Actions there are no longer possible to take. This is marked by placing a Damage token on the Section’s text bubble. Other characteristics of Sections, such as Dark, are not affected by Damage.

A Section can be Damaged in several ways, the most obvious one is the Basic Action Sabotage, which requires the Conspirator who takes the Action to have the item Bludgeon or a Gun . Sections can have other attributes mentioned via text or icons, such as Dark or, as in Bio Lab, where Characters get contaminated by entering.

LINDSEY’S STRATEGY
Lindsey’s Secret Identity, Engineer, also wants to prevent any Contaminated Characters from getting back to Earth (this would give Lindsey 4 points). The Section that contaminates Characters is Bio Lab. A very important factor to consider, a common challenge in Stationfall is other Players’ being able to Influence your Conspirators and derail your plans. We are making it easy for Lindsey, since you are told not to do anything using Station Chief, Astrochimp or Stowaway, but normally this could cause problems.

The Stowaway is a flexible Character that can appear on the map in any Dark Section the first time she is activated. This is an example of a Character that has special rules when it comes to Activation. Stowaway’s pawn starts on her Character card.

Her 1st Action in the game HAS to be to move her pawn from her Character card to any Dark Section on the board. Lindsey has her mind set on dealing with Bio Lab using a Firebomb, so she decides that Stowaway’s 1st Action will be to Step her Pawn from her Character Card to Forward Exhaust.

LINDSEY’S ACTIONS
Make Stowaway a Conspirator and Activate her. Stowaway is not Exhausted so Lindsey gets to take 2 Actions (and a Free Pick up or Drop).

Move Stowaway from her Character card to Forward Exhaust and then Step Action to move Stowaway to Chem Lab.

PLAYERS’ ACTIONS - TURN 3

  • Add more Conspirators (if you want). More Conspirators is useful if you want to have more Characters to select from when you Activate.

  • Have a Conspirator work towards your Agenda. This time, try to be a bit Creative in what you choose to do, preferably starting to work towards your Secret Identity’s Agenda. Look at the Tip-section on your Secret Identity card for inspiration. Remember to check in the Reference manual and Character Dossier if there are terms you do not understand.

@RossM is up

Because of Lindsey: Still, avoid placing any Influence cubes on or Revealing as Station Chief, Astrochimp or Stowaway.

Ok.

Does this work?

Put a cube on the exile.

Activate troubleshooter again.

Move through vents to where the cyborg is.

By using the troubleshooter again, are they exhausted?

Ok.

Activate troubleshooter.

Move through vents.

Play Kompromat troubleshooter to give blunt to cyborg.

Turn over

@COMaestro is up

Because of Lindsey: Still, avoid placing any Influence cubes on or Revealing as Station Chief, Astrochimp or Stowaway.

Activate the Counselor to Data Mine and get the Kopromat from Alcatraz. Then step to the Therapy Garden.

@mr.ister is up

Because of Lindsey: Still, avoid placing any Influence cubes on or Revealing as Station Chief, Astrochimp or Stowaway.

Activate Medical, pick up suitcase and move to Aft Hub.

Now that you are more familiar with how to Influence and act with Characters, we will go a bit deeper into some details in the game. This Minute we will see an example of how to use Bribes and Kompromats to take more than 2 actions in a turn and cover how to Escape from the station in Pods.

To arm the Antimatter you have to move it out of the Magnetic containment. As mentioned previously, other players’ Actions may (and probably will) interfere with your Actions. If you want something specific to take place, making it happen in one turn before the others predict it is a good idea. Kompromats and Bribes can give you such possibilities. Kompromats add 1 Action for a specific Character and Bribes 1 Action for any Character.

LINDSEY’S STRATEGY
Lindsey will not be able to get the Antimatter out in 2 Actions (step into Magnetic Containment, Pick Up Antimatter and Step back to Reactor). It requires 3 Actions in this case. And Station Chief does not have a Helmet and has to spend her Free Pick Up on getting that instead of potentially using it for a Free Pick Up of the Antimatter. But she has Astrochimp’s Kompromat and the Bribe token left so she will use these.

Lindsey’s turn in cinematic interpretation:
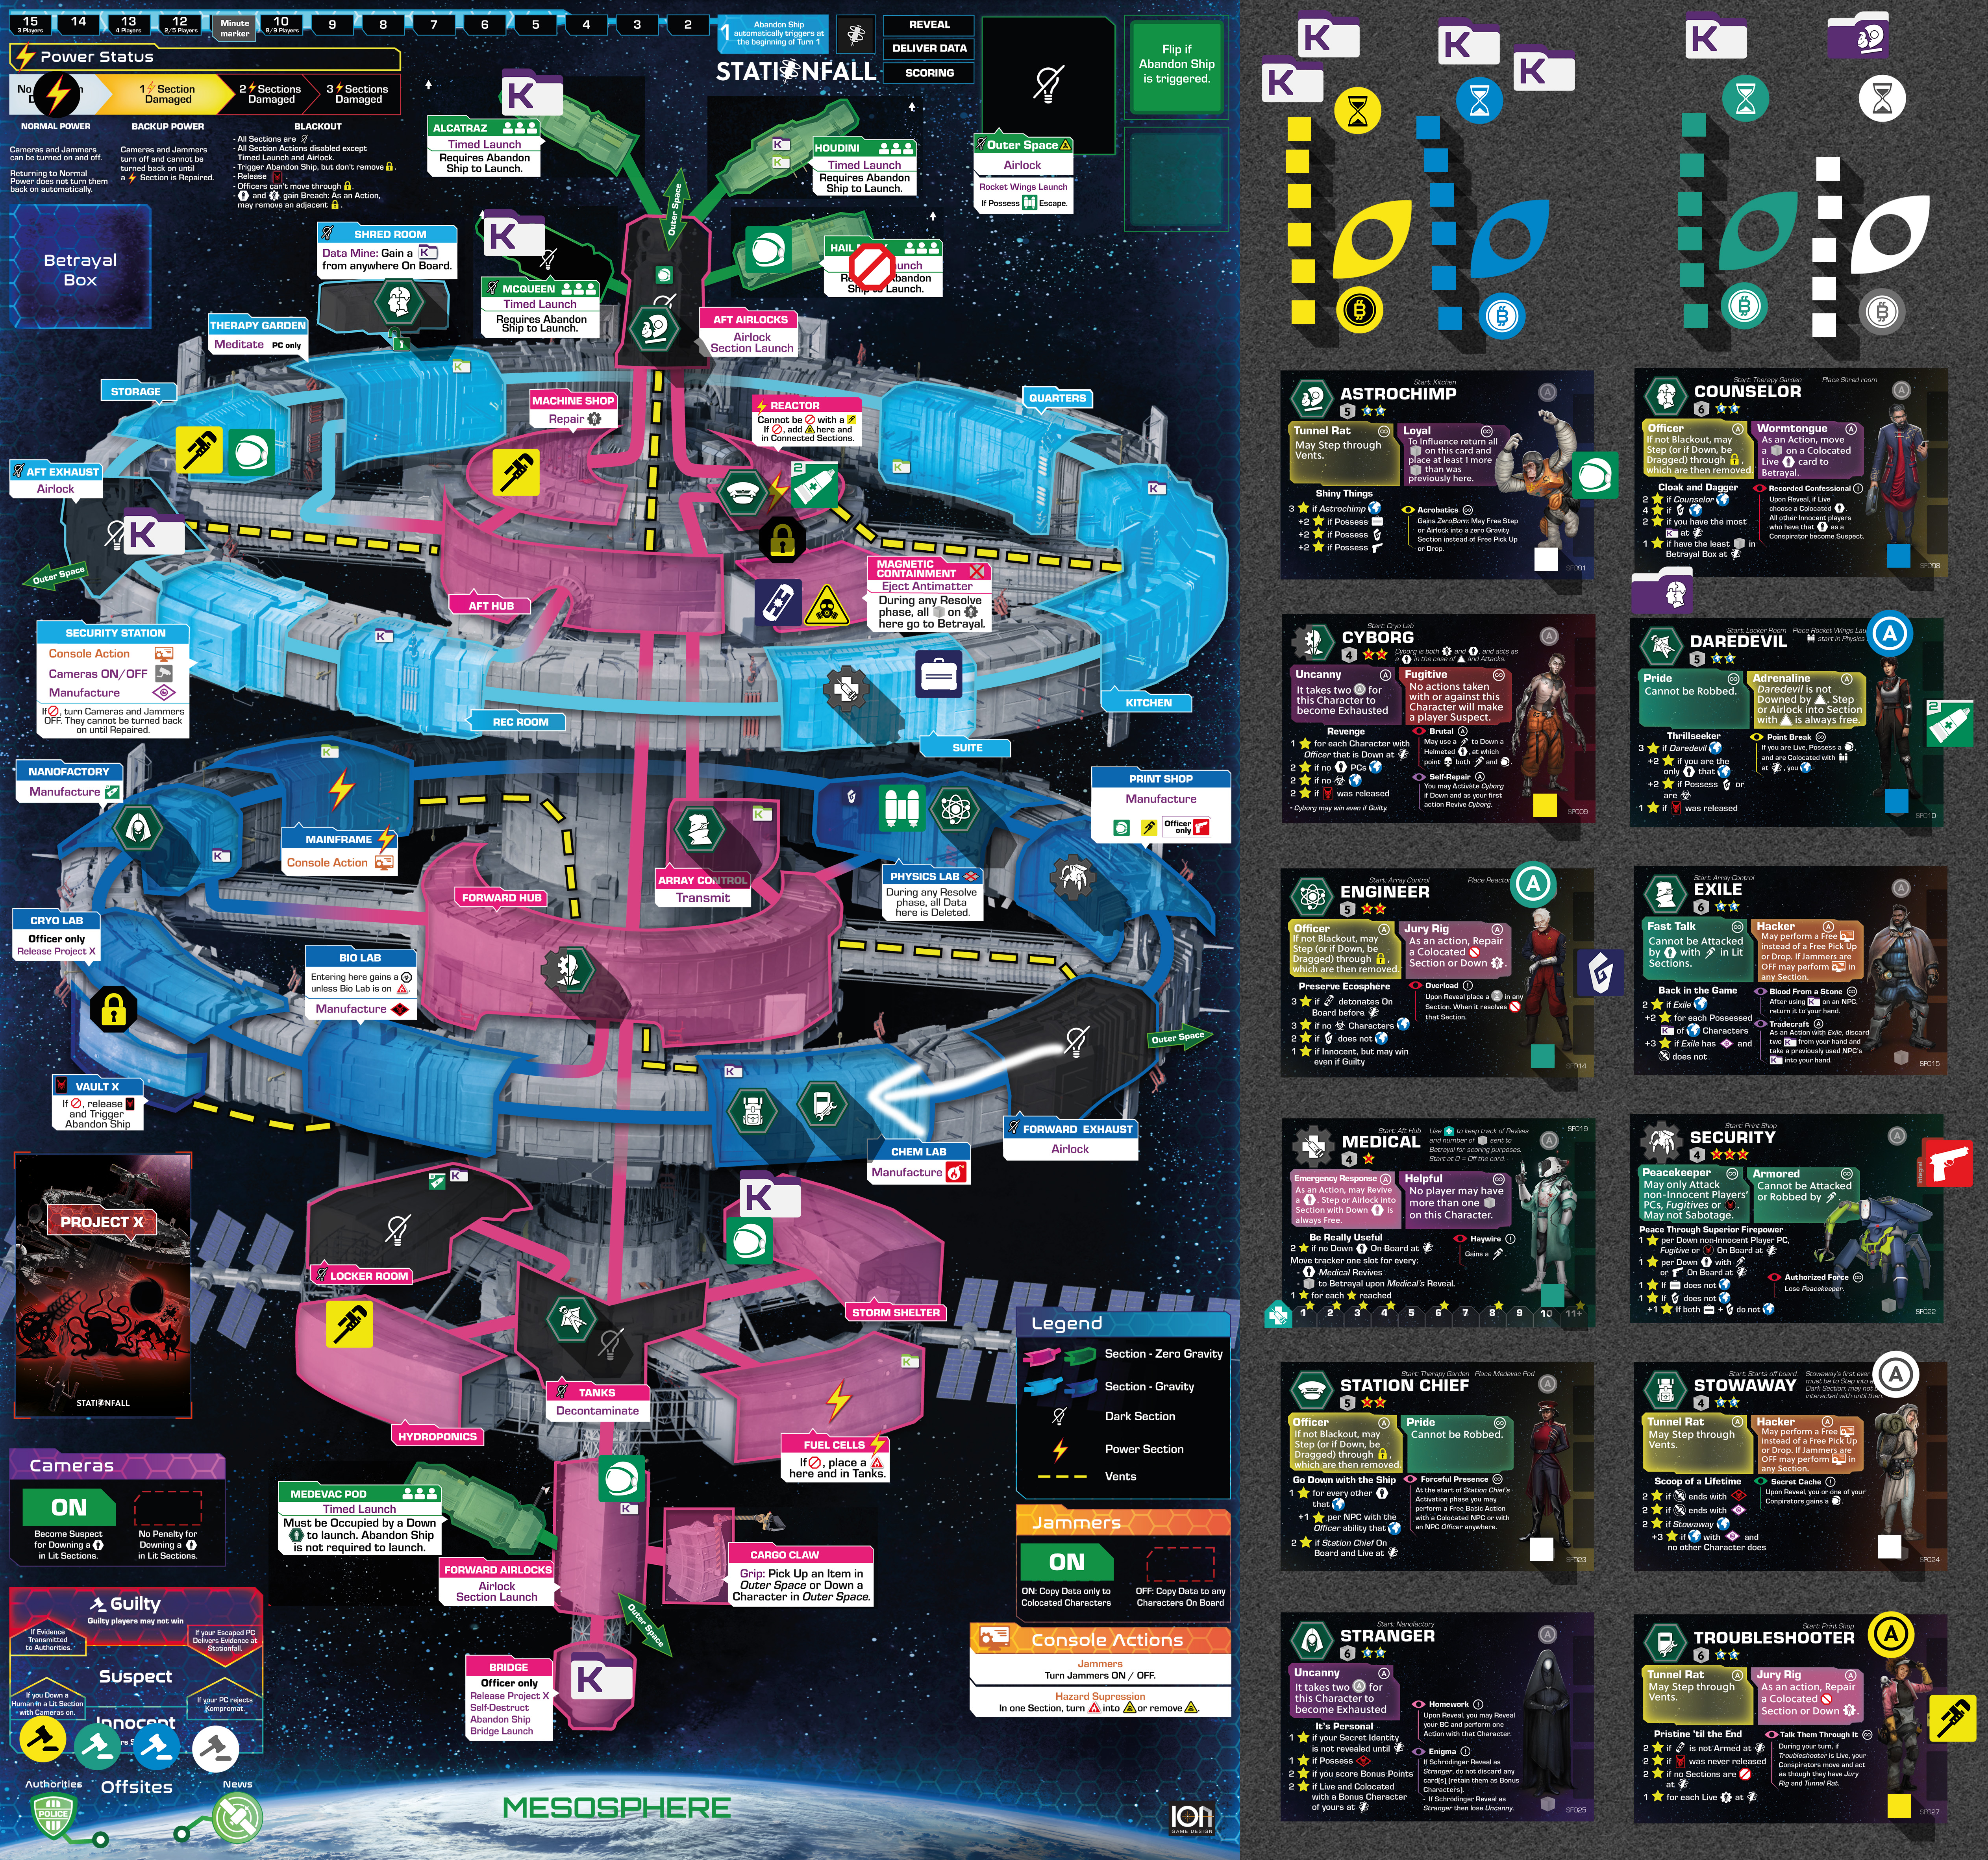
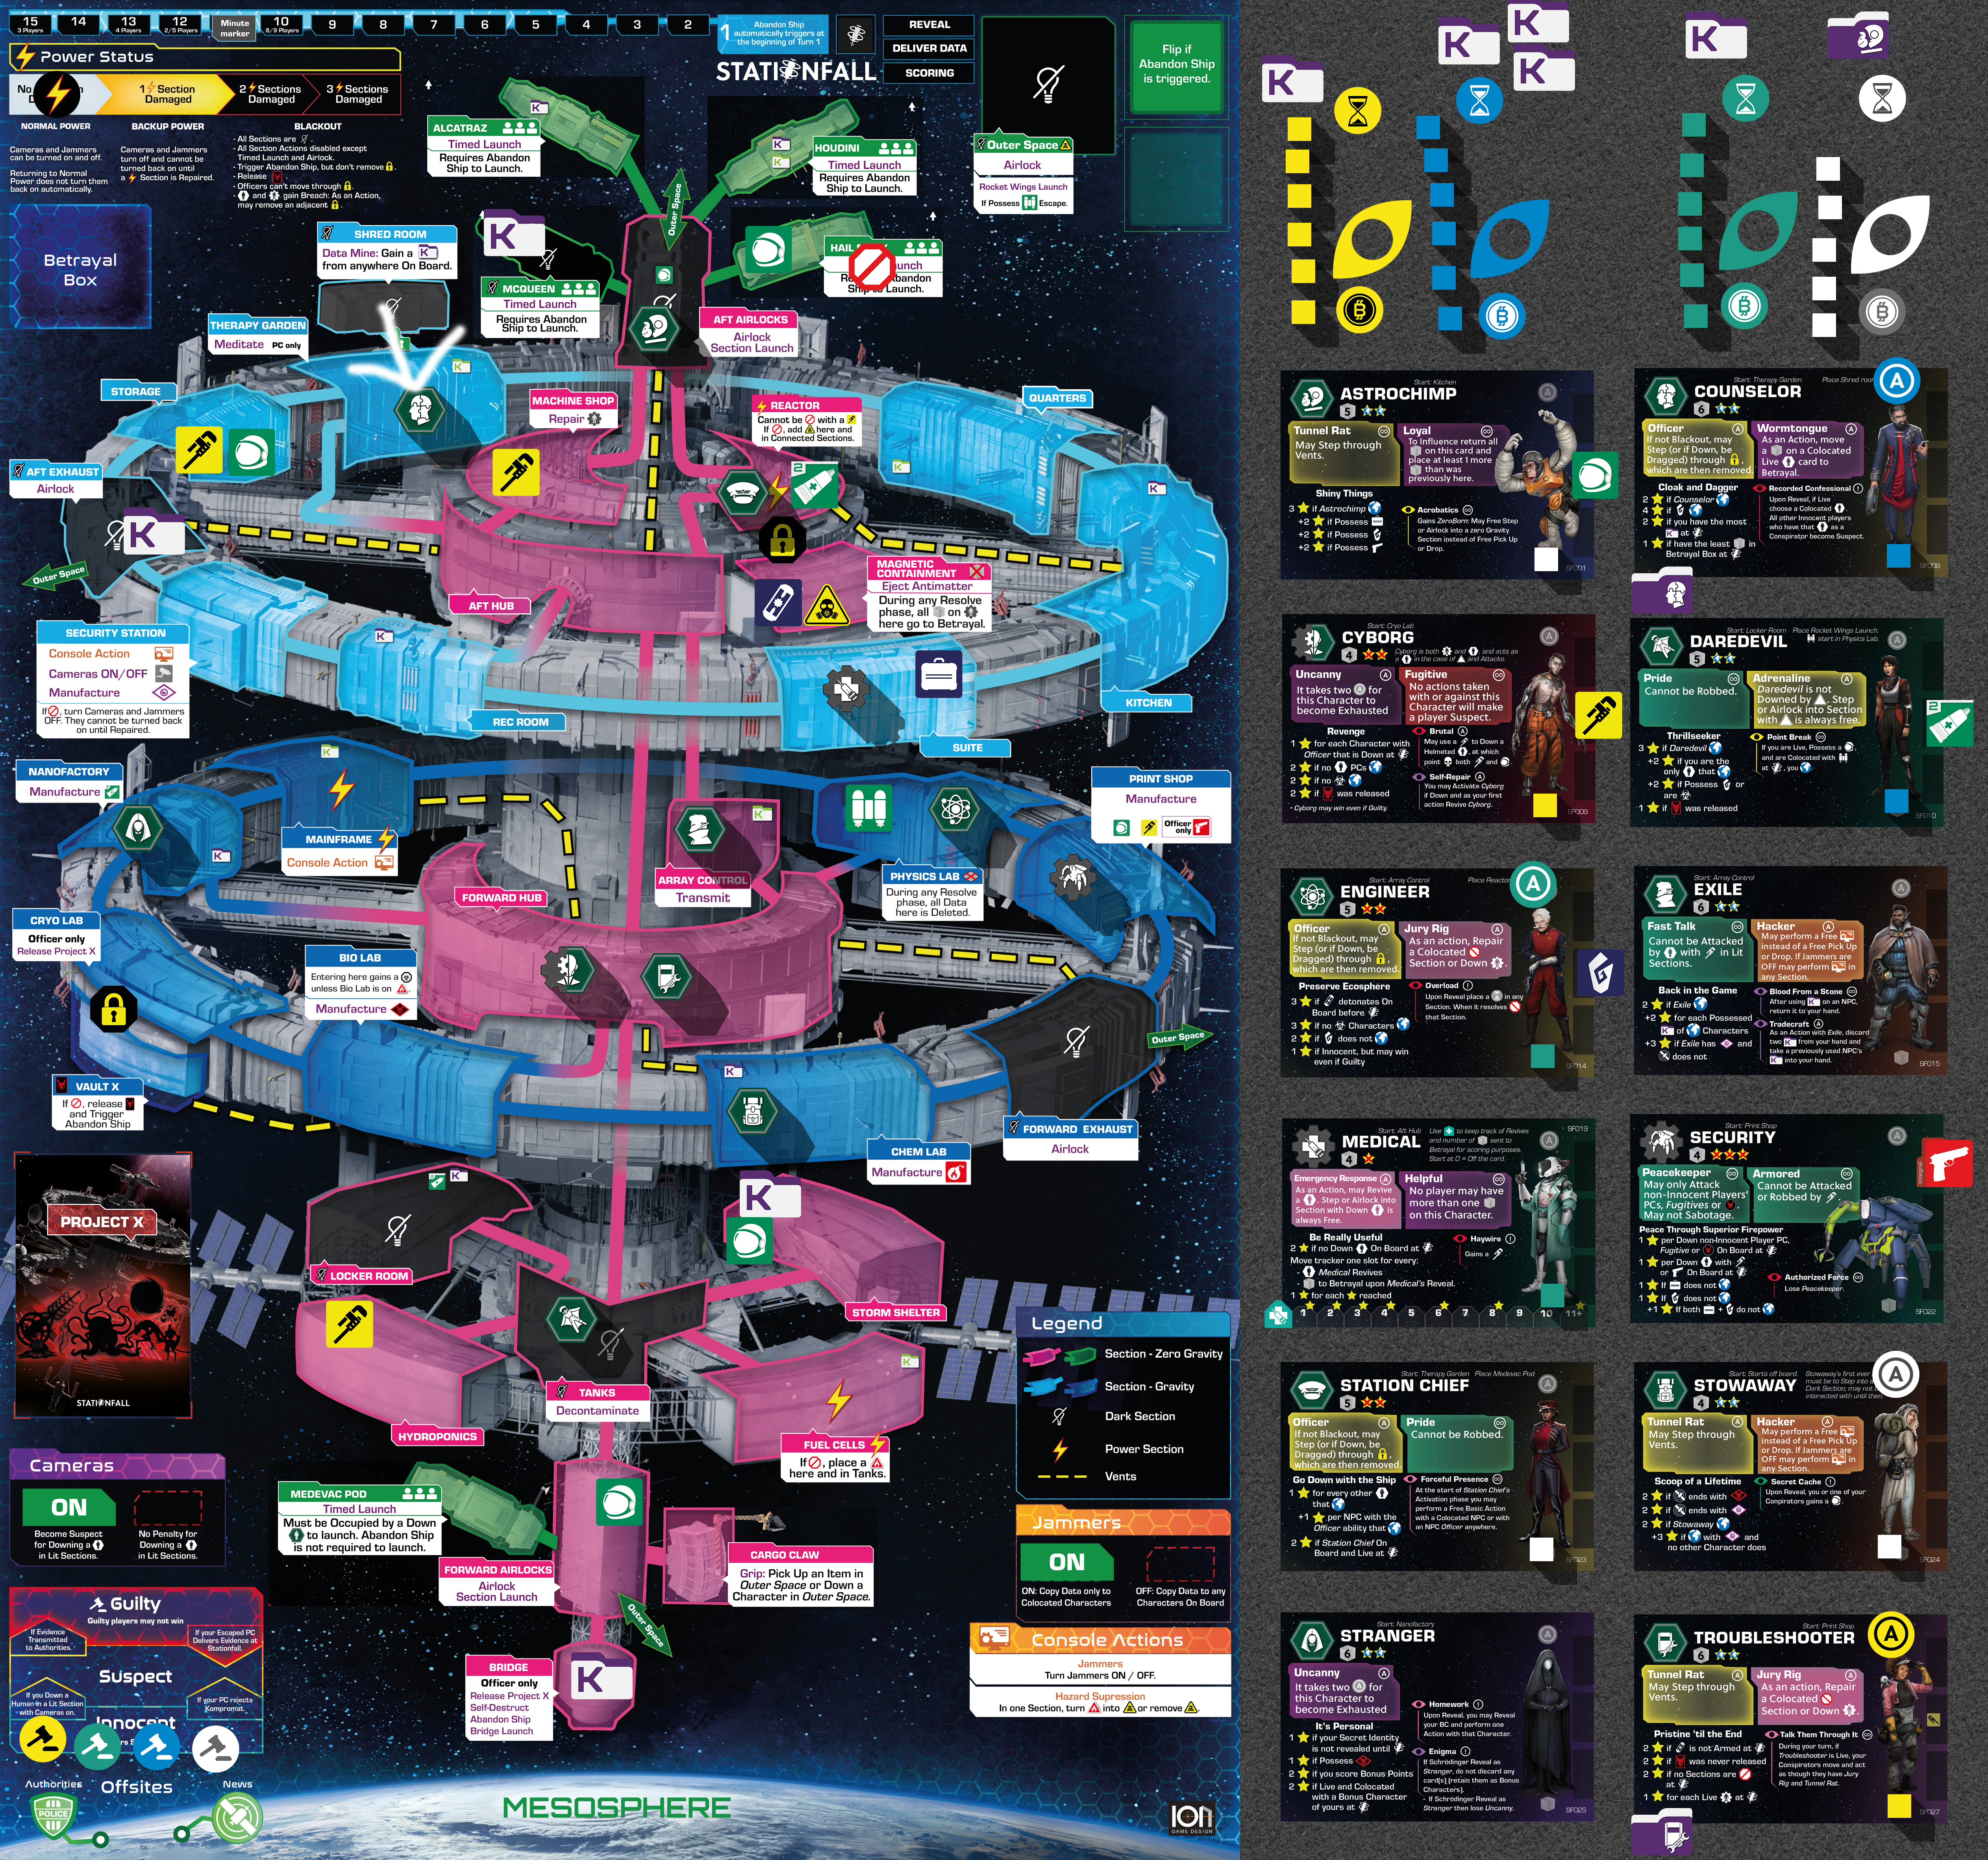
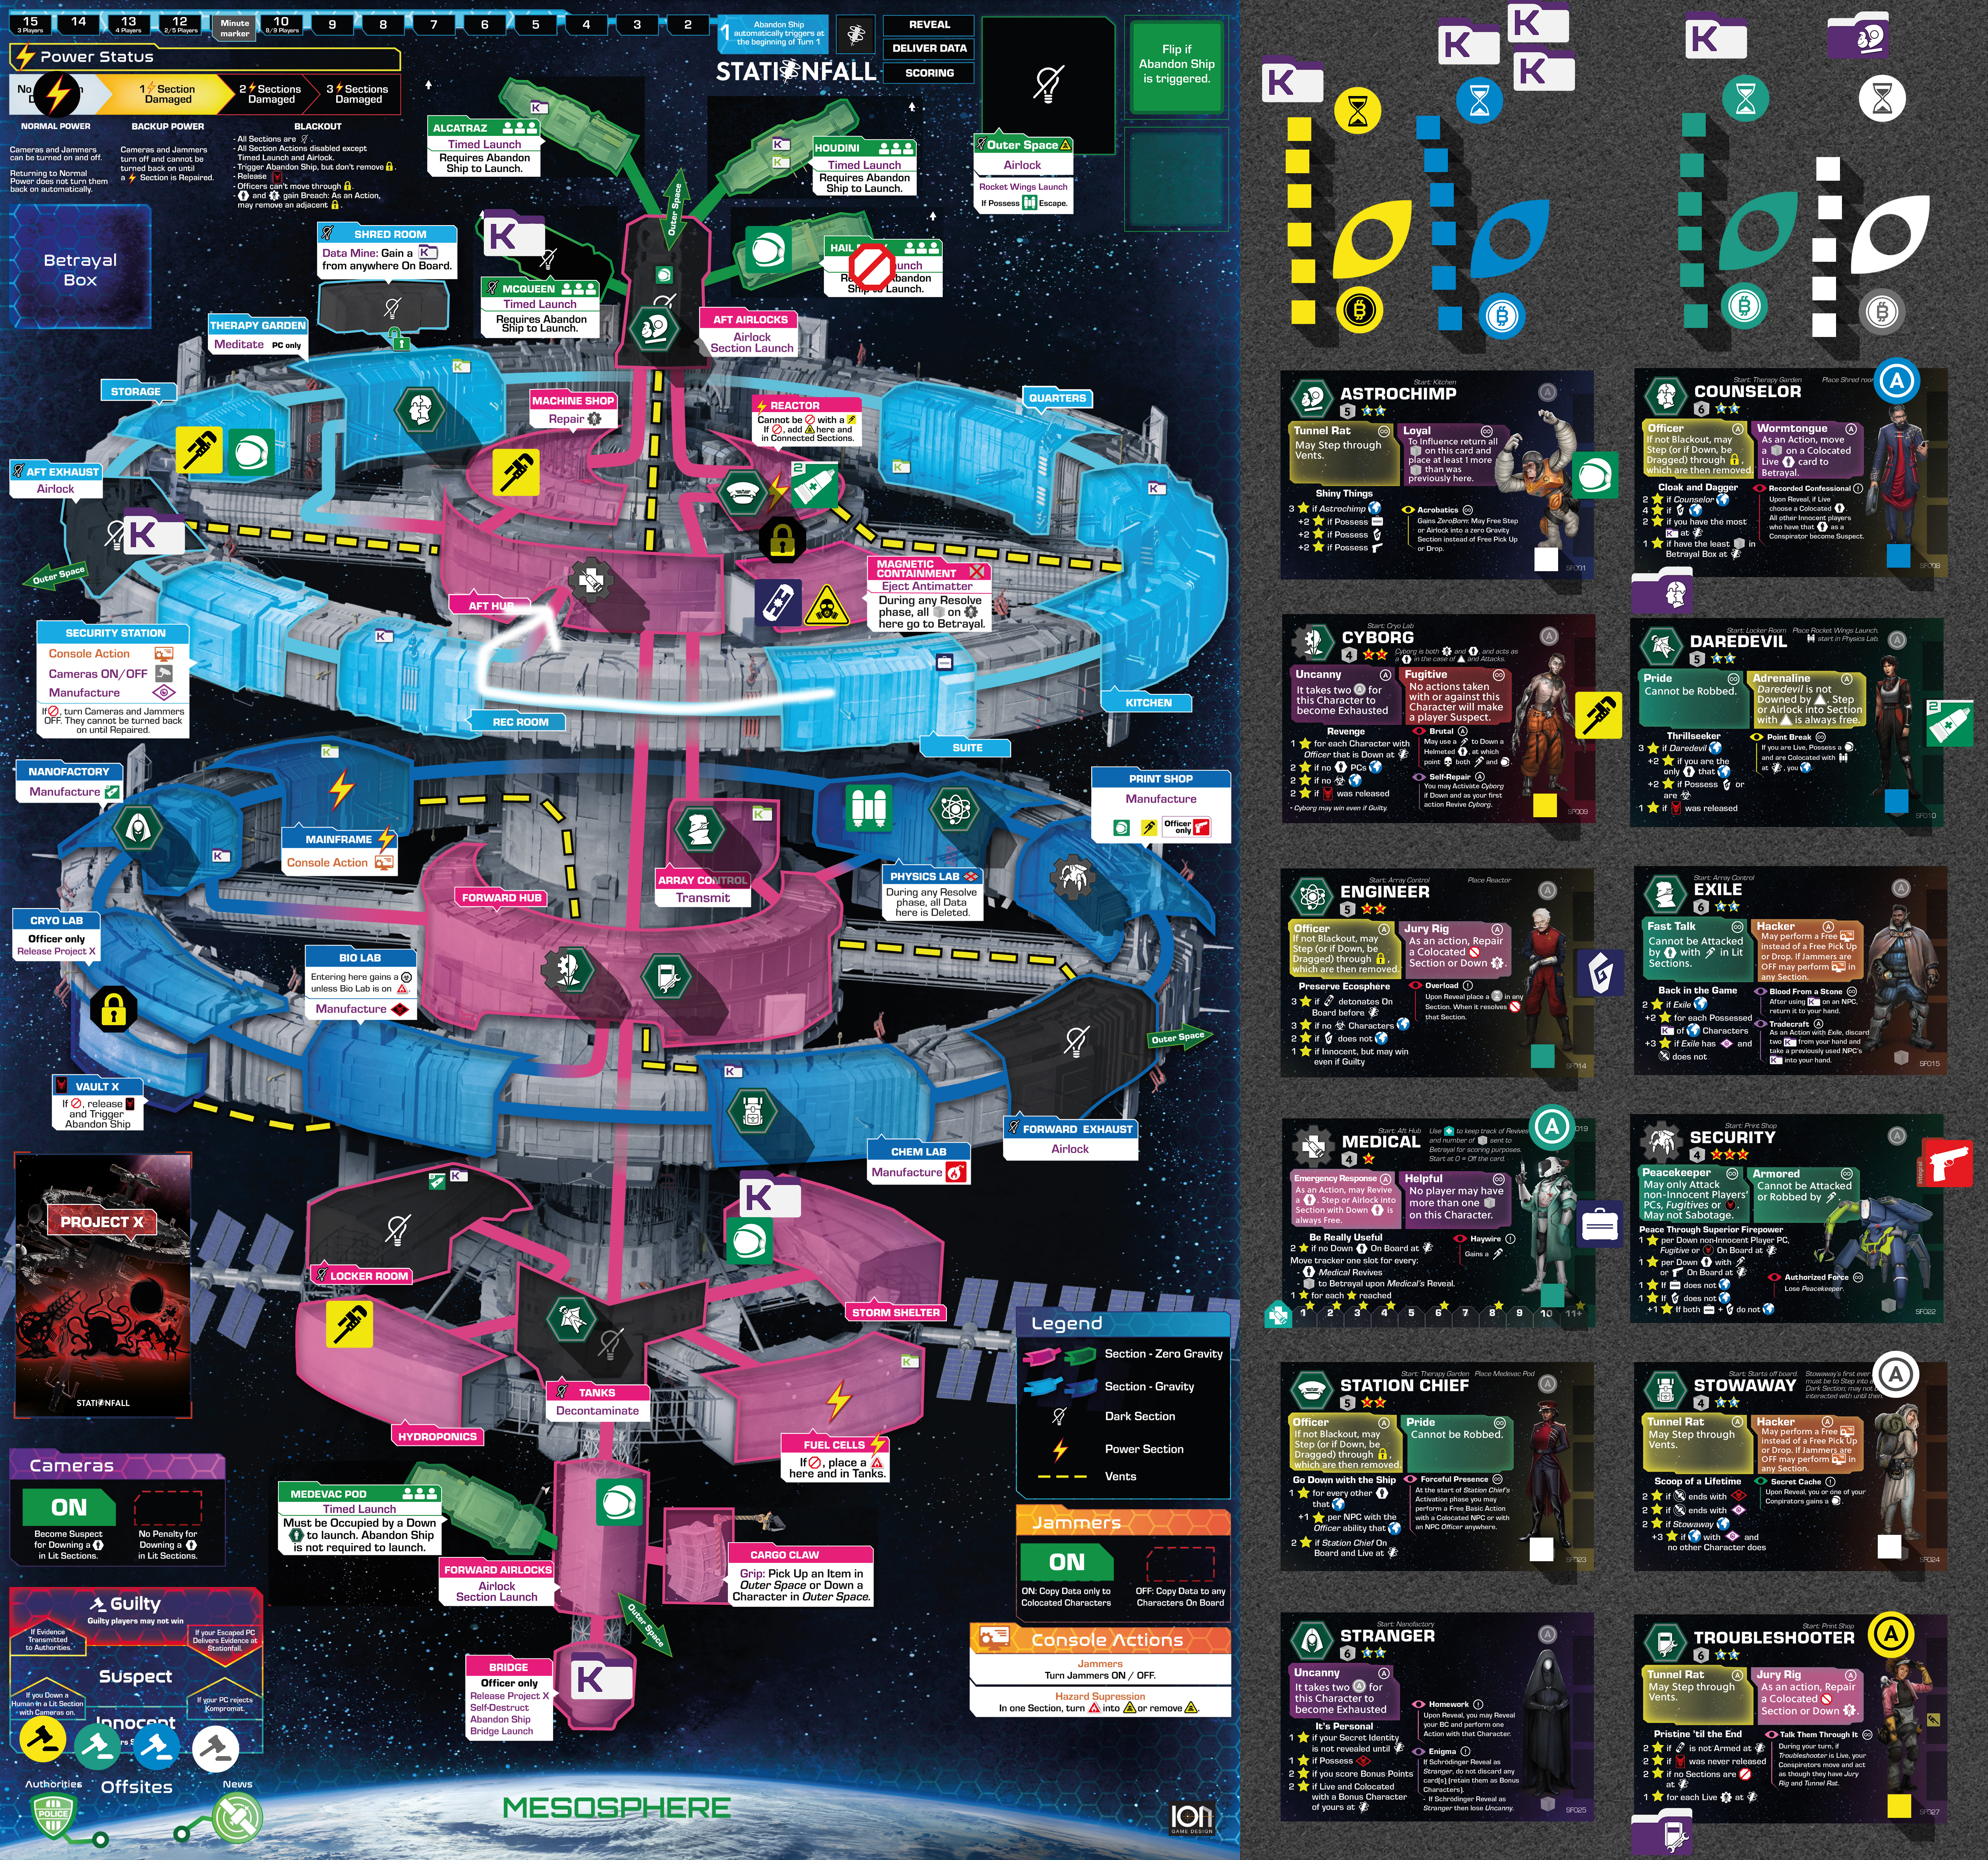
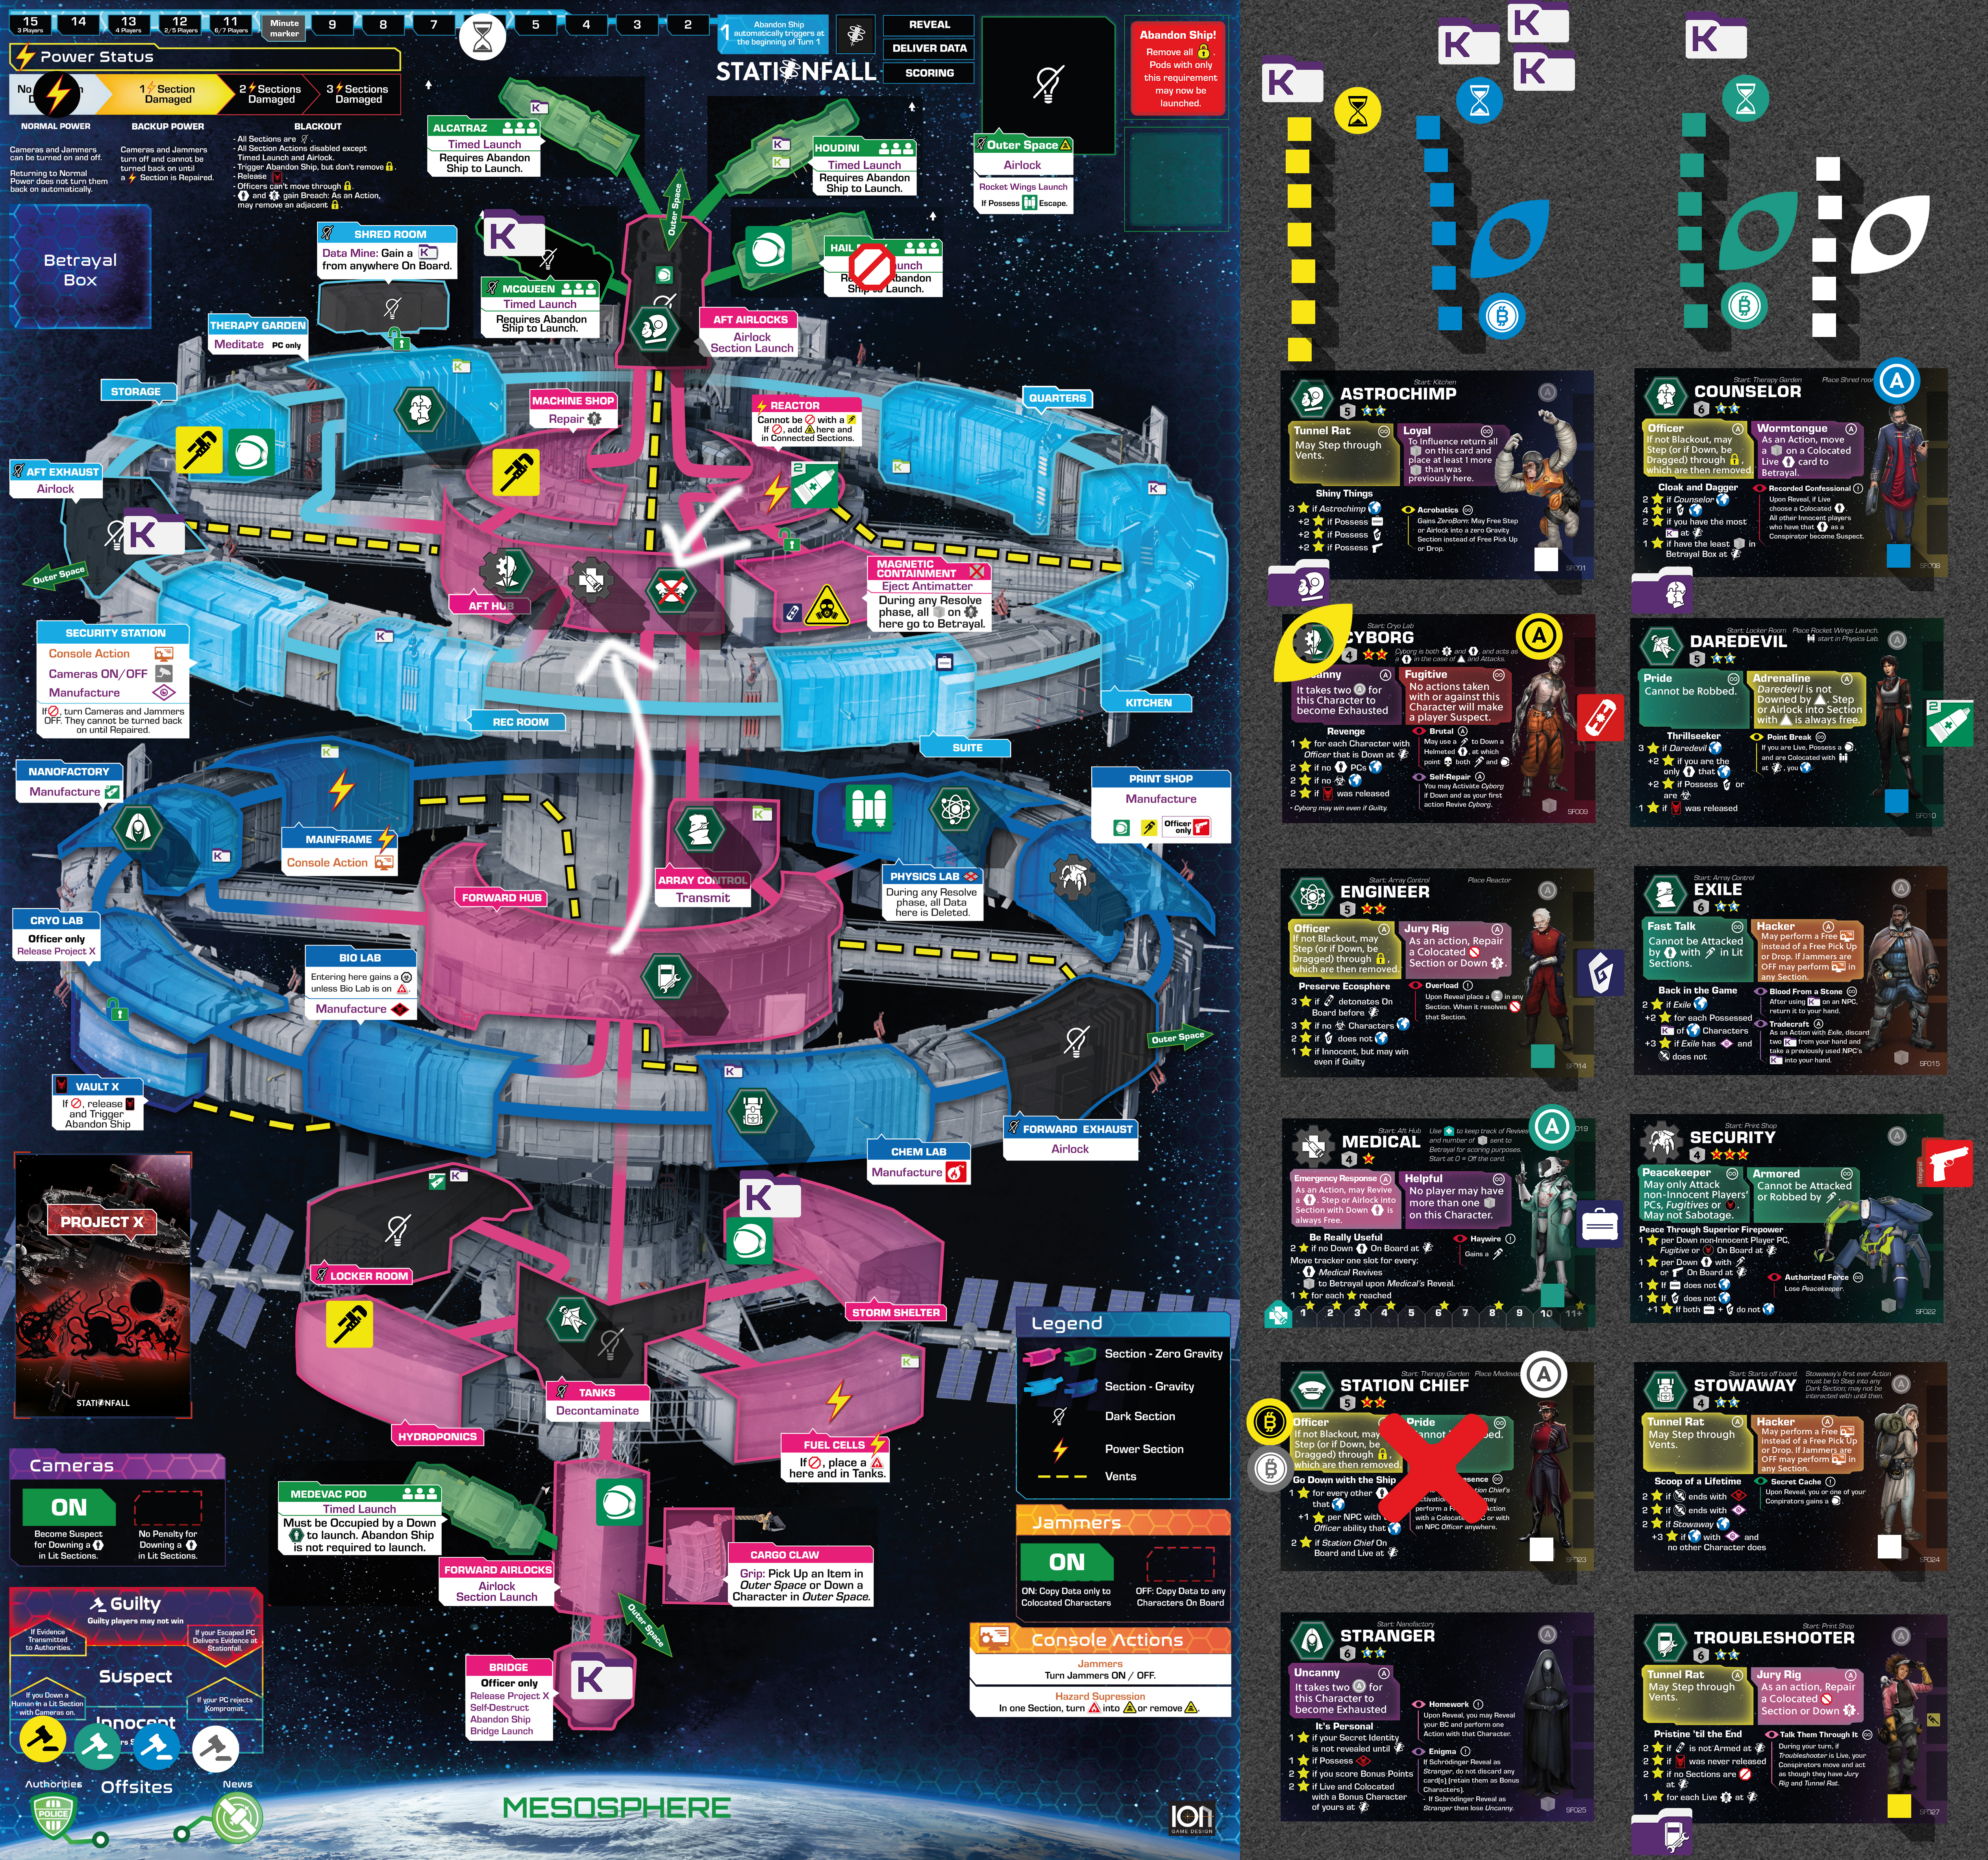
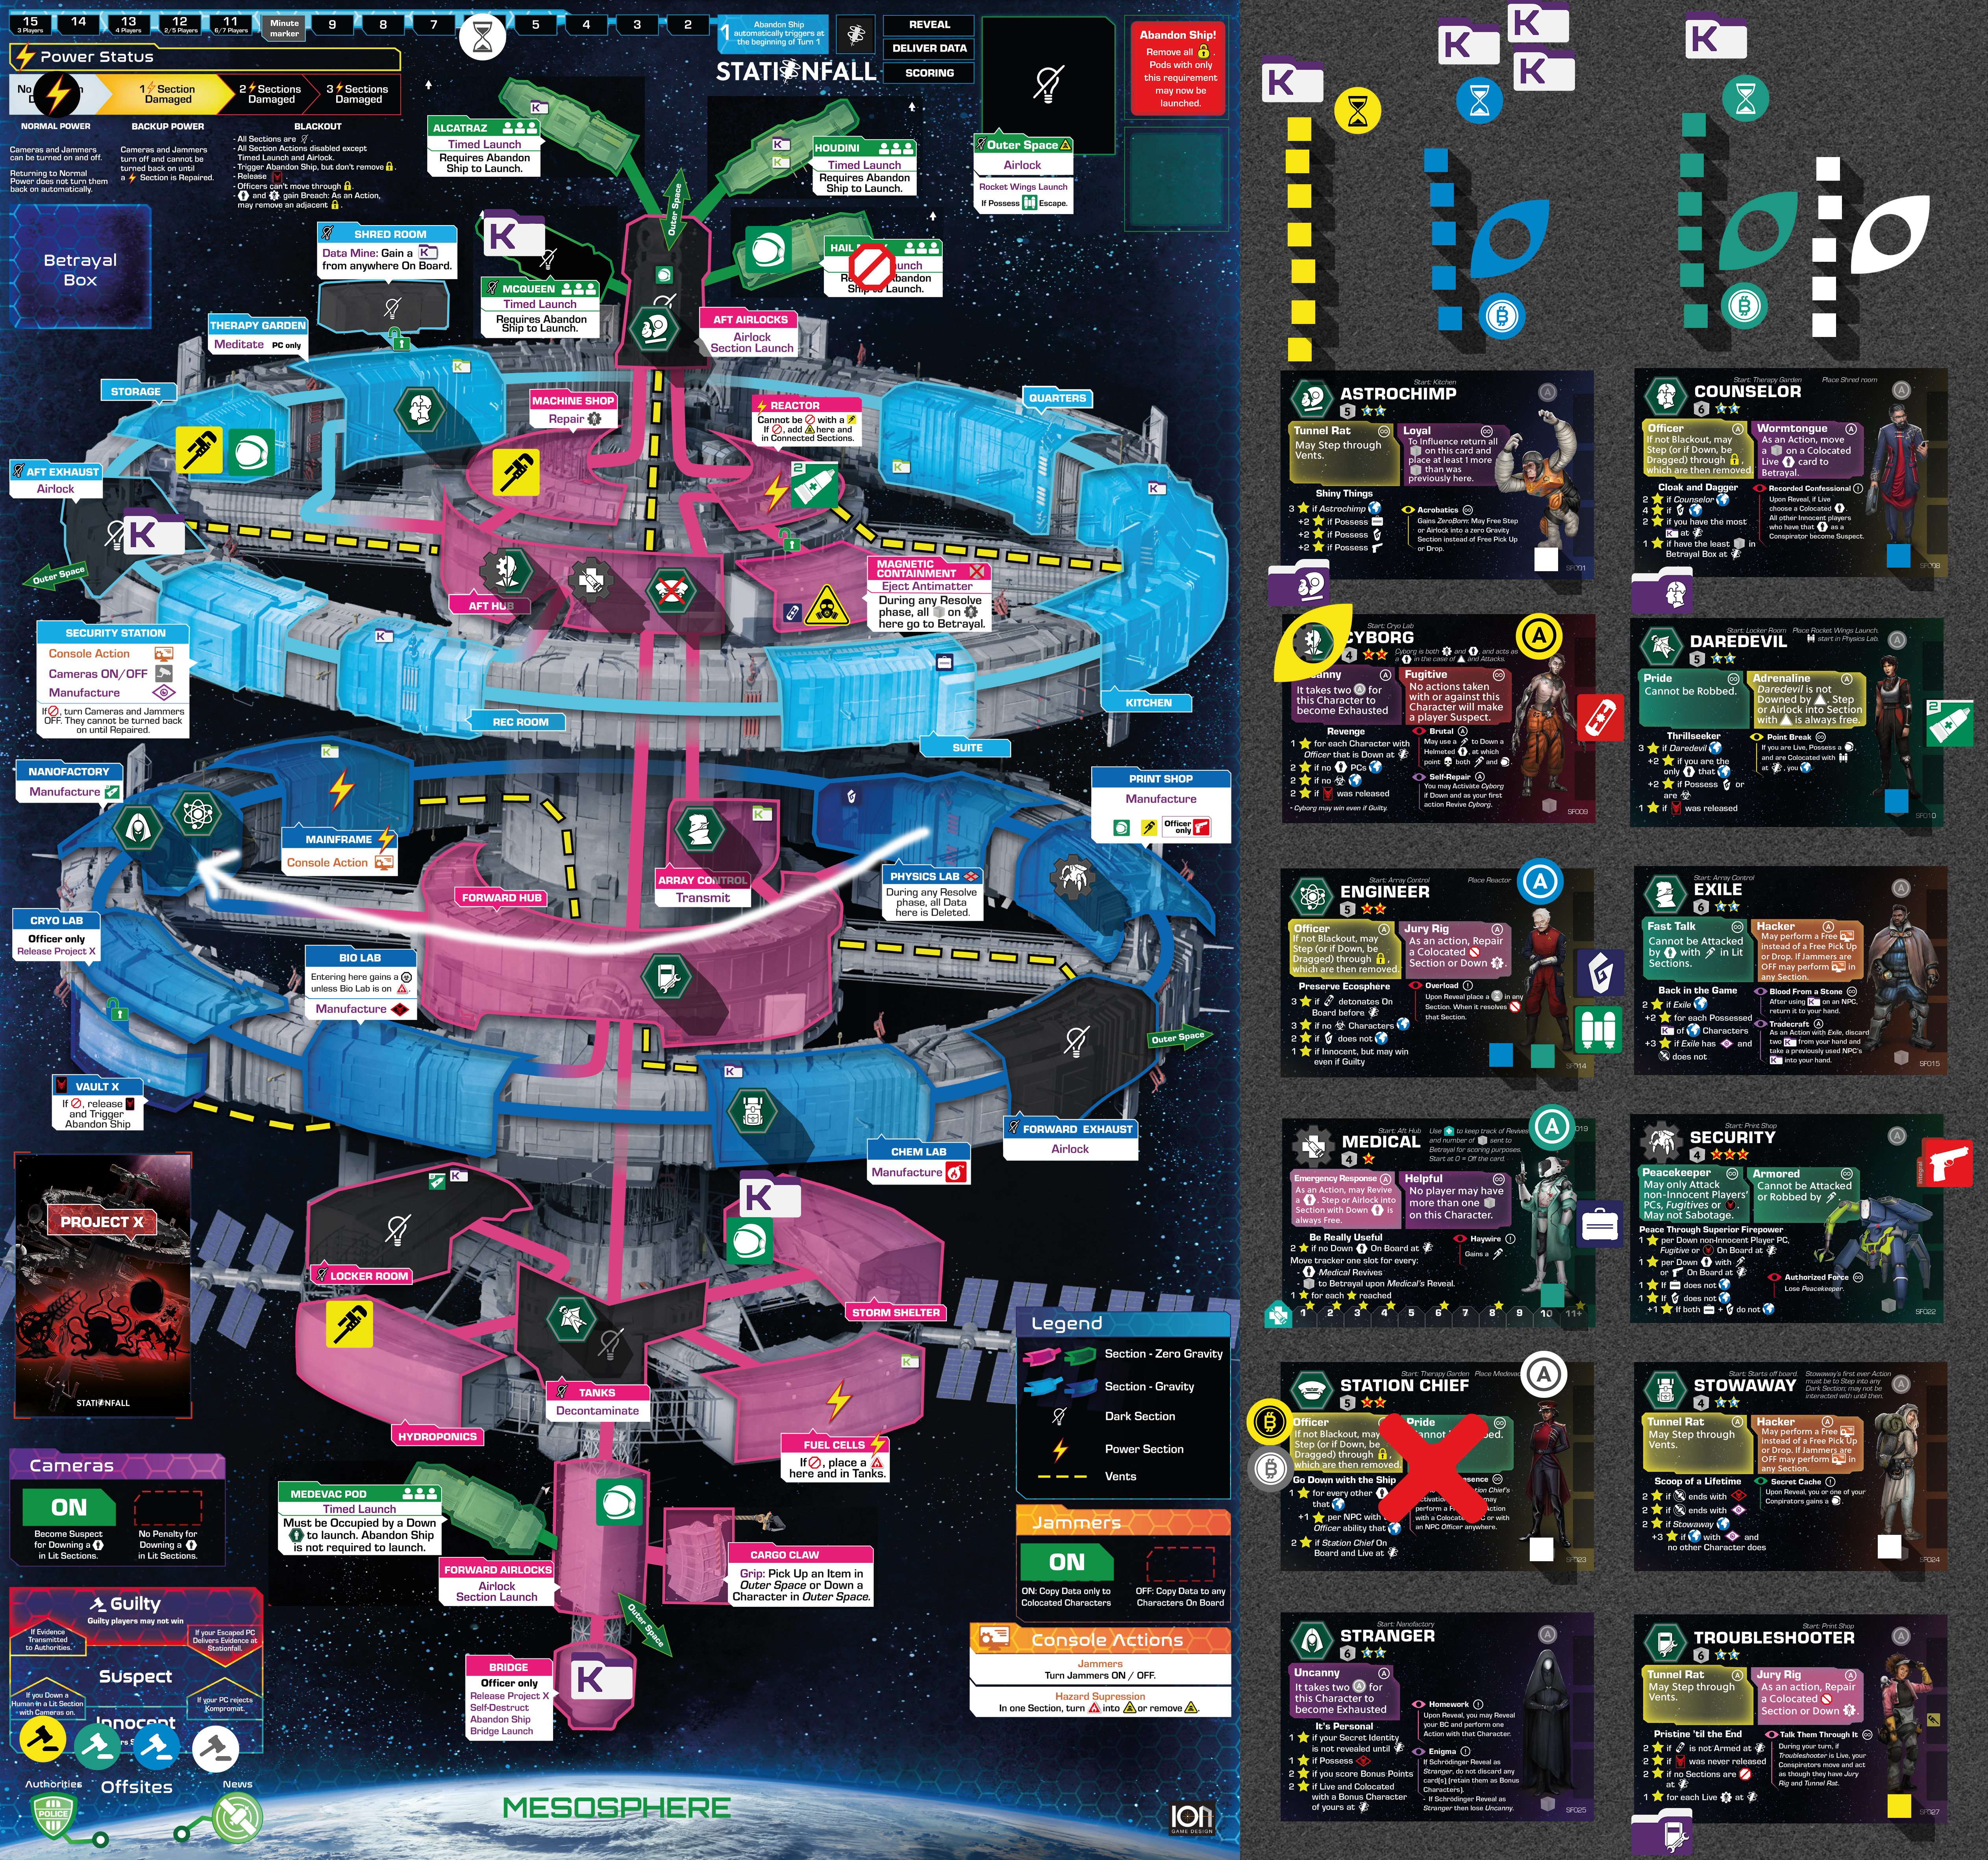
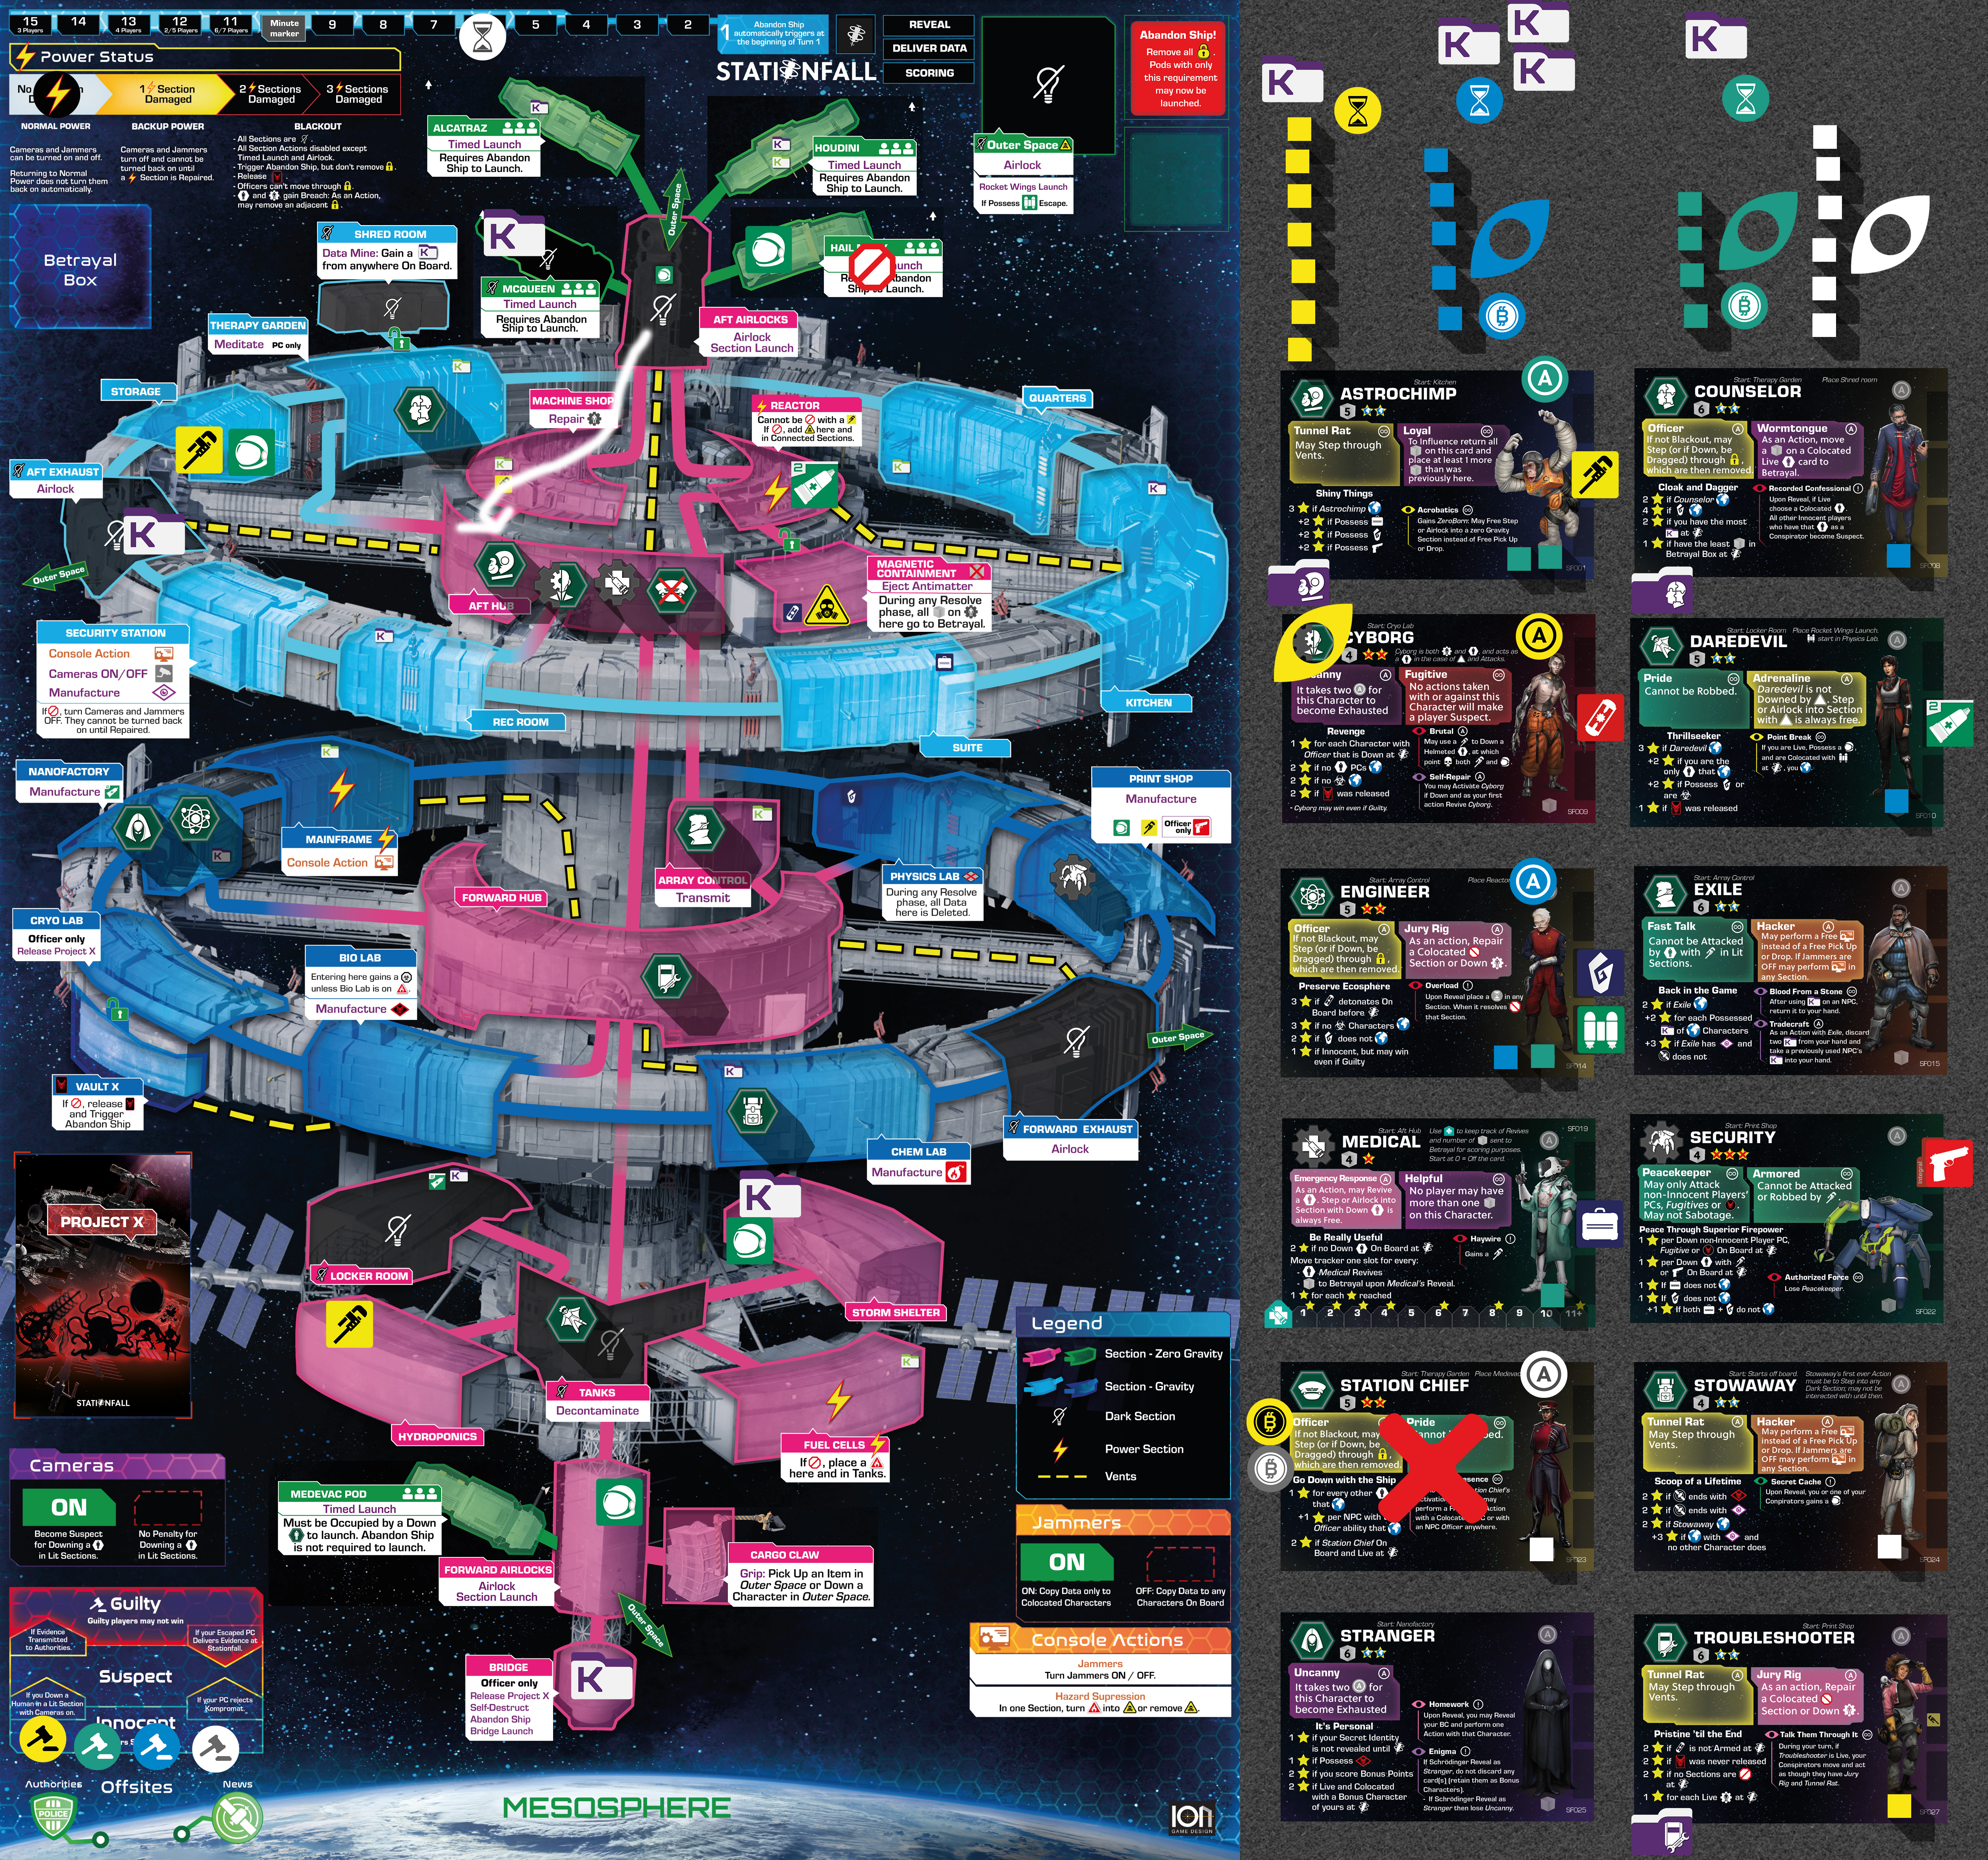
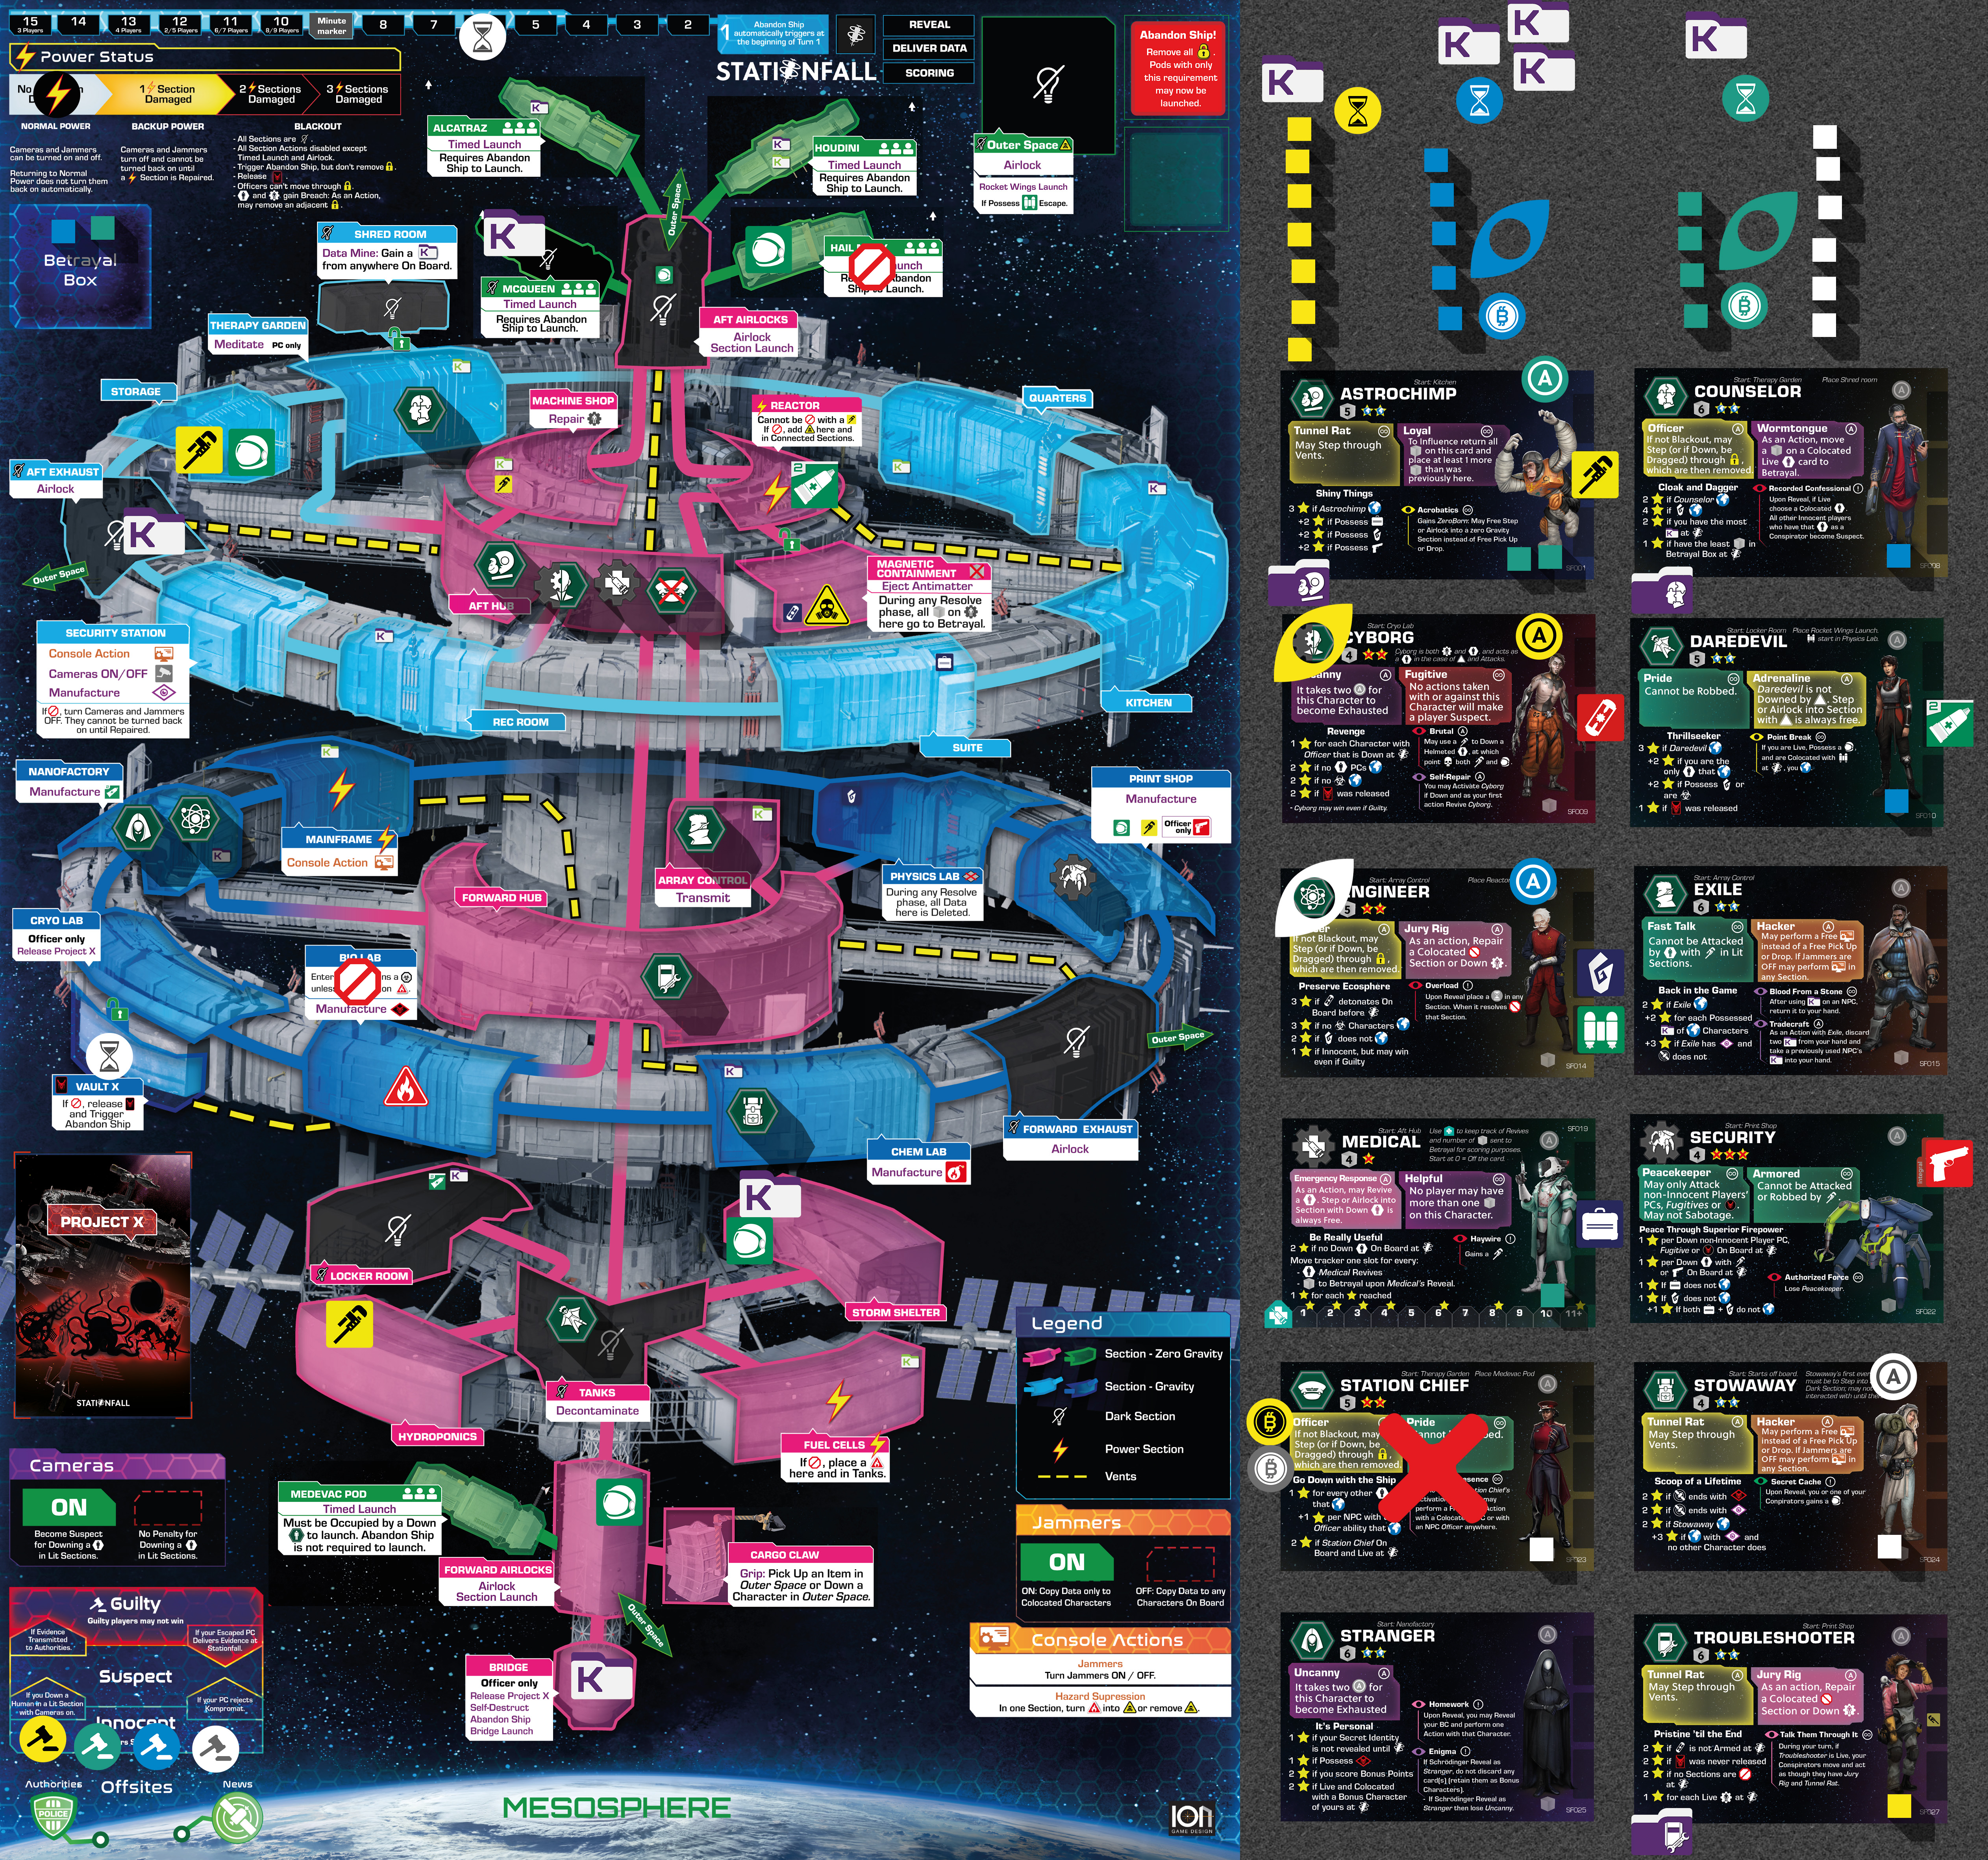
Astrochimp, floating in zero Gravity in Aft Airlocks, heaves his Helmet in a hail mary pass through the corridor to the Reactor. Station Chief floats towards the incoming Helmet, receiving it (using her Free Pick Up). She floats onwards to Magnetic containment and when reaching the locked door she unlocks the door mid air with her Officer credentials. Station Chief floats into Magnetic containment (taking her first Action “Step”, being protected by the helmet in this Hazardous Section). In Magnetic Containment, Station Chief takes the Antimatter (using “Pick Up” as her second action, moving the Antimatter token to Station Chief’s Item slots). Then Station Chief makes an extra effort, and manages to direct herself out of Magnetic Containment, back to Reactor, (Lindsey spends her precious Bribe token, placing it on Station Chief , symbolizing a Bribe paid earlier, to have Station Chief do an Action, which Lindsey chooses to be “Step”). The Antimatter container has exited the Magnetic containment, it starts blinking red and a warning signal from it tells us it is now armed and unstable and will inevitably detonate in 4 minutes.

LINDSEY’S ACTIONS
Don’t add any Influence cubes.

  • Activate Station Chief (move the Activation disc to Station Chief).
  • Use Astrochimp’s Kompromat (place it on left side of Astrochimp’s card) to take the Throw action to move the Helmet from Astrochimp to Reactor.
  • Free Pick Up Helmet with Station Chief, Step into Magnetic Containment (removing the Lock to the supply because of her Officer ability) and Pick Up Antimatter.
  • Use Bribe on Station Chief to Step to Reactor and arm Antimatter, flip it and place one of Lindsey’s Time markers on the Minute track, 4 turns into the future (Minute 6).

Lindsey did 5 things in 1 turn (including the Free Pick Up). Planning such grand moves can help prevent others from interfering with your plans, but are costly. You only have 1 Bribe and if it is unused it is worth 1 point to you during Scoring, so use it with care and only when it really makes a difference. Furthermore the Bribe is placed on the left side of the Character card of the Character it is used on (Station Chief in this case). If this Character is another player’s Secret Identity, that player will get 1 point for that Bribe during scoring.

ANTIMATTER
Arming the Antimatter means a few things:

  • The Antimatter token is flipped to its armed side.
  • Abandon Ship is triggered, mark this at the top right of the board by flipping the Abandon ship marker . This also removes all locks from the board.
  • Place one of the acting player’s time markers (as you just did for Lindsey). When the Minute marker reaches the time marker, at the end of that player’s turn, the Antimatter will detonate.

If the Antimatter is still on the Station when it detonates, the game ends triggering Stationfall (the game end sequence, described later).

If the Antimatter is elsewhere when it detonates, other things may happen, check the Reference manual in these cases.

So, right now there are only 4 turns left. If you need more turns for your agenda, you should try to get the Antimatter off the station when it detonates, in which case the game continues after the Antimatter detonates.

Time markers are placed on the Minute track or on Sections. They indicates that something will occur at the end of a player’s turn; during a specific Minute if it is placed on the Minute track, or at the the end of the next Minute if it is placed on a Section. Several different effects involve Time markers, Pod launch is one of them, described below.

ESCAPE AND PODS
Many Character’s Agendas involve Escaping the station. It is also important for BC Friend points . To Escape means that a Character has been moved to the Mesosphere. Characters in the Mesosphere are marked with the Escaped marker , which is placed on the Character card. They cannot be Influenced or Activated any more.

The most common way to do so is to use a Pod. The Pod finds its way to the Mesosphere by itself but setting it up for launch may be a challenge.

Each Pod has requirements written in their information text. These needs to be met before the Launch action may be performed. For most of them this includes Abandon Ship having been triggered.

Because the Antimatter got armed, this has now been taken care of. A Pod needs at least 1 occupant (Human and Robot) and can have no more than its maximum number of occupants. The maximum is indicated by silhouettes Some Characters are not Humans or Robots (they may instead be Data or an Item). These do not count as occupants. In this tutorial however all included Characters are Humans or Robots.

A Pod is launched by using a Section Action. There are three Section Actions that do this:

  • Timed Launch, performed by a Character inside a Pod. The player doing this places one of their Time markers on the Pod. The Pod launches at the end of their next turn.
  • Section Launch, performed by a Character in the Section a specific Occupied Pod is attached to. This Character is left behind, but the Pod launches immediately, no time marker needed.
  • Bridge Launch, performed by a Character at Bridge. This is similar to Section Launch but simultaneously launches all Occupied Pods that have met their Launch requirements.

NOTE: Abandon Ship is automatically triggered at Minute 1, but it is not certain that there is a Minute 0. Two times out of three, there is no Minute 0, this is determined by the Reentry marker (the marker placed on the 0 spot on the Minute track during setup). To be certain to be able to launch a Pod from inside it, using the Timed Launch Section Action, you should make sure to trigger Abandon Ship somehow before Minute 1. Causing Blackout from Damaging two Power Sections or taking the Actions Abandon Ship or Self-Destruct from Bridge are examples of ways of doing so. These have other effects too, see Reference Manual for complete information.

PLAYERS’ ACTIONS - TURN 4

  • Review your situation. Many things changed because of the arming of the Antimatter and so should your plans. Have a look at your Agenda and the Tip, and see what could be your best course of Action. Stationfall is an ever changing beast, where the other players’ Actions constantly change the conditions for your plans. This is a good example and a good opportunity to practice that.

  • Remember that a Kompromat/Bribe Action does not come with a Free Pick up/Drop.

@RossM is up

Because of Lindsey: Do not put Influence cubes on Stowaway. All other Characters are now free for you to use.

So we’ve all got one bribe?

Just the one, yes.

(There is a character that has more, not featured in this game.)

1 Like

Bribe Station Chieft to move him to aft hub.

Reveal cyborg as my character.

Move cyborg to Aft hub.

Used revealed ability and blunt to down character (Destroying helmet and blunt in process)

Pick up core thingy for free

@COMaestro is up

Because of Lindsey: Do not put Influence cubes on Stowaway.

(revealing and states like down are in the next entry in the launch manual, if anyone wants me to post it now, let me know)

1 Like

Place a cube on Engineer and Activate him. Pick up the Rocket pack for free. Step into the Forward Hub. Step into the Nanofactory.

@mr.ister is up

Because of Lindsey: Do not put Influence cubes on Stowaway.

Two cubes on Astrochimp, step into machine shop, pick up wrench, step into aft hub.

REVEAL
You may Reveal at the start of any of your turns. Revealing means that:

  • You place your Secret Identity card face up for all to see for the remainder of the game. Your Secret Identity is now instead your PC (Player Character).
  • Your Live PC is always a Conspirator to you.
  • Other Players may no longer Influence your PC (your PC will never become a Conspirator for any other Player).
  • You place your Reveal token on the PC Character card, with its Character icon in the Reveal token opening.
  • You remove all Influence Cubes from the PC Character card. Your own Influence cubes are returned to your pool, while other players’ cubes are put in the Betrayal box next to the Minute track. Cubes in the Betrayal box are lost for the player!
  • Activation discs remain on the Revealed Character, since it is still relevant if this Character acted recently and is Exhausted.
  • Your Reveal power is now active (written at the bottom of your Identity card as well as next to the Reveal icon on the Character cards). There are three kinds of Reveal powers. One that happens instantly and only once, one that is persistent and one that provides a new Action this Character can take
  • Your Bonus Character remains secret.
  • Your PC can still be Bribed but after knowing what the Action is, you may refuse the Bribe token and not do the Action. If the Action is refused the Bribe is then returned to the bribing player. There is no penalty for declining a Bribe (but Bribes on your PC will often earn you points during Scoring).
  • Your PC can also be targetted by the appropriate Kompromat. It works in the same way as Bribes, it is your choice to decline the Action or not. If you are Innocent and decline to perform the Action requested by the Player using Kompromat on your PC, you must move your Guilt Marker to Suspect. If you are already Suspect or Guilty, there is no penalty for declining the Kompromat. Regardless of whether you perform the Action or decline it, the Kompromat is returned to the active player. (More on the Suspect concept soon).

Instead of Revealing, you can Schrödinger Reveal. This means that you instead Reveal as your Bonus Character. The procedure is the same, with the difference that your original Secret Identity card is discarded (not showing it) and you do no longer have a Bonus Character that may provide points during scoring.

FIRE
As with Sabotage, Fire is another way to change a Section’s attributes.

  • When a Section catches Fire, place a Fire token in the Section and a Damage token on its text bubble.
  • Characters that are Human need to have a Helmet in order to enter Sections that are on Fire. Any Unhelmeted Humans that are in a Section that catches Fire are immediately Downed.

If you want to remove a Fire token you have to do a Console Action called Hazard Suppression. Console Actions are done in Security Station or Mainframe. (Some Character Abilities let them do Console Actions elsewhere as well). This replaces the Fire token with a Asphyxiation Hazard token (same as the one found in Magnetic Containment earlier). Another Hazard Suppression Console Action is needed to remove the Asphyxiation token.

SUSPECT
Suspect was mentioned above. It means that your Guilt marker, the one you placed on “Innocent” during setup, is moved to Suspect. This in turn means that you risk becoming Guilty. Guilty is a concept in the game related to Data, which will be covered in Minute 7.

LINDSEY’S STRATEGY
After a dramatic Minute 10, Lindsey shows no sign of stopping.
Lindsey will Reveal, to show how Reveal is done (and to wreak even more havoc on you all). Engineer’s Reveal power triggers. It reads “Overload - Upon Reveal place a Time marker in any Section. When it resolves Damage that Section.” Lindsey chooses to place this Time marker in Vault X. If Vault X is Damaged, Project X is released. This means that at the end of her next turn Project X will be flipped and you will follow the instructions on that card.

Lindsey chose not to place any Influence cubes. She can Activate Engineer if she wants, since a Live PC is always a Conspirator, but she Activates Stowaway to acquire a Firebomb. Using the Firebomb she will be able start a Fire to prevent Contamination and make life problematic in general on the station. It is optional if the Firebomb explodes or not when you Throw it. Of course Lindsey wants the Firebomb to blow up and ignite the whole Bio Lab!

LINDSEY’S ACTIONS

  • Reveal as Engineer.
  • Put her Reveal token on the Engineer Character card, move any other player’s cubes on it to the Betrayal box
  • Place one of Lindsey’s Time markers on Vault X because of Engineer’s Reveal power.
  • Activate Stowaway and take the Section action Manufacture Firebomb . Place a Firebomb on Stowaway’s Character card.
  • Then take the Throw Action to throw the Firebomb into Bio Lab.
  • Put the Firebomb back in the supply, put a Fire token on Bio Lab and a Damage Token on Bio Lab’s text bubble.

PLAYERS’ ACTIONS - TURN 5
Now all the rest of the players take their Minute 9 actions.

INFLUENCE STRUGGLES
Remember that you can Activate any Character where you are tied for the cube lead. During the Influence phase you may put any number of Influence cubes, the limit is that you may only add your Influence to a single Character each turn.

Players having several Influence cubes on one Character is an important mechanic of the game. It is a way to make it harder for others to try to derail your plan for a Conspirator you intend to Activate. And it is a way to derail others’ plans, preventing them from using a Conspirator they seem very interested in. Note that you can put Influence cubes on one Character card and then Activate any of your Conspirators, not necessarily the one you put cubes on that turn.

You have something called an Influence Limit on the top right corner of your Secret Identity card (and top left of character card). You can place all of your 8 Influence cubes during the game if you want, but during scoring, any Influence cubes exceeding your Influence Limit will give you -1 point. Many Influence cubes on a Character is a bit of a risk due to Reveal, since cubes may be lost to the Betrayal box this way.

@RossM is up

No Lindsey restrictions