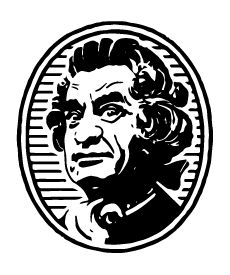
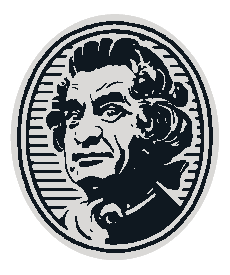
I have a set of images that look like variations on this:
And I want to batch process them so the white becomes one colour, and the black another.
There’s a good batch tool, BIMP, which I have used. There’s a good colorify plugin, which I have used to get
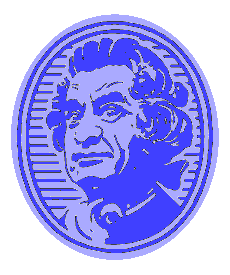
by batch colorify of white, which works great.
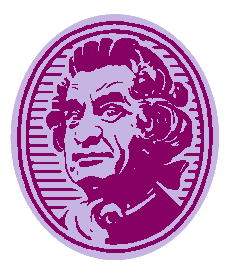
But the only way to batch colour black that I found is inverting the original image and colorifying white again to get this:
But I need to be able to batch colorify black, or batch merge only the non-black portions of these two coloured images somehow, and I’m not sure how to do that.
Can you imagemagick?
What is the desired effect?
What format are the originals in? And what’s the color depth actually? etc?
With imagemagick:
convert Family_a.png -fuzz 10% -fill '#aaaaff' -opaque '#ffffff' Family_a_1.png
convert Family_a_1.png -fuzz 10% -fill '#4040ff' -opaque '#000000' Family_blue.png
Family_blue.png
That’s not bad. Could do with more fuzziness, maybe? Something to clean up the midrange tones between black and white. I’ve never used imagemagick, I assume it handles batch processing. Also needs to preserve the transparency of the background.
1 Like
It does batch processing in that it’s designed to be used in a windows .bat batch file or a linux/UNIX .sh shell script, among other things; following the Unix philosophy of “each command should do one thing and do it well”
In this case, convert fails, because it’s a veritable powerhouse of image manipulation.
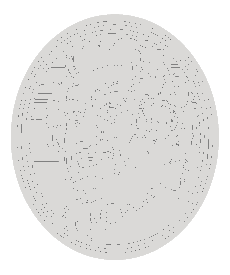
Regarding midrange, I don’t see any midrange in your source imagine posted above; it looks completely bi-tonal to my eye.
I’ll check on the transparency bit; I’m sure that’s just a bit of command parameters I’m missing
Yes, it looks completely bitonal, but that’s due to antialiasing. In the colored output you provided, you can see a lot of greys between the two colours that haven’t been converted.
If I had svg source, this wouldn’t be an issue, but I only have PNG files to work from.
1 Like
Here’s both fuzz set to 50%, and enabling transparency:
EDIT: single command via linux pipe:
convert Family_a.png -fuzz 50% -fill '#aaaaff' -opaque '#ffffff' -background none - | convert - -fuzz 50% -fill '#4040ff' -opaque '#000000' -background none Family_ blue.png
Not perfect, but good enough for my purposes, thanks!
So now I just need to figure out how to do this for 18 images and 6 colour combinations.
Send me the images and the bi-tonal palettes and I can knock it out in 5 minutes or so
1 Like
Awesome. How should I do that? Discourse won’t allow zip files or more than 5 images at a time.
Here’s a Gdrive link: https://drive.google.com/file/d/1awy1r5uHvs0So5ToJj2R2lThcyuCjs1U/view?usp=sharing
Yeah, that should work. I requested access
I’m toying with the “antialias” features of ImageMagic and the flag to disable antialias +antialias appears to have no effect
Well, the antialiasing is already present in the source, I don’t think you are adding or removing any with the conversion. It’s just how a non-pixellated source image is made to look smoother when converted to a bitmap/pixel format.
1 Like
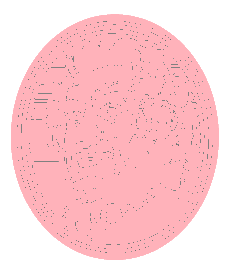
Unfortunately, the grey and pink color palettes are too alike and I’m getting… uh, crap results
The others seem to be fine.
Sadge. If you can find a solution, great. Maybe something like I was originally trying to do, where you do it in two passes, or maybe the fuzziness setting has to come down for those two. If not, I’ll gladly take what you have done so far.
1 Like
Step 1: create version of each portrait with only black or white pixels (remove AA)
Step 2: Set “background” color (replace white with the background of the bi-tonal palette)
Step 3: Set “foreground” color (replace black with the foreground of the bi-tonal palette)
palette.txt:
purple,#C6B5E3,#870064
blue,#97DBEB,#006680
pink,#FFB2BA,#CD3363
grey,#DAD9D7,#0F1820
yellow,#F9E08E,#9C6017
green,#ABDC92,#295135
for f_icon in $(find src_img -name 'Family_*'); do
  local_fname=$(basename $f_icon)
  convert +antialias $f_icon -threshold 50% $local_fname # +antialias is likely unnecessary here
done
while IFS=, read famname bgcolor fgcolor; do
  mkdir -p "$famname";
  for f_icon in $(find . -maxdepth 1 -name 'Family_*'); do
    target_fname=${famname}/$(basename $f_icon)
    convert $f_icon -fill "$bgcolor" -opaque "#ffffff" -background none $target_fname | convert - -fill "$fgcolor" -opaque '#000000' -background none $target_fname
  done
done < palettes.txt
1 Like
I’m an idiot. My I had copy/paste errors in my palette data 
1 Like
I’m not entirely sure that removing the antialiasing effect is the right way to go here. I mean, it’s there in the first place so the image doesn’t look jagged. Ideally the colour conversion would make black the darker colour, white the lighter colour, and the in-between greys into whatever looks like a decent match for in-between the two colours.
Or, I suppose, there’s probably a way to add antialiasing after the colour conversion. The only problem there is that you’d be doing so from a considerably more lossy image than the one you started with (whatever was used to generate the original antialiased image).
But regardless, I’ll be happy with any result.
1 Like
Ah, that would explain it. I apologise for this not being the 5 minute task you expected.
1 Like
I guess you get to be the judge  I did both (once I figured out why my grey and pink were not coming out correctly (spoiler: I populated the same color code for foreground as background… the process was working as-instructed))
Files: https://drive.google.com/file/d/1wOPC0HuJn5Rl0gI0W5bnNnjXC3X-mJ6G/view?usp=drive_link
Anti-Aliased
Aliased
mkdir "bitonal_src"
for f_icon in $(find src_img -name 'Family_*'); do
  local_fname=$(basename $f_icon)
  convert +antialias $f_icon -threshold 50% "bitonal_src/$local_fname"
done
while IFS=, read famname bgcolor fgcolor; do
  mkdir -p "aa/$famname" "noaa/$famname";
  for f_icon in $(find bitonal_src -name 'Family_*'); do
    target_fname=$(basename "$f_icon")
    convert "$f_icon" -fuzz 0% -fill "$bgcolor" -opaque "#ffffff" -background none - | \
    convert - -fuzz 0% -fill "$fgcolor" -opaque "#000000" -background none "noaa/${famname}/$target_fname"
  done
  for f_icon in $(find src_img -name 'Family_*'); do
    target_fname=$(basename "$f_icon")
    convert "$f_icon" -fuzz 50% -fill "$bgcolor" -opaque "#ffffff" -background none - | \
    convert - -fuzz 50% -fill "$fgcolor" -opaque "#000000" -background none "aa/${famname}/$target_fname"
  done
done < palettes.txt
palettes.txt:
purple,#C6B5E3,#870064
blue,#97DBEB,#006680
pink,#FFB2BA,#CD3363
grey,#DAD9D7,#0F1820
yellow,#F9E08E,#9C6017
green,#ABDC92,#295135
4 Likes