I think I’ll take gravity for t3, and yes I’ll confirm those orders.
- yes, you would need to match position and velocity to board a disabled ship.
- does z6 want to accept or reject the first gravity field it passes into? (The B-ward one; it will have to take the A-ward one. So it has a choice between coming out of this turn with C or BC.)
Once you’ve confirmed this I’ll roll for the attack.
z6 rejects the first gravity field, please.
Wait. Wouldn’t I be pulled A-ward by gravity, not F-ward?
Edit: I still want the effects of gravity if they’re A-ward.
Yes, it should have been an A.
z6 attacks t3. Range is 2, delta V is 3 (CD to BB), net -3.
@discobot roll 1d6
1
z4 should have been coast (I edited it, but maybe not before you picked it up). If you rule that’s too late, I accept.
z5’s current vector is 1 in direction C. If I thrust B and don’t take the gravity hex I’m in, I should match course and speed with d3 after his turn, I think.
I also thought z6 was going to be vector C (speed 1 hex after movement), so I’m clearly missing stuff still. I’ll get the hang of it.
I forgot to specify that t3 was going to collect all the ore at t2 before leaving. I think you already accounted for that, but just to be sure.
d3 is still shown as disabled, but I’ve seen no other fire at it - is that in error, please?
Hitting that CT shard with d1 really hurt. The lack of them early I think made me come to expect a bit of prospecting to be safe.
d3 is active again. And I’ll fix z4’s position, see EyeZee’s post above.
Then d1 thrusts F; d3 thrusts into orbit, sells, and I may have some purchases to come but I’m not sure of my financial state.
It’s always too late to take the gravity hex you’re in. That has already had its effect. It’s the gravity hexes you will enter during a turn which change your vector for the next turn…
If you wanted z5 to match with d3 (before its move) it would have to thrust B. But d3 is about to do something else which will complicate matters.
The difficulty is that this turn d3 can go into an orbital path; then Z gets a turn; then next turn d3 can sell etc.
Then d3 thrusts into orbit with a view to selling next turn; I think I still have no option but to hope that I escape z’s fire by a series of lucky rolls, even if this does risk gifting z my current load of ore if I am disabled. I could suicide into Luna to spite z, but that’s just playing kingmaker (except I think z probably has this in the bag anyway.)
Confirm the thrust F for d1.
I accept this for the game and will try to remember it with coming orders.
However, I still think there’s an issue. It may just be how I read the way you present the vectors, or it may be a disagreement with the rules. If the former, all of this is just an exercise in the obvious that I hope you’ll forgive me for.
Let’s take this case:
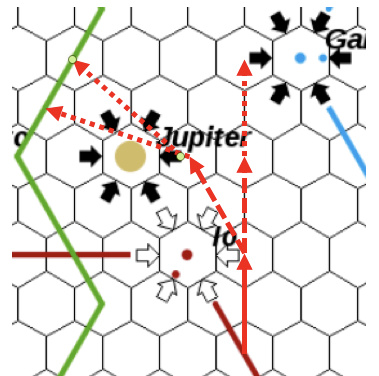
Turn 1 (solid), the ship at 2 hex speed enters Io’s B-side gravity hex. It can take or not take its gravity effect next turn.
Turn 2a: It does not, and proceeds straight up (right dashed arrow).
Turn 2b: It does and takes left dashed arrow, ending up speed 2 hexes in direction F. This seems to contradict your ruling above - The gravity is taken or not on this turn, not the turn in which you land in the gravity hex.
Turn 3a: (right dotted line) ship proceeds up, enters Ganymede’s E side gravity hex, which will accelerate it toward B on turn 4, but not on turn 3.
Turn 3b. ship choses to skip gravity effect of Io’s A-side hex, but must accept Jupiter’s B side gravity which it landed in on turn 2.
Turn 3c. Ship chooses to accept Io’s A side gravity and must accept Jupiter’s B side, which results in a very exciting skim of the Jovian cloud tops.
I’m clearly explaining this badly. Let me have another bash.
During turn 1, the player was required to decide whether to accept or reject the weak gravity from Io’s B-facing hex (because that was a gravity hex the ship was entering during that turn, and you have to decide whether to be affected by hexes as you enter them). That decision then determined what the velocity vector would be for turn 2. But it doesn’t change the position at the end of turn 1; it’s just that the decision must be locked in at this point, because the ship has now entered the hex.
So at the end of manoeuvre in turn 1, the player has on their map the solid arrow plus one of the dashed arrows. (And this may make an immediate difference, for example if there’s another ship in turn 1 that it’s trying to match velocities with.)
During turn 2, the manoeuvre plotting starts at the end of the dashed arrow, and can be displaced by one hex with thrust. Once that decision is made, you know where the ship will be; and again, you look at the gravity hexes entered during this turn, and use those to change the velocity vector that will apply next turn.
The velocity vector plotted on my maps always indicates where the ship will end up if it doesn’t thrust.
I believe I understand. And again - happily accept the ruling in the game, but am continuing the academic discussion.
I see it as a matter of how the plotting is done. For me, the dashed line at the end of turn 1 would always represent the velocity vector unaffected by thrust or gravity (even required gravity), In astrogation turn 2, I would add vectors for thrust and gravity to determine new vector. This is just different than the way you do it, and I see advantages to the way you do it (since it accounts for mandatory gravity).
The other difference is that I did not assume you had to lock in using or not using weak gravity on the turn you entered the optional gravity hex, but rather you could chose to do that during the next turns astrogation phase. It makes a tactical difference if you have to commit at the end of turn 1, or can wait until turn 2. Pre-commitment tips more of your hand to opponents. So this is actually a difference in the way we play that I didn’t fully understand.
The rules on weak gravity are actually quite un-illuminating about exactly when you use them.
“Luna and Io have weak gravity, represented by hollow arrows. A ship passing through one weak gravity hex may ignore it or use it, as the player chooses. When two or more weak gravity hexes are entered consecutively, the second and later hexes have the effect of full gravity hexes, regardless of how the first such hex is treated.”
The Figure Cap (Fi 7) "A ship which enters gravity hexes I and II on turn 1, and chooses to ignore the first gravity hex, will be affected on Turn 2 by the second gravity hex. "
sounds more like your interpretation, but is not specific about when the player “chooses to ignore” the first gravity hex - end of turn 1, or astrogation turn 2. I would argue that since movement is after astrogation, then the effects of gravity hexes are determined in next turn’s astrogation.
Anyway, I think I’ve beaten that one utterly to death now.
For that matter, I’ve been assuming it’s “the first weak hex you enter in a turn” rather than “the first weak hex you enter in an unbroken sequence of such, however long you take to do it” that gives you a choice! (Too late to alter that for this game.)
I realise that the rules have been updated in places, but this is still visibly an early-1980s game in terms of rules clarity.