Oath PBF - My Kingdom for a Horse

OK, I think I’m about ready, so @GeeBizzle @COMaestro @Whistle_Pig and @Lordof1, you have a couple of decisions to make before I post the overview then lead you through the entirely scripted opening round.

Who wants to be the Chancellor? The militaristic ruler of this land, with a small domain stretching from the central fertile plains, across the mountains, to the hinterland of the rocky coast, keeping the peace with the longbows of the plains.

Who wants to be Red? The foxy exile in the mountains, with their animal friends.

Who wants to be Blue? The Cyclops exile also in the mountains, with a coterie of naysayers denouncing the Chancellor’s rule.

Who wants to be Yellow? The four-armed exile at the rocky coast, who may have made a pact with a devil or two.

You also have to come up with a name for this chronicle, which will be the title of this thread.

This is also a good time for anyone wanting to pair up to speak up - up to two players can tag team or cooperate playing each role.

Rules questions and discussion over here please: Oath PBF companion thread, for rules questions and the like


2 Likes

I quite fancy the king in yellow.

Possible name, The trials of (chancellors name) the inexperienced?

1 Like

“Lordof1” is an appropriate name for an exile, I think. I quite like the Red animal master if that’s okay. Happy to double team with someone. I think that’s the right expression.

2 Likes

I fancy a go at being chancellor :crown:

2 Likes

I feel somewhat myopic, so I’ll go for the Blue Cyclops.

1 Like

Well, by happy coincidence, everyone picked different colours!

So, about that chronicle name…

(Remember this isn’t the name of this game, but this chronicle, which could span many games)

1 Like

Ah, I thought it was just this game. Hmmm.

Here is the world.

This image is too low resolution to read the cards. I’ve fixed that for future screenshots.

It’s pretty much exactly what you’d see at a real table, with a couple of tweaks. The dice are “off-screen”, ready to be rolled. The player boards are trimmed. The amount of favour and warbands in reserve are numbered. There’s a pointless (for you) Shuffle zone.

Whenever someone wants to peek at a facedown card, I will message the image to them. Same when searching. I probably won’t post the count of discard piles all the time - if you want to know, I’ll post it publicly.

The next two posts will be direct from the Playbook, which you are free to read yourselves and can be downloaded at Resources – Leder Games

1 Like

Who You Are, How to Win

Oath is a game about history. It’s about what gets forgotten, who gets left behind, and how power moves from one part of society to another. In each game, players will steer the fate of this land toward their own interests, affecting all the games to come.

In your first game of Oath, Whistle_Pig is the Chancellor, and the other players will start as Exiles. Some Exiles may become Citizens in play.

The Chancellor

In your first game, the Chancellor begins as the Oathkeeper of Supremacy.
To remain the Oathkeeper of Supremacy, the Chancellor must rule the most sites, as shown by the Oathkeeper goal.

At the start of the game, the Chancellor rules three sites.

As shown above, the map of this land has three regions—the Cradle, the Provinces, and the Hinterland. The Cradle contains two sites, while the Provinces and Hinterland each contain three.

You rule a site if you have any number of your warbands on it. A site can only hold warbands of one color at a time, so generally only one player can rule a site at a time.

The Chancellor rules three sites and nobody else rules any, so the Chancellor marks their title as Oathkeeper by taking the Oathkeeper title.

Oath lasts up to eight rounds, but the Chancellor can only win on rounds five through eight.

At the end of the fifth, sixth, and seventh rounds, the Chancellor has a chance to win. If they are the Oathkeeper, they roll a six-sided die to determine whether the game ends:
• End of fifth round: Game ends on die roll of 6
• End of sixth round: Game ends on die roll of 5–6
• End of seventh round: Game ends on die roll of 3–6
• End of eighth round: Game always ends
The Chancellor wins if the die roll ends the game or if they’re the Oathkeeper at the end of the eighth round.

If any Exiles have become Citizens, they might win instead of the Chancellor.

The Exiles

An Exile can become the Oathkeeper, but they must become the Usurper to win.

If an Exile rules the most sites, they take the Oathkeeper title from its current holder. If they ever start their turn as the Oathkeeper, their title flips to Usurper.

If the Exile remains the Usurper until the start of their next turn, they win!
They also win if they’re the Usurper at the end of the eighth round.

The Exiles have a second path to victory—becoming a Visionary.

In each game of Oath, you play with only one of the four possible Oathkeeper goals—in
this game, the Oathkeeper of Supremacy. But you’ll always play with all four true Visions, which mirror the four Oathkeeper goals. For example, the Vision of Conquest lets you win if you rule the most sites, mirroring the Oathkeeper of Supremacy goal. As you search for cards, you might find a Vision!

An Exile wins if they have a Vision played and its goal fulfilled at the start of their turn. They also win in this way at the end of round eight as long as the Chancellor isn’t the Oathkeeper.

Often, the Exiles will try to be the Oathkeeper—which stops the Chancellor from rolling the die to win—while also working to complete a Vision.

The Broad Strokes of Play

On your turn, you’ll do three phases—Wake, Act, then Rest. Once you’re done, the next player in clockwise order takes their turn. Once each player has taken a turn, the round ends. Keep playing like this until someone wins or you finish the eighth round!

The Wake Phase

Only Exiles do much in this phase. As an Exile, you’ll check whether you win as the Usurper or Visionary, then if you have the Oathkeeper title, you’ll flip it to Usurper. Whether you’re an Exile or not, you might also use wake powers on the few cards that have them.

The Act Phase

In this phase, the main part of the game, you can take these major actions:

You can take any number of actions in any order.
Even the same one multiple times or none at all!

Every major action costs 1 to 4 Supply.
Each time you spend a supply, shift your Supply marker on your board once to the right.

Most major actions refer to your site.
This term means the site that your pawn is at.

You can take various minor actions, which cost no Supply.
Some minor actions include flipping over facedown cards to play faceup, peeking at relics at your site, and picking up and dropping off warbands at your site if you rule it.

Many cards in Oath give new actions.
These cost no Supply, but some cost favor or secrets, which usually you’ll put on the card. Generally, you can’t put favor or secrets on a card with favor or secrets on it already!

Almost all cards live either at a site or in a player’s advisers, which is a personal set of cards to the right of their board.

You can only use a card’s power if…
• Your pawn is at the site that has the card, or—
• You rule the card, even if your pawn isn’t at the site with it. You rule all cards in your advisers and at sites you rule.

There are a few other kinds of card powers.
Some modify the six major actions, some only happen once when played, and some can only be used if you rule them, regardless of whether your pawn is at the card’s site or not.

The Rest Phase

In this phase, favor tokens on cards return to the six favor banks on the map, going to the bank that matches the card’s suit. Secret tokens on cards, however, return to your own board!

As you’ll learn, secrets are your main way to get favor, so try not to lose your last one in play.

After this, you’ll refresh your Supply. The amount you refresh depends on how many warbands are left in your personal bank next to your board—that is, not on the map or on your board. The fewer warbands you’ve mustered and need to feed, the more Supply you’ll have for yourself.

If you don’t spend all your Supply on your turn, you get to save it for your next turn!
For each Supply you didn’t spend, refresh your Supply one extra space to the left.

And with that, we are ready to start. First, @Whistle_Pig written from her perspective.

The first phase of the turn is the Wake Phase. However, the only thing the Chancellor can do now is check the People’s Favor. The Chancellor doesn’t have the People’s Favor—so unpopular!—so they skip this phase and go to the Act Phase, the main phase of the game.

Search the deck. To draw from the deck, I need to spend 2 Supply, so I push my Supply
marker twice to the right. I draw three cards.

Why 2 Supply? Take a look at the Visions Drawn track next to the world deck. This shows that it currently costs 2 Supply to draw from the deck. As Vision cards are drawn from the deck, this cost increases.

(Here I messaged Whistle_Pig the image of the cards drawn)

I only get to keep one card, so I’ll keep Garrison. My pawn is on the Plains, which is in the Cradle region, so I discard the other two cards facedown to the top of the discard pile of the Provinces region.
Whenever you discard cards, place them in the next discard pile out. Cards discarded from the Cradle go to the Provinces discard pile, Provinces cards go to the Hinterland, and Hinterland cards wrap around to the Cradle.

I’ll play Garrison to my site, the Plains.
Garrison has a tree restriction in the top-left corner under its suit. This means Garrison can only be played to your site! Notably, any card can be played as an adviser facedown, even Garrison or a card like it.

I take one favor 1 from the Order bank on the map and put it on my board.
Why am I taking favor? Whenever you play a card to your site, you gain one favor! It comes from the favor bank matching the suit of the card you played—in this case, Order.

Then I resolve Garrison’s power: I gain three warbands and place one each on the three sites I rule—the Plains, the Mountain, and the Rocky Coast.
Remember—you rule a site if you have any number of your warbands on it. Pawns don’t matter for rule.

Trade at the Garrison.
I spend 1 Supply, then take one secret from my board and place it on the Garrison card. In return,
I take one favor from the Order bank and put it on my board.
Trade is different from playing a card to site, which gives one favor. With the Trade action, you gain one favor plus another favor for each adviser you have matching the suit of that card. Remember—your advisers are the cards to the right of your board, except for relics.

Search the deck.
Like before, I spend 2 Supply and draw three cards. I’ll play Errand Boy to my advisers to the right of my board, and discard the other two cards I drew to the Provinces.

(Here I sent an image of the cards revealed to whistle_pig)

Unlike Garrison, Errand Boy has no restriction shown under its suit, so it can be played to either site or advisers. Notably, you do not gain a favor for playing a card to your advisers.

travel to the other cradle site.
I spend 1 Supply, flip over the facedown site at the Cradle to reveal the Lush Coast, and place my pawn there.
why 1 supply? Look at the Travel aid under the Cradle title on the map. From the Cradle, it costs 1 Supply to go to the other Cradle site, 2 Supply to go to any Provinces site, and 4 Supply to go to any Hinterland site.

Reveal my forest paths.
As a minor action, I flip over the facedown card in my advisers.
I play it to my site and take one favor from the Beast bank. This costs no Supply.

why could I play forest paths? When you have an adviser facedown, you’re saying, “I’ll play this card faceup later.” When you do play it later, it works exactly like you’d just drawn it, including gaining favor. By keeping advisers facedown, you can hide useful info and wait for the right time to play something! You can even hold cards with restrictions, like the tree, facedown.

Trade at the forest paths.
I spend 1 Supply. I place two favor on the forest paths card, and I take one secret from the shared bank and put it on my board.
Trading for secrets is harder than trading for favor. You only get one secret per matching suit—if you don’t have any matching advisers, you won’t get any secrets. The denizens keep their secrets close!

Rest.
I’m out of Supply, so I’ll rest. I return the two favor on Forest Paths to the Beast bank, and return the secret on Garrison to my board.
I have 14 warbands in my bank—in other words, not on the map or on my board—so I refresh my Supply to its “17 to 11” space.
The more warbands you’ve mustered and need to provision, the less Supply you get to keep for yourself!

Why is the Chancellor doing this? The Chancellor wants to build up warbands at sites they rule so that the sites are harder to campaign against. In this game, the Oathkeeper goal is to hold the most sites, and being the Oathkeeper is the main way the Chancellor can win.
Otherwise, it never hurts to get some more favor and secrets, since those are the main resources you’ll spend. Getting another secret is especially important since they can be hard to get, and since they increase the number of times you can trade per turn.

5 Likes

Next up, @Lordof1 's first turn.

search the provinces discard.
This costs 2 Supply. I draw three cards from the top of the Provinces discard pile. I play The Old Oak to my site, take one favor from the Beast bank, and discard the other two cards to the Hinterland discard pile.
Does drawing from a discard ever get more expensive? Nope! It always costs 2 Supply, no matter how expensive drawing from the world deck becomes. However, you can only draw from the discard pile in the region that your pawn is in, so it might empty out.

(Here I sent the search result to Lordof1)

reveal my animal playmates.
As a minor action, I’ll flip over my facedown adviser and play it to my advisers. It’s my Animal Playmates!

Animal Playmates has a person in its top-left corner. This means the card can only be played to advisers! You can only hold up to three advisers at a time, whether they’re faceup or facedown.

trade with the old oak.
I spend 1 Supply and put two favor on The Old Oak. In return, I get two secrets from the shared bank.
Why two secrets? Red gains one secret because they have one Beast b adviser, and gains one more secret because they traded with The Old Oak for secrets and had at least one Beast adviser.

search the deck.
This costs 2 Supply. I only draw two cards, not three. I find the Alchemist,
and I’ve seen a Vision! I advance the Visions Drawn marker on its track once. I play the Alchemist to my advisers, and I discard the Vision to the Hinterland.

(search result sent to Lordof1)

Why two cards? When you draw a Vision card from the world deck, you stop drawing cards immediately!
So really, you should draw cards from the world deck one at a time. You don’t stop drawing cards if you draw a Vision from a discard pile, though.
What does the Visions Drawn track do? It shows the Supply cost to search the world deck. As more Visions are drawn, the cost goes up!

use my alchemist.
I place one secret on it and burn one secret, returning it to the shared bank. In return, I take four favor, one each from these banks: Nomad, Arcane, Discord, and Order.
Actions on cards do not cost Supply. The closed book on the card’s power
box means “I put one secret on this card.” The open book on it means “I burn one secret, returning it to the shared bank."

recover the people’s favor.
This costs 1 Supply. I take the Banner of the People’s Favor placard and put it near my board. I’ll choose to put two of my favor on it, and I’ll choose to put the one favor that was already on it into the Beast bank.
peoplesfavor_front

What is the People’s Favor? It is a banner, which adds to many victory goals. Now, whenever you’re playing a card to site, you can first discard one card at any site in your region, then you can play your card to any site in your region, not just your site. You don’t even need to discard and play at the same site!
You can use this power to draft good cards for yourself while discarding good cards from your enemies.
Why two favor? To recover the People’s Favor, you need to put more favor on it than it has already—in this case, the one favor it started with. Red could have chosen to put even more favor on it, though!
The more favor on it, the harder it is for other players to recover it or take it in a campaign.
What’s this “Wake” power on it? From now on, during Red’s Wake Phase, they will either need to place one favor on the People’s Favor, or the People’s Favor will lose one favor to the bank that has the least favor. The people are hungry! Notably, the People’s Favor cannot lose its last favor token, so if it is down to one favor you will be forced to put a favor on it—unless you have no favor at all.
Can other players recover this from me now? Yup, watch out! Someone else can recover it from you by paying more favor than you have on the People’s Favor.

rest.
I return the two favor from The Old Oak to the Beast bank, and I return the secret from Alchemist to my board. I would refresh my Supply to the “9+” space, but I didn’t spend my last Supply, so I refresh it to the leftmost space.
When you end your turn with unspent Supply, you get to keep it for your next turn. You can’t push your Supply beyond its leftmost space, though.

Why is Red doing this?
Seeing the strong defenses at the Chancellor’s sites, Red is avoiding getting into direct conflict with the Chancellor. Instead, they build a strong economic engine by getting two more secrets and fnding the Alchemist, which is one of the best cards for getting a lot of favor in a short time—but it’s costly!

By recovering the People’s Favor, Red has set themself up to compete on two Visions—one being “hold the most relics and banners,” and the other being “hold the People’s Favor.” They will need to maintain their economy to keep feeding favor to the People’s Favor, and they will need to protect it from other players campaigning against them. If they hope to win, they’ll need to eventually find the right Vision card. Also, if they become a Citizen later on, they will be able to compete on the Successor goal, which is to hold more relics and banners than the Chancellor or any other Citizen.

1 Like

Next up, @COMaestro

use taming charm.
I put one secret on the Taming Charm card at my site to use its action, which costs no Supply. It lets me discard The Old Oak—which I put in the Hinterland discard pile—to take two favor from the Beast bank.

If you take a look at Taming Charm, you’ll see that its power starts with “action:” This means you can use this power as a minor action. Remember—using a card power never costs Supply, and generally you can use any card powers in your advisers, at the site where your pawn is, and at any sites you rule.

search the deck.
I spend 3 Supply and draw three cards. I’ve seen a Vision!

(search result send to COMaestro)

I keep the Vision as a facedown adviser and advance the Visions Drawn track once.
Then I discard the other two cards to the Hinterland discard pile.
Why not reveal the Vision? Blue could have chosen to reveal it, putting it on their Revealed Vision slot on their board, rather than filling an adviser slot. They can still reveal it later as a minor action, spending no Supply. But the time wasn’t right, since Exiles can only win with a Vision if at least three Visions have been drawn from the world deck.
Can only Exiles reveal Visions? Yes, but there is one false Vision in the
deck—the Conspiracy—which anyone can play. It lets you steal a banner or relic from someone whose pawn is at your site, given the right conditions!

reveal my naysayers.
I flip my facedown adviser up, and I play it to my advisers.


The “rest:” at the start of Naysayers’ power means it happens once during the Rest Phase.

peek at the relic.
As a minor action, I take a look at the facedown relic at the Mountain, without showing it to anyone else. This costs no Supply.
You can always peek at relics at your site, even if you don’t want to recover them.

recover the ivory eye.
I spend 1 Supply and burn two favor, returning it to the shared bank, as shown on the Mountain, to take the relic from my site—it’s the Ivory Eye! I put it faceup next to my board, near my advisers.
relics_16

Am I limited to three relics? Nope! Unlike advisers, you can hold any number of relics.
Can other players recover relics from me? Nope.
Unlike the two banners—the People’s Favor and the Darkest Secret—relics can only be recovered from sites, not from players. If someone really wants to take a relic from you, though, they can campaign against you!

travel to the third provinces site.
This costs 2 Supply. I flip the third Provinces site card up—it’s the Salt Flats! I put my pawn on it, and I put two favor and one secret on it from the shared bank.

Why did I travel to the third site? You don’t need to move between sites in any particular order! Blue could have moved to the second one, but chose to move to the third one instead, with no extra Supply spent!
How did I know to put this stuff on the site? The icons in its top-left corner mean “when revealed, put two favor and one secret from the shared bank onto this site."

rest.
I refresh to my leftmost Supply space, and I return the secret from Taming Charm to my board. My Naysayers card, unfortunately, does not give me anything this turn because the Chancellor is the Oathkeeper, but it may let me take a favor from them on later turns.
As with Red, Blue refreshed one more Supply because they didn’t spend their last Supply this turn.

Why is Blue doing this? Concerned about the powerful combo that Red used to get secrets last turn, Blue sees an opportunity to break that combo and profit at the same time, so they discard The Old Oak for some favor. However, The Old Oak is just in a discard pile now, so it may get drawn and played again later in the game.

Blue is playing a diversified strategy—by recovering a relic, they can compete for holding the most relics and banners if they find the Vision of Sanctuary. By playing Naysayers, Blue will profit as long as an Exile is competing well for the Oathkeeper goal, so whether they pursue the Oathkeeper goal itself or let someone else go for it, they will benefit. Finally, they found a Vision and kept it, so now they have a new victory goal that they can pursue if they want to.

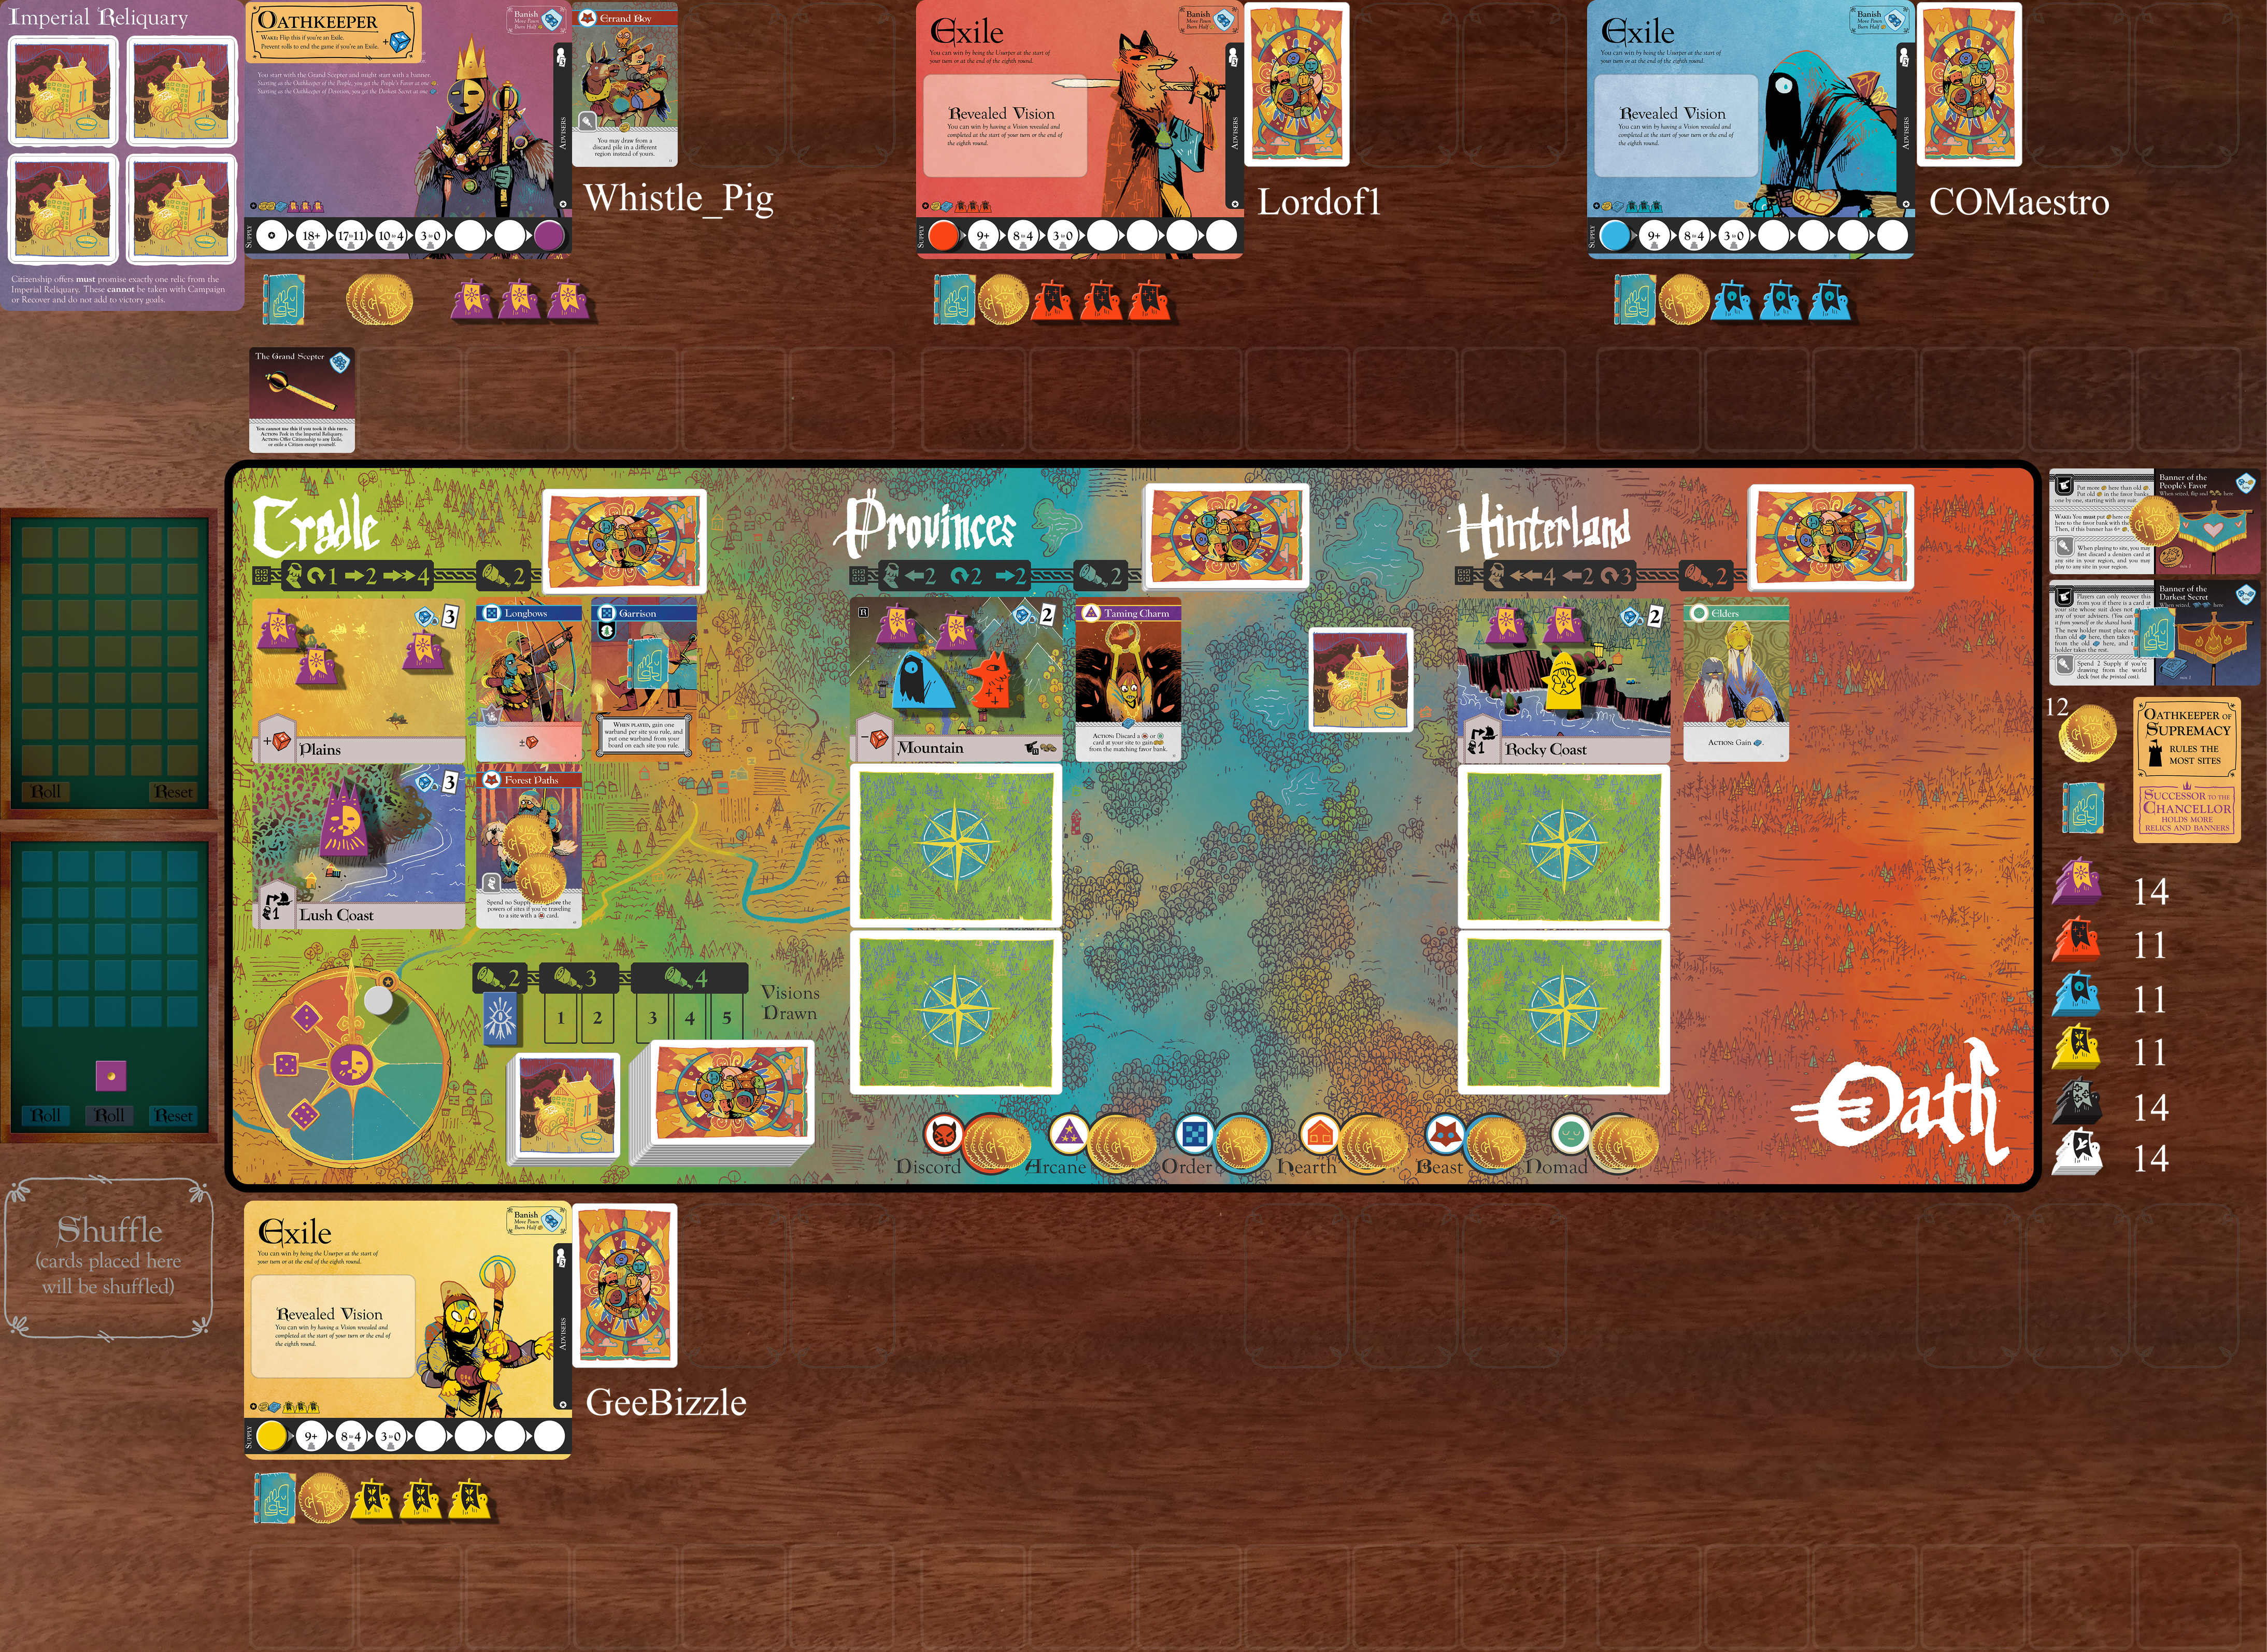
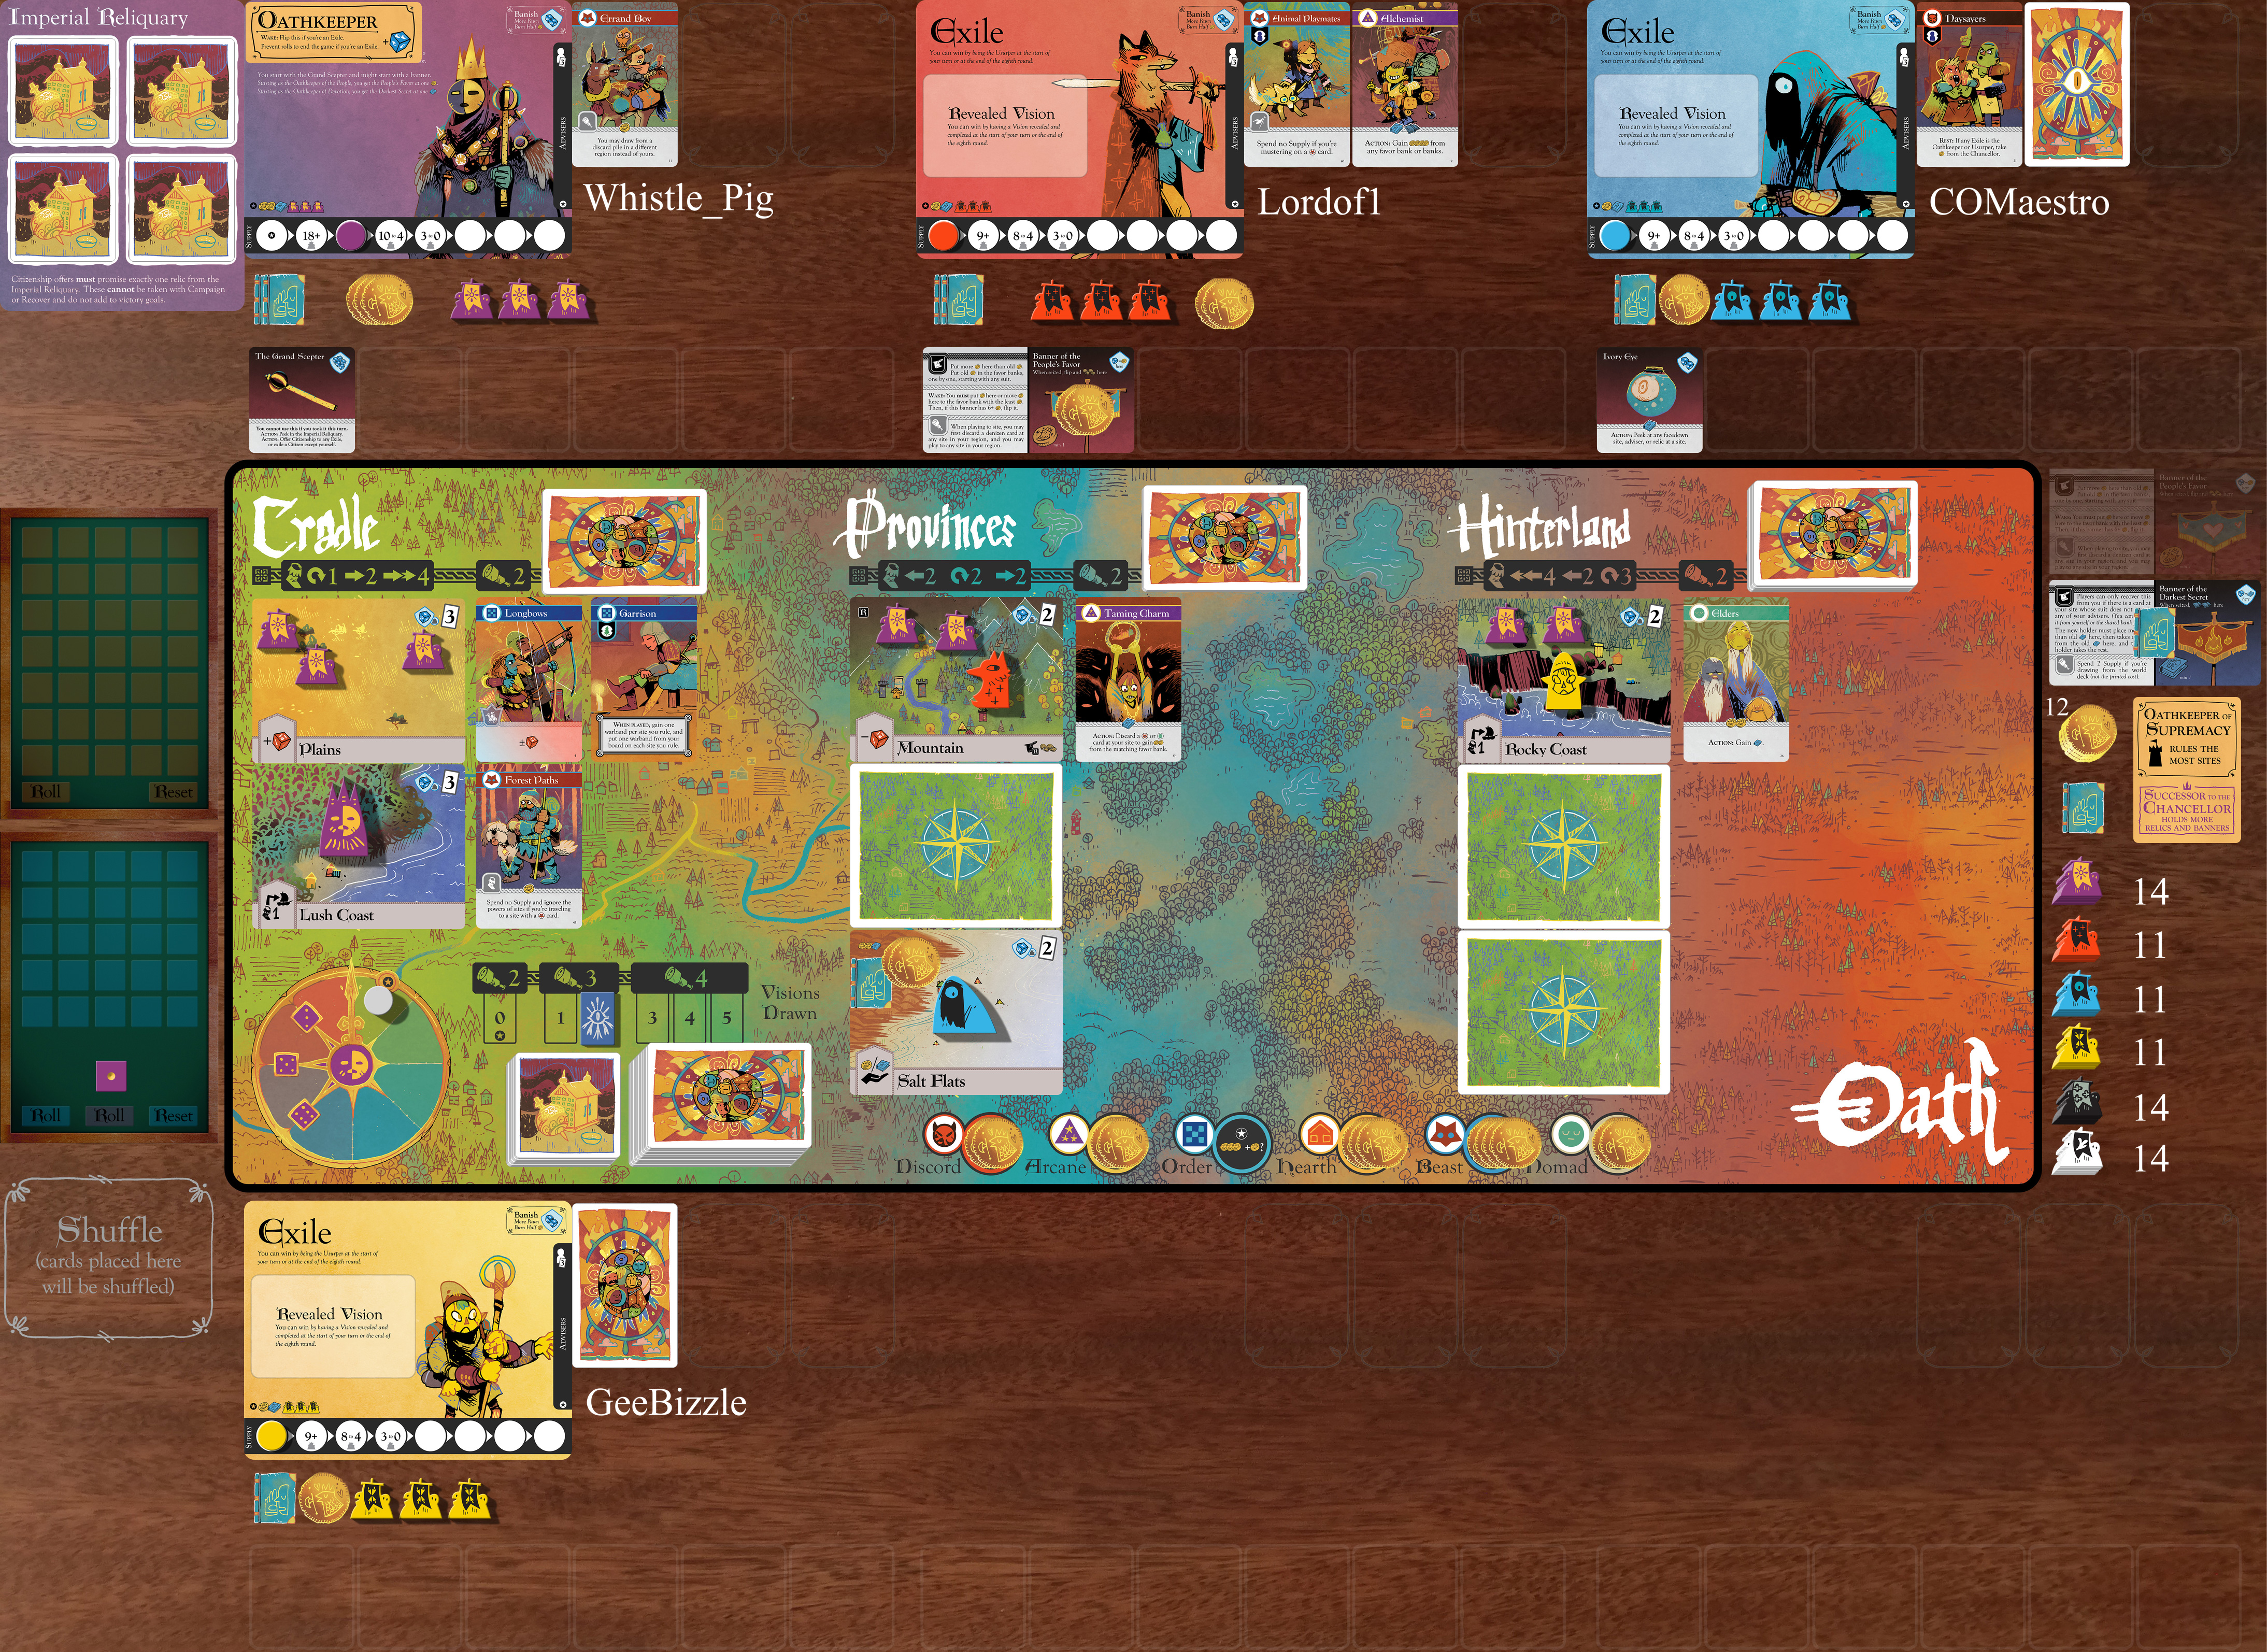
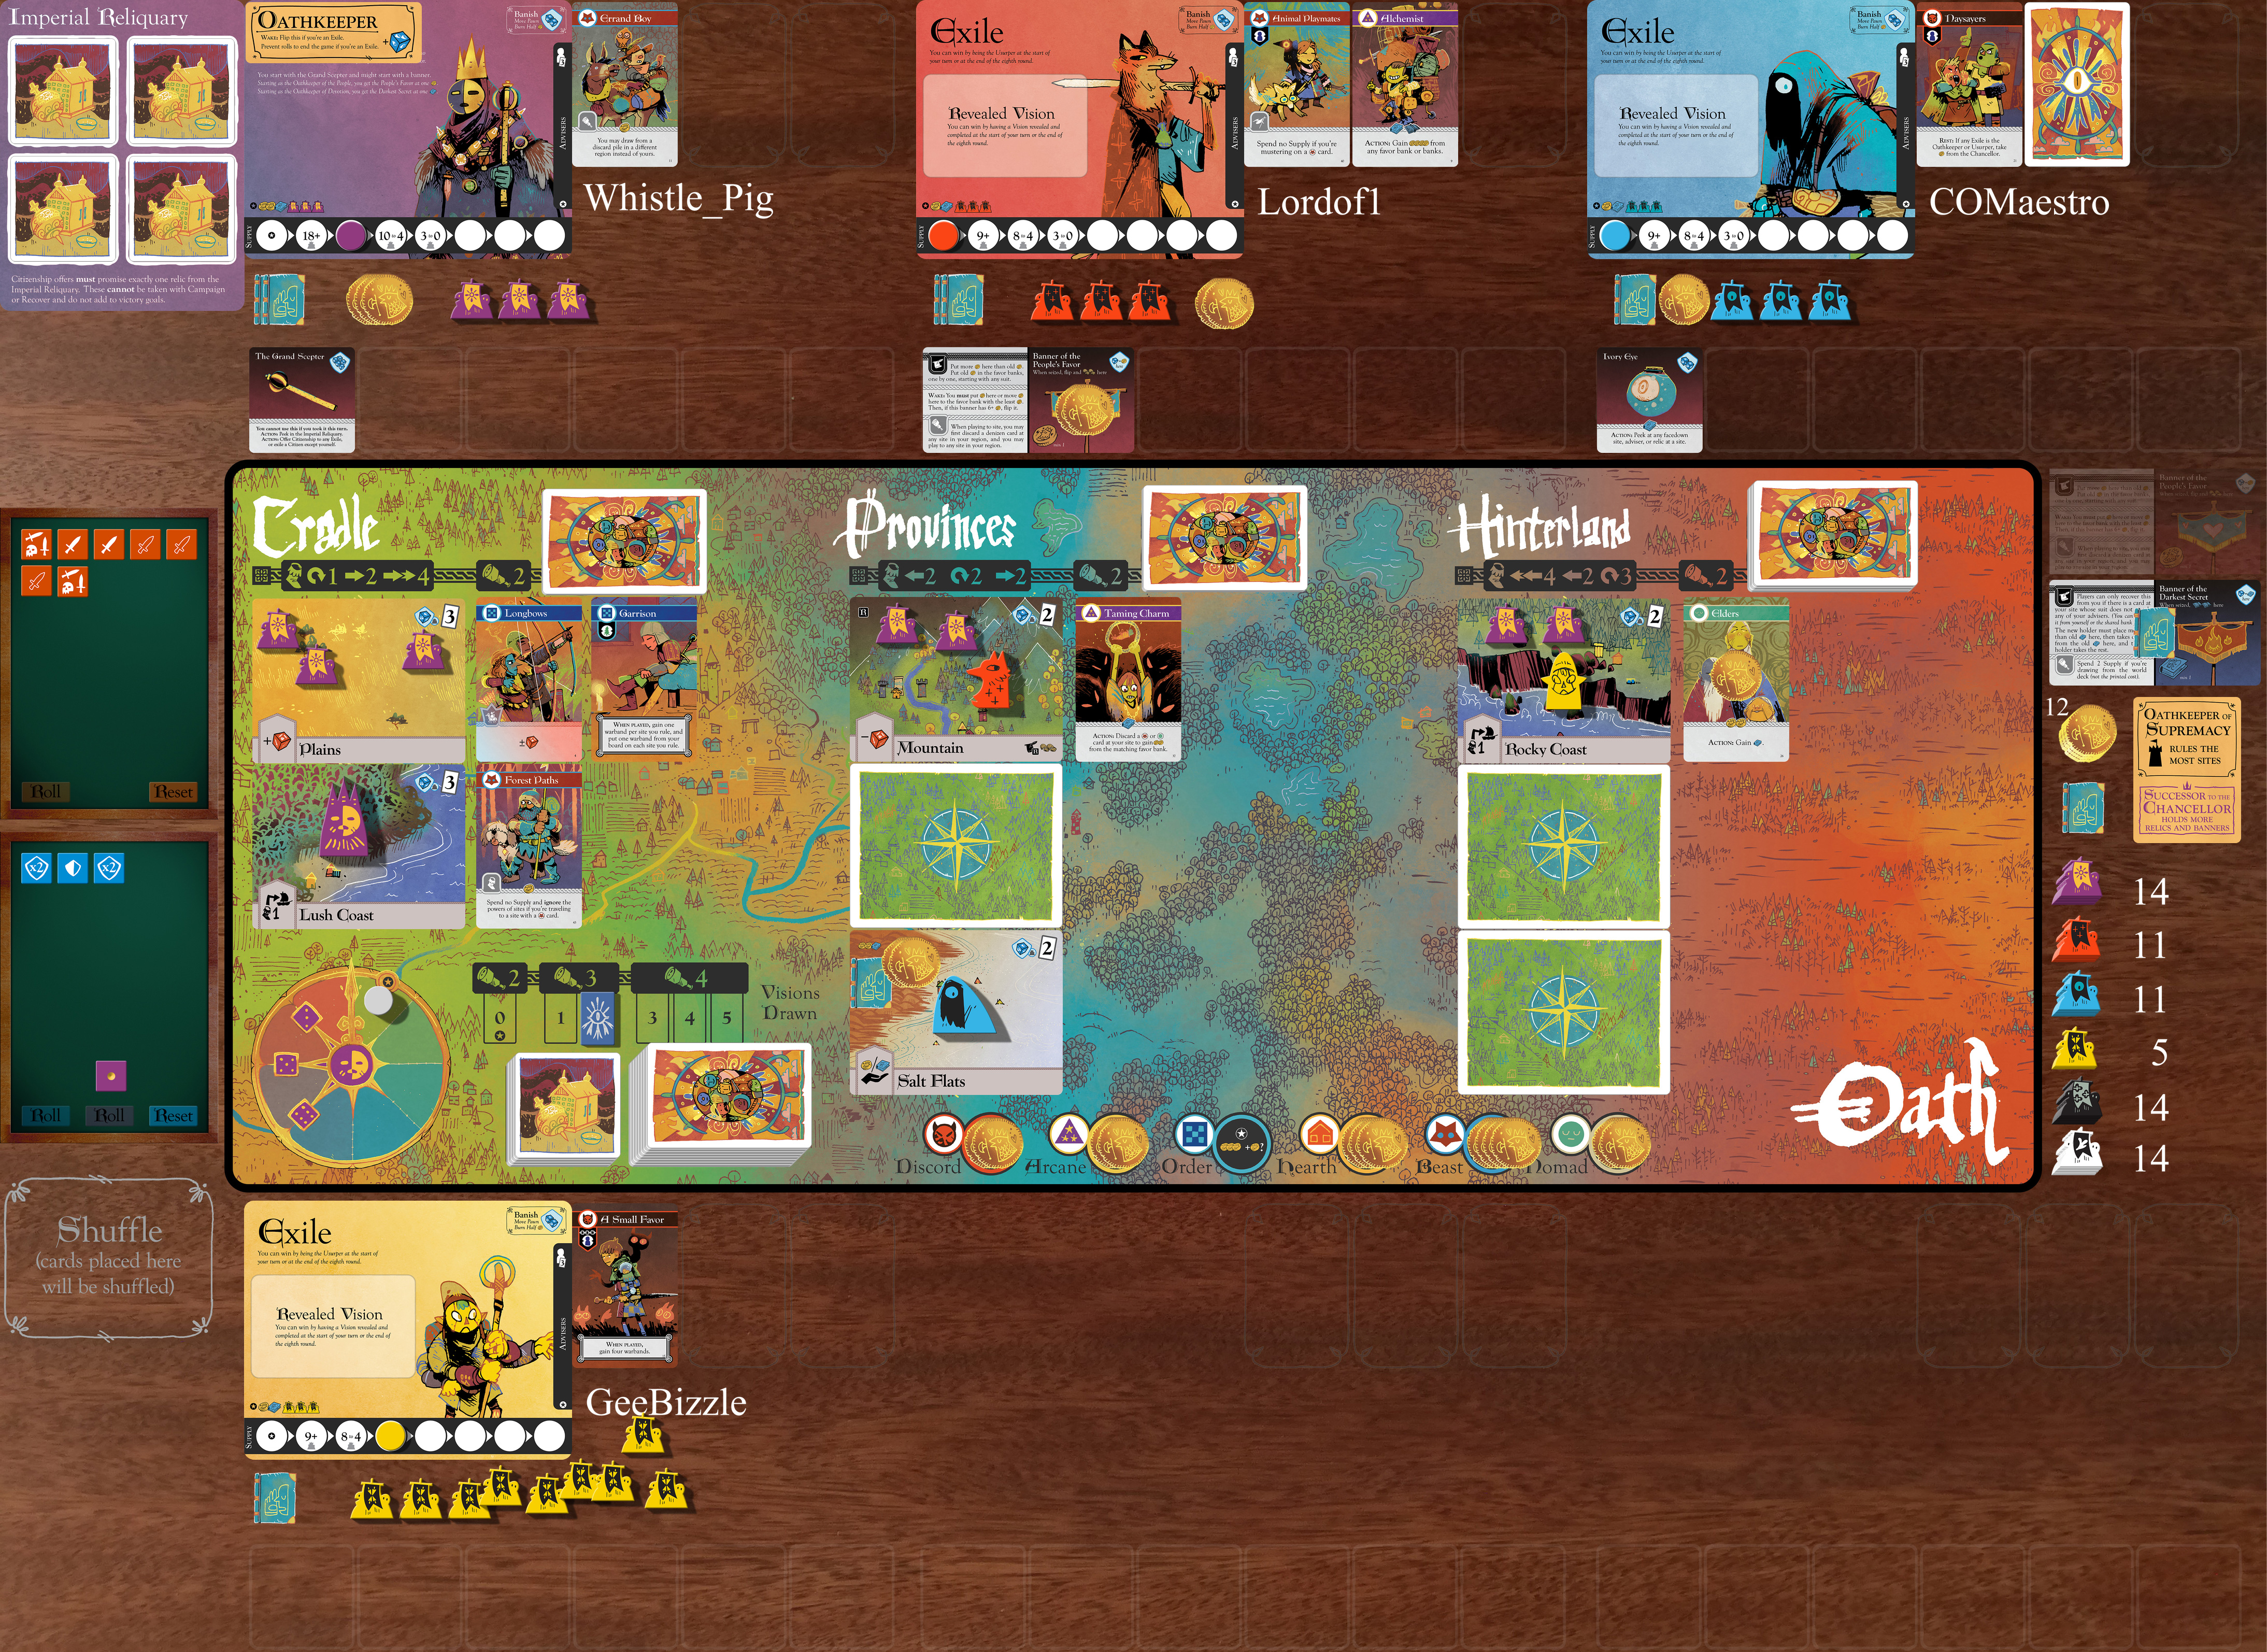
Final scripted turn, @GeeBizzle

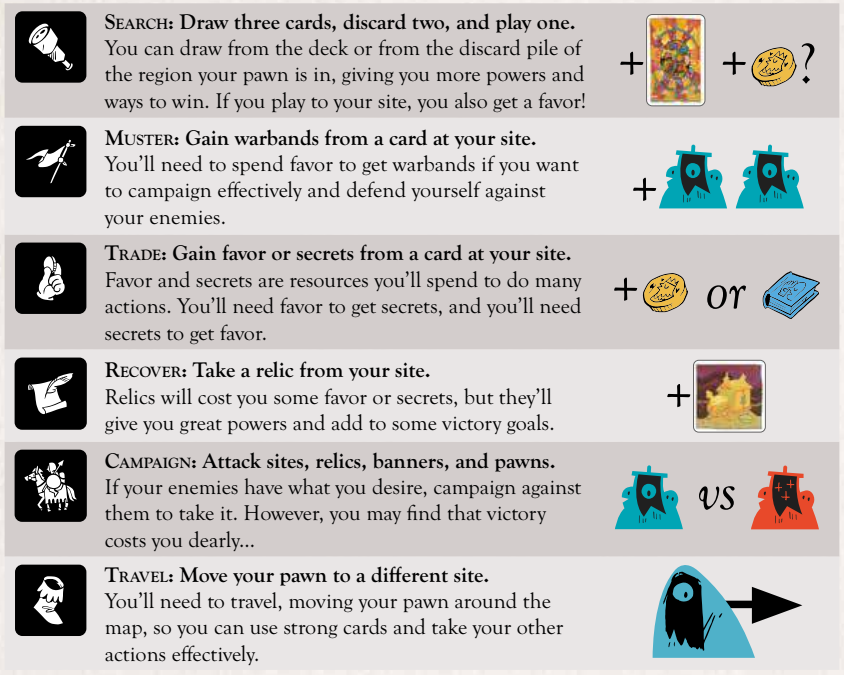
muster from the elders.
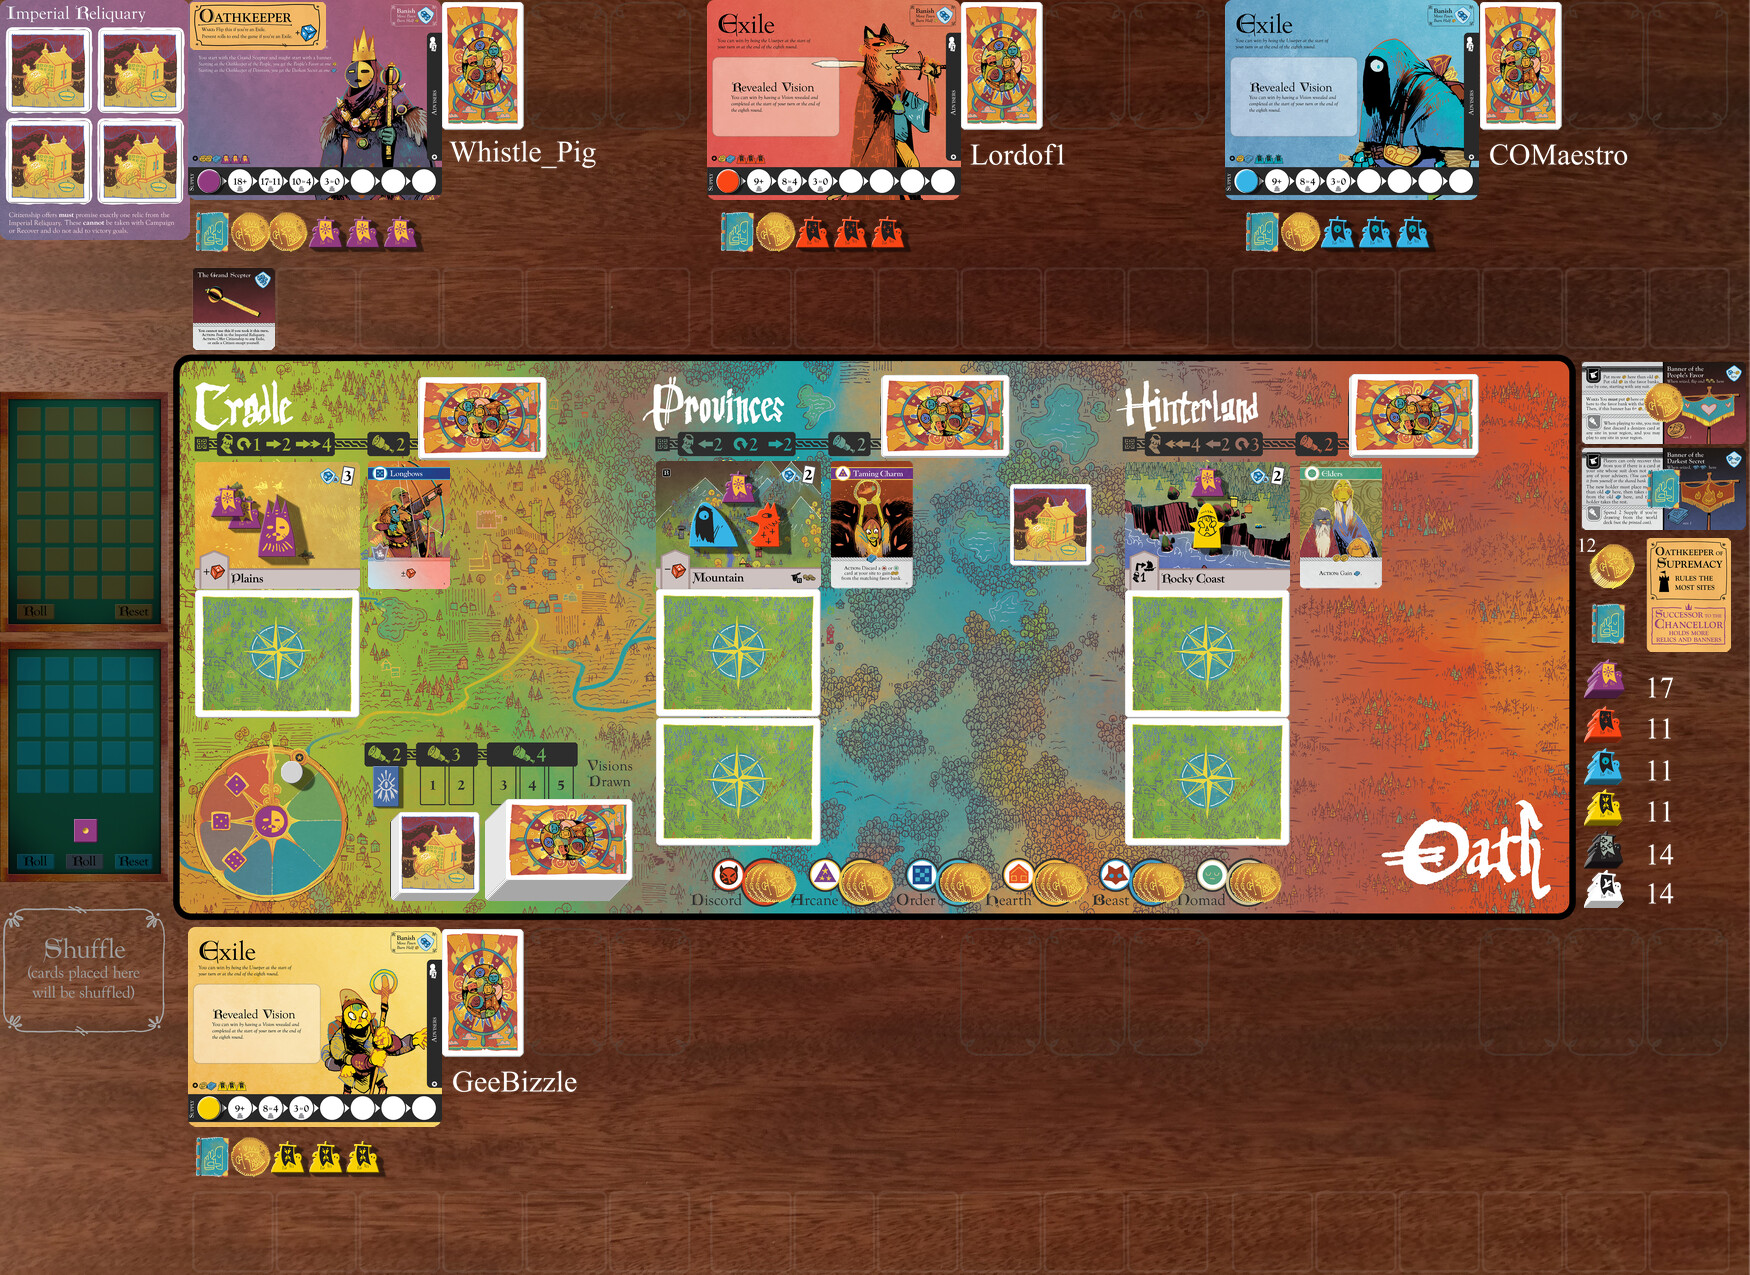
I spend 1 Supply and put one favor on Elders. In return, I gain two warbands, taking them from my bank and adding them to the three warbands on my board.
Once a card has favor or secrets on it, you can’t put favor or secrets on it to do anything else. So Yellow cannot muster from the Elders again this turn, and cannot put favor on Elders to use its Action power.

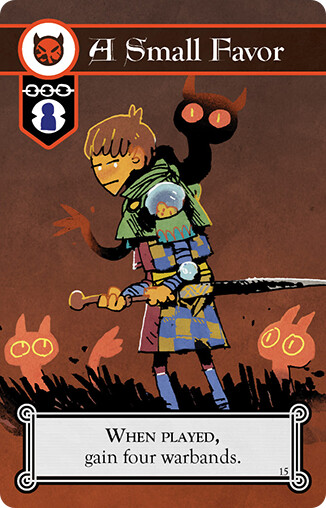
reveal a small favor.
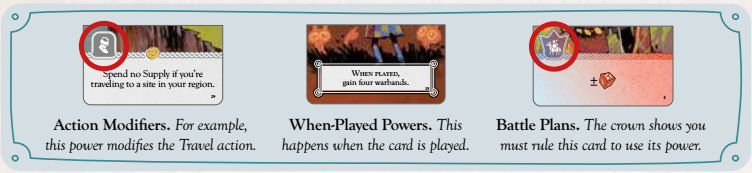
I flip my facedown adviser up and play it to my advisers. This card’s power lets me gain four warbands, taking them from my bank and adding them to my board.

You’ll notice that A Small Favor has a chain on its restriction in the top-left corner under its suit. This card cannot be discarded, moved, swapped with other cards, or otherwise messed with. This is absolute and cannot be overridden.

campaign against the chancellor.
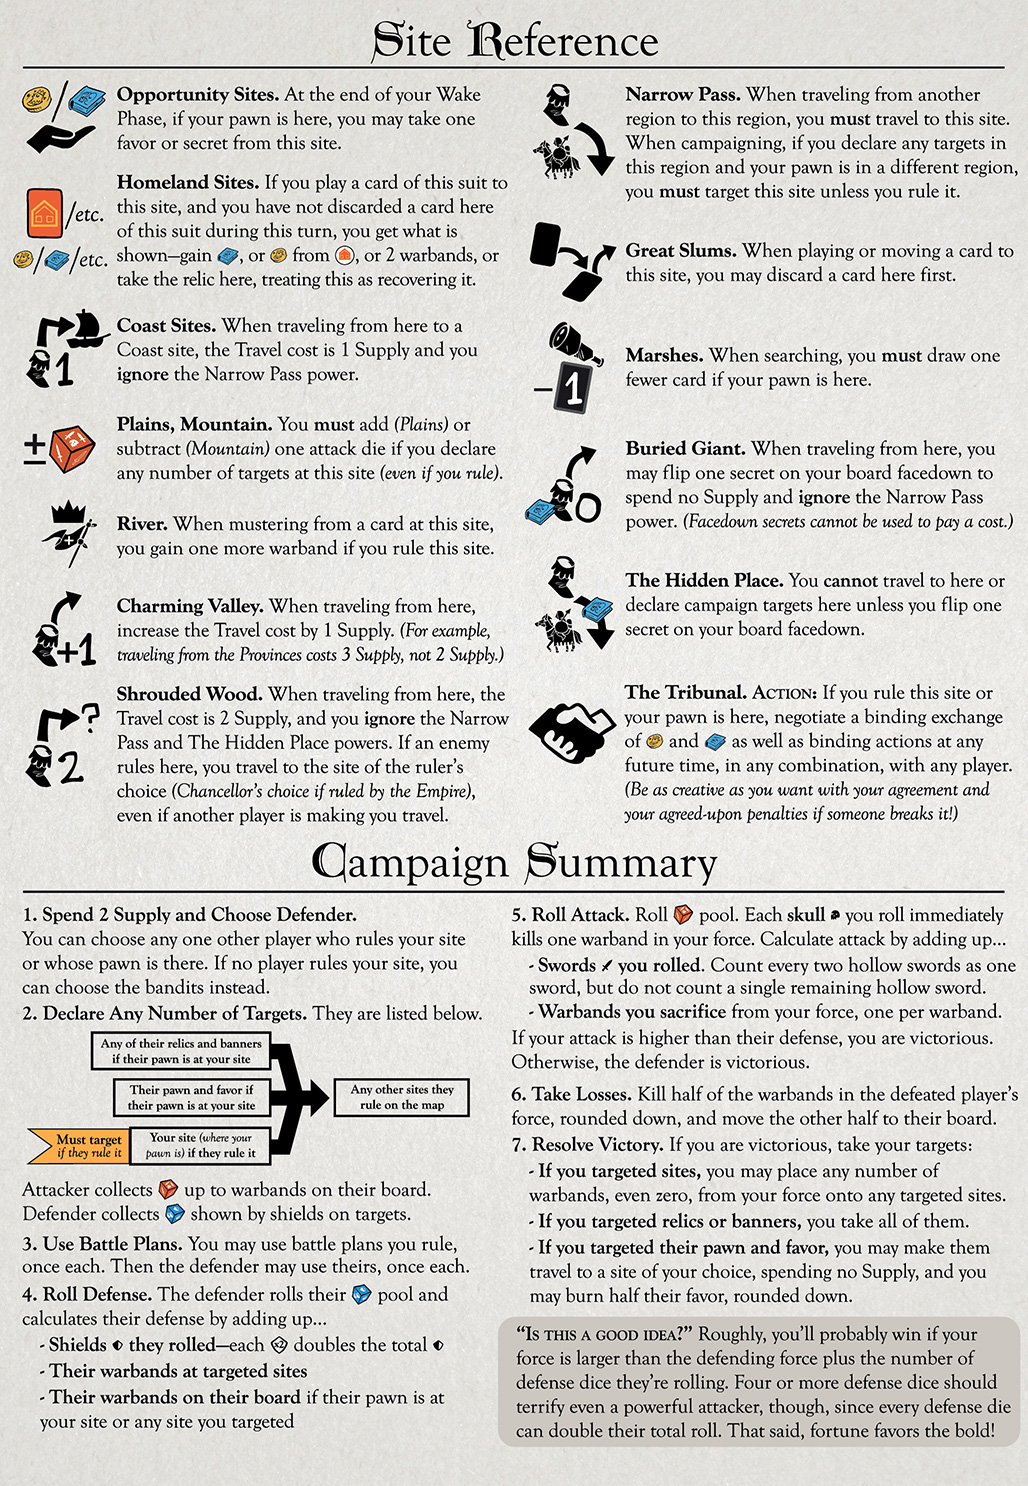
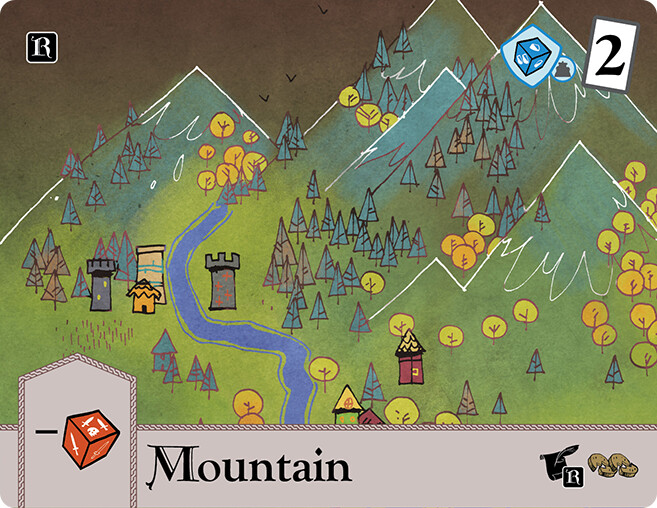
This costs me 2 Supply. I choose the Chancellor as defender since they rule my site. I declare the Mountain and Rocky Coast as my targets.
Your defender is who you want to attack, and either their pawn or warbands must be at your site. Your targets are what you want to take, such as their sites or relics. You must declare at least one target at your site.

My targets give the Chancellor two defense dice, and the Chancellor gets a third defense die for being the Oathkeeper. I have nine warbands on my board, so I collect nine attack dice, but I lose one because I’m declaring the Mountain as a target—its power reduces attack dice by one.
How do I know to add dice? The shield in a target’s top-right corner shows the number of dice it adds.


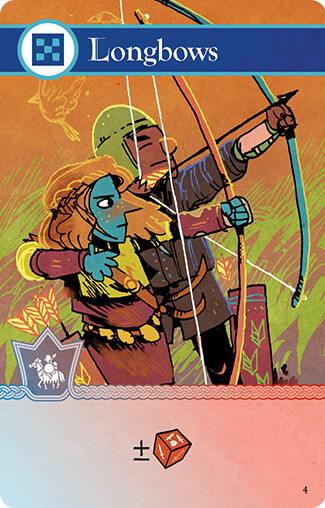
I don’t rule any battle plans. The Chancellor rules the Longbows, removing one of my attack dice.

If I were at the Plains, could I use the Longbows? Nope! You need to rule battle plans to use them. This is shown by the crown outline around its action icon.

The Chancellor rolls their three defense dice and gets a total of four shields.
Their total defense is eight—four shields plus their four warbands at the targeted sites.
I roll my seven attack dice and get two swords, three hollow swords, and two skull and double swords. The skulls mean I kill two of my own warbands immediately. Two of the hollow swords add up to one sword, but the remaining hollow sword counts for nothing.
My total attack is seven.
You can choose to roll fewer attack dice than the number of warbands on your board.

I need nine attack to beat the Chancellor’s eight defense, so I sacrifice two warbands. I’m victorious, so I kill half of the warbands in the Chancellor’s force. The targeted sites—the Mountain and the Rocky Coast—have four warbands, so two are killed and go back to the Chancellor’s bank next to their board, and the other two return to their board.
If Yellow didn’t sacrifice enough warbands to win, they would have lost half of their force—three warbands.

I put one warband on the Mountain and two on the Rocky Coast. I now rule the most sites, so I take the Oathkeeper title from the Chancellor.

What else can I declare as targets? Anything with a blue shield in its top-right corner—their sites, relics, and banners, as well as their pawn and favor, as shown by the “Banish” box on their board.
If you’re victorious and you targeted their pawn and favor, you can put their pawn on any site, and you burn half the favor on their board, rounded down, returning it to the shared bank. To target their relics or their pawn and favor, their pawn must be at the same site as yours.

search the deck.
I spend 3 Supply, draw three cards, and find Tents. I play Tents to my site
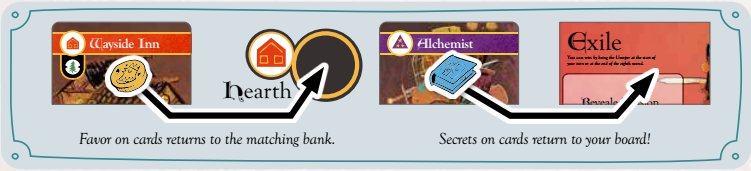
and gain one favor from the Nomad bank. I discard the other two cards to the Cradle discard pile.

(search result sent to GeeBizzle)

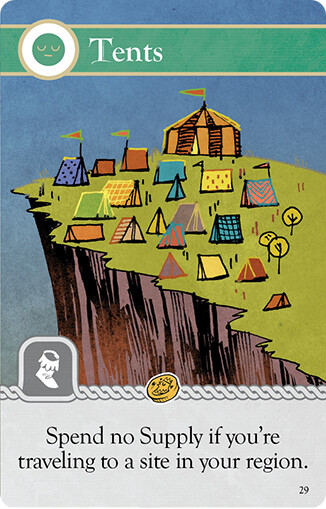
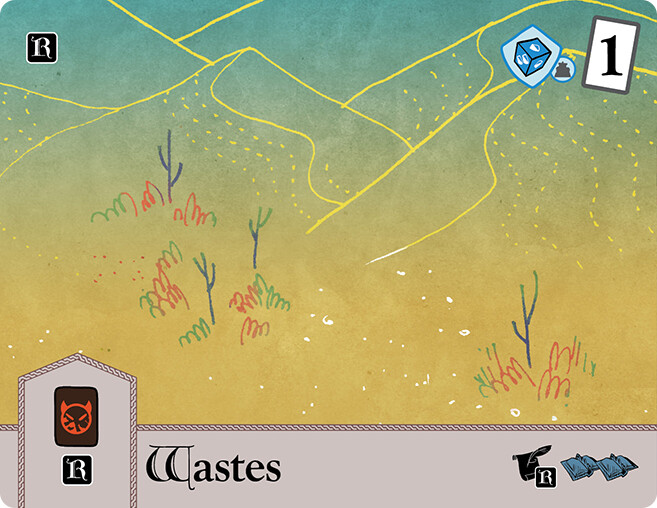
use tents to travel.
I put one favor on Tents to use it. I travel to the middle Hinterland site, reveal the Wastes, and place one relic next to it facedown. This costs no
Supply because I used Tents and traveled to another site in my region.

You can use a card power if your pawn is at its site or if you rule it. Yellow rules the Rocky Coast—they have warbands on it—so they can use Tents on later turns even if their pawn is not at the Rocky Coast.
It may seem odd that the Hinterland cards go back up to the Cradle, but that is how it works!

rest.
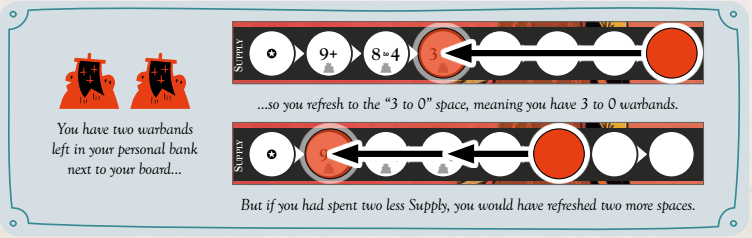
I didn’t spend my final Supply this turn, so I refresh my Supply to the leftmost space instead of the “9+” space. I return the favor on Elders and Tents to the Nomad bank.
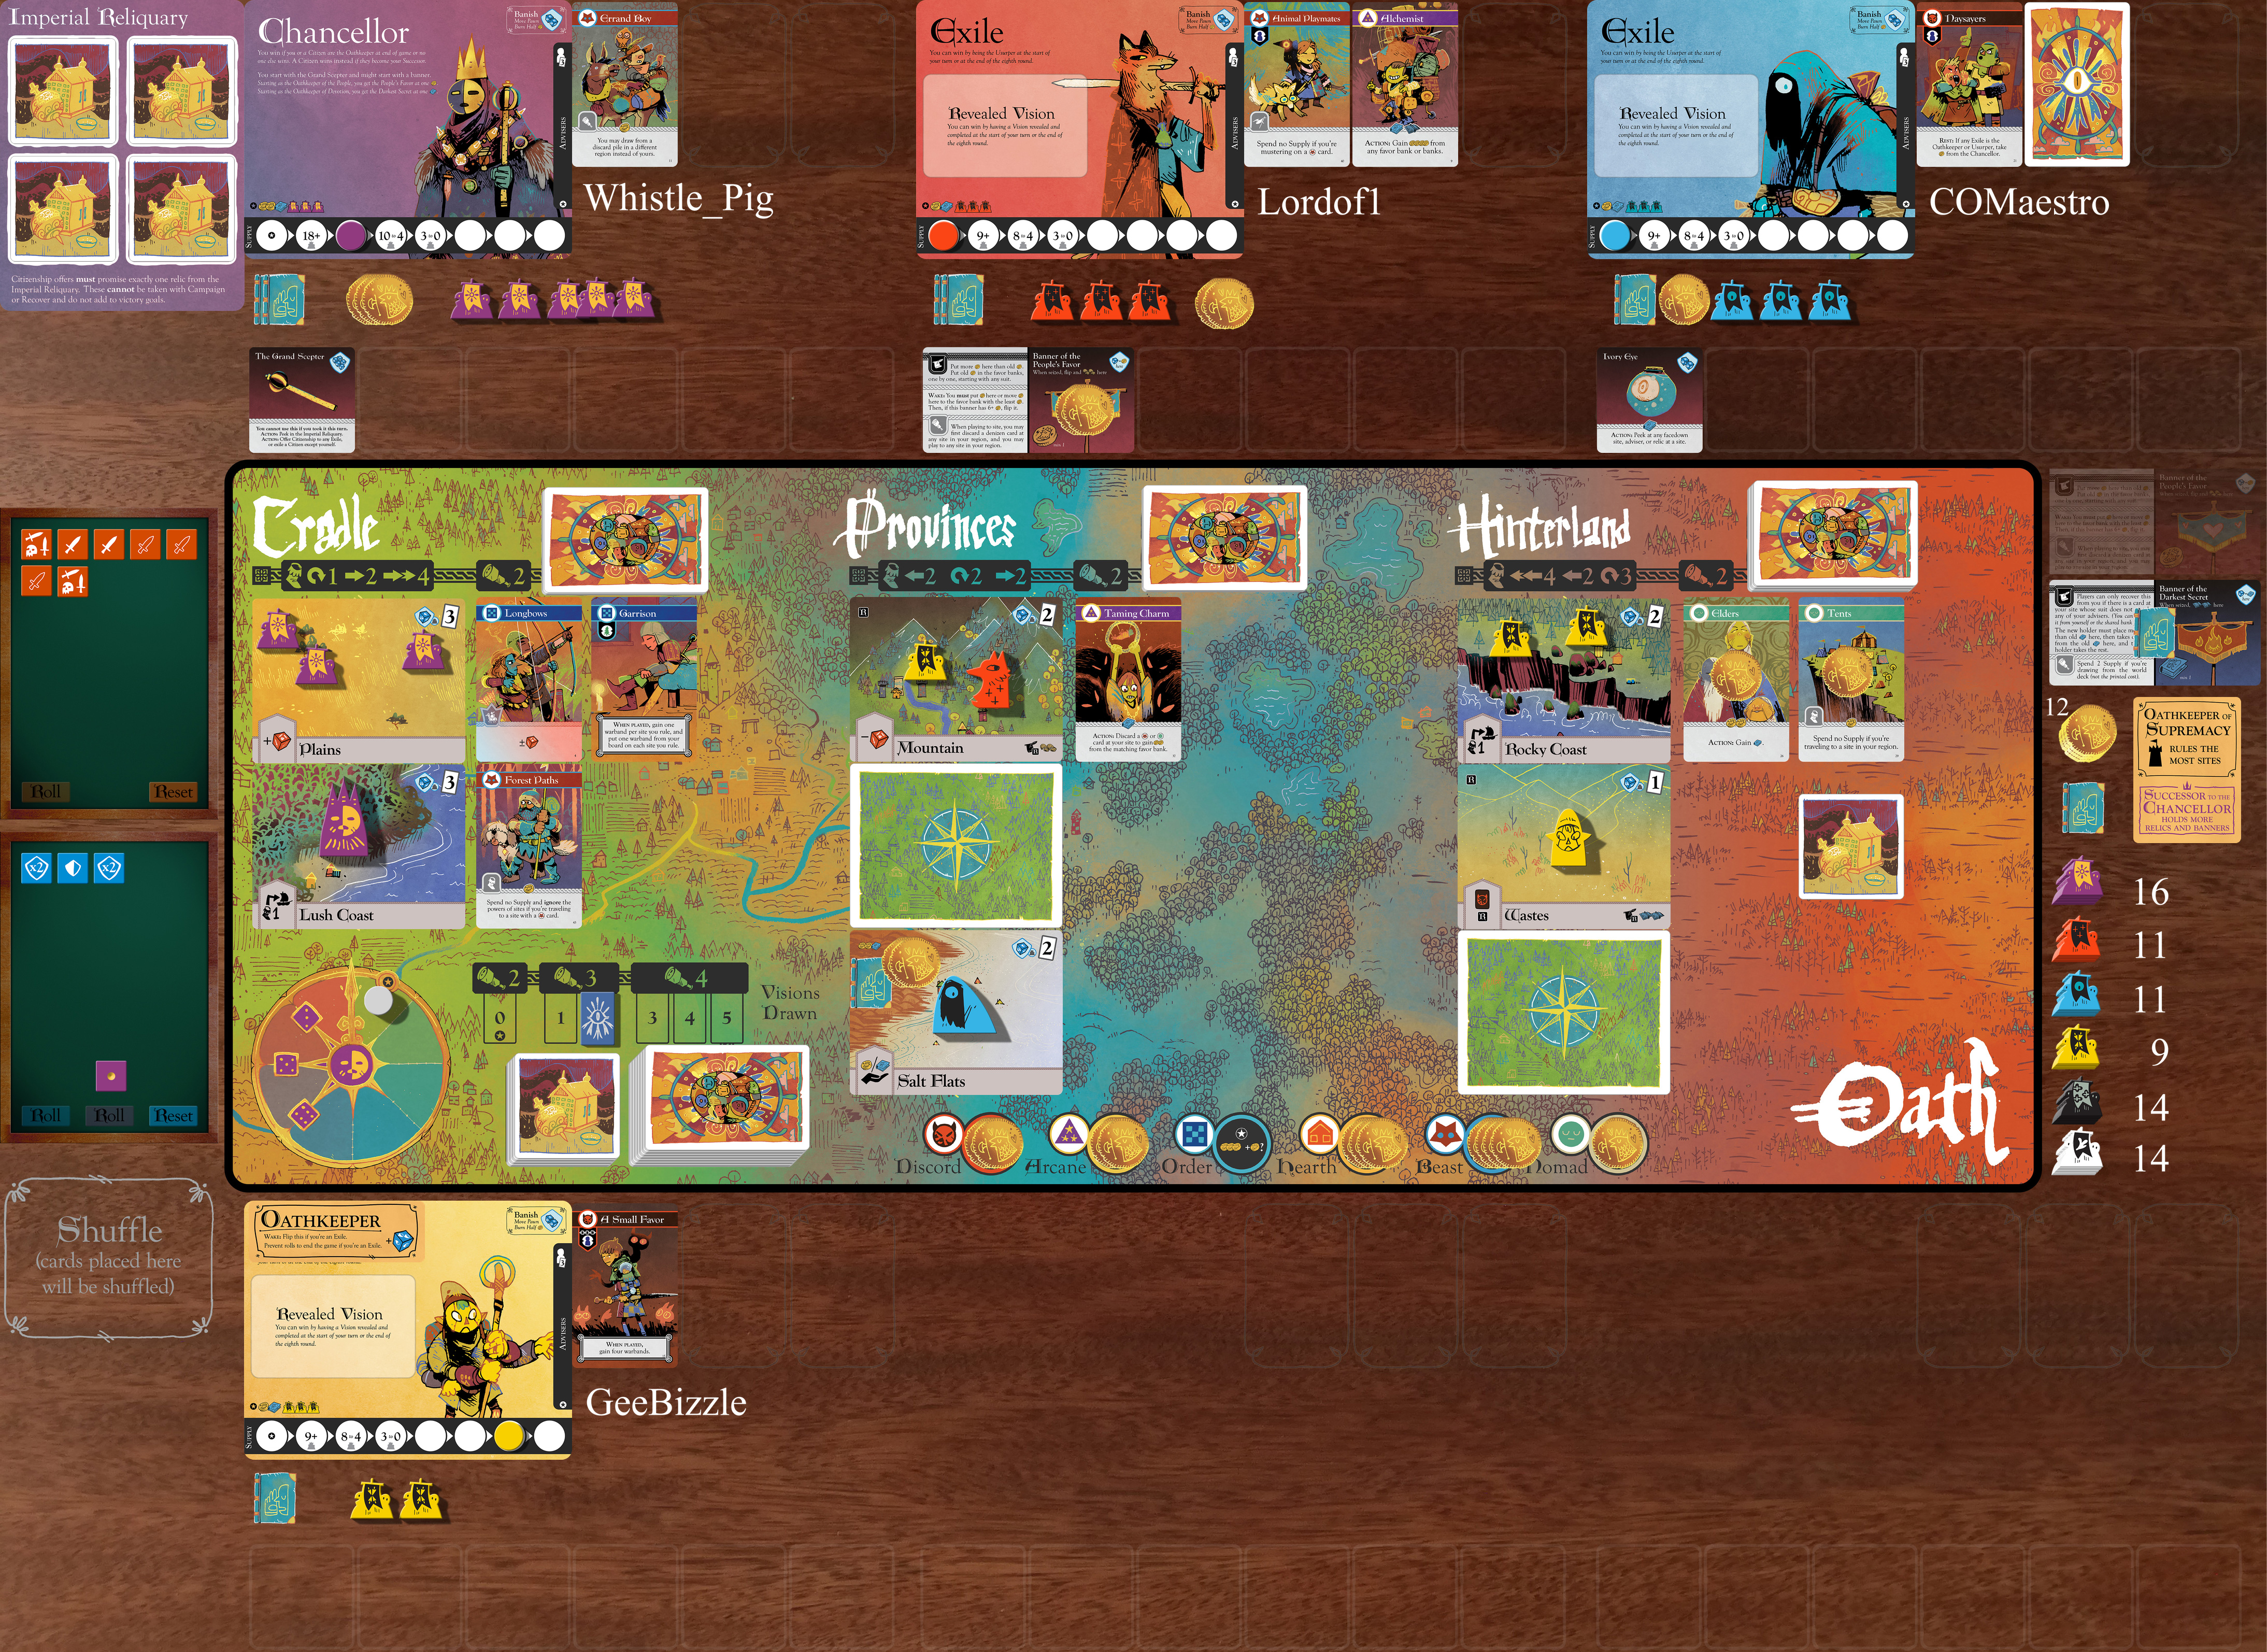
it’s now the end of the round. advance the round marker one space.

Why is Yellow doing this? Yellow started with A Small Favor, which lets them gain tons of
warbands, so they see an opportunity to compete for the Oathkeeper goal—and succeed! By taking
the Oathkeeper title, their defenses get stronger, making the other players less likely to attack them.
Likewise, the Mountain is difficult to campaign against, further discouraging others from attacking.
Since they’ve built up a small kingdom, Yellow feels pretty safe in playing Tents to one of the sites they rule, keeping their advisers open for cards later, which is important since A Small Favor is now stuck in their advisers. Over time, Yellow will need to consolidate their power by getting battle plans that make them even better at campaigning and defending against enemy campaigns.

This ends the scripted play!

Round 2, @Whistle_Pig 's turn.


1 Like

Right think I followed all that (thanks for all the effort @Benkyo).

There was one question I had, on my turn it says “ It may seem odd that the Hinterland cards go back up to the Cradle, but that is how it works!” is this referring to the discarded cards from searching & playing tent?

I haven’t quite had time to digest all that today, but I will endeavour to take my turn by tomorrow evening!

From my understanding of the rules, yeah. Though I suppose I should let @Benkyo answer.

I think it is just referring to how the search discards go to the next region over (or loop back to the Cradle), when one might assume they stay in the same region.

1 Like

That’s what I thought it was meaning but wanted to check incase I was missing something.

1 Like